Page 12 of 13 FirstFirst ... 28910111213 LastLast
Results 166 to 180 of 185

Thread: How to bend wood like this - Outdoor furniture project

  1. #166
    Join Date
    Feb 2004
    Location
    Perth, Australia
    Posts
    9,519
    Hi Alan

    Regarding the question of lighter cuts using a straight pattern bit, it occurred to me later than you could use a step process of progressively deepening the cut via decreasing sized bearings, such as these (which I purchased for cutting rebates) ...


    Regards from Perth

    Derek

  2. #167
    Join Date
    Jul 2013
    Posts
    578
    Blog Entries
    1
    Alan, working on your bandsaw technique is a key to being able to follow the line. Michael Fortune taught me his technique, which relies on using the back of the blade as a fulcrum for passing the front of the blade into the cut.

    https://www.finewoodworking.com/2011...on-the-bandsaw

    Another option is use pattern bandsawing.

    https://www.finewoodworking.com/2008...complex-curves

    I often use pattern bandsawing to rough the part, then pattern shape the result on the router table or shaper.

    When I pattern shaped the legs for my chairs, I made my jigs so that I could flip my part end for end. This means that you have two jigs for each side being shaped. You shape the part going downhill with the grain; when the grain switches, you flip the part onto the other jig, and start shaping from that point.

    But, in my experience, there's no substitution for hand tool work. Pattern shaping, whether with a bandsaw, router, shaper, will only get you so far. Then it's time for drawknives, spokeshaves, rasps, and sandpaper. Maybe even round bottom planes, travishers, and scorps. Even better, the reward that you get from shaping by hand is the real payoff, in my opinion.

    So, machines can help to remove a lot of the work, but hand tools are often quicker and more flexible that trying to achieve a perfect result with a machine. And the marks of handwork indicate that a craftsman built the piece rather than it being mass produced in a factory.

    Mike

  3. #168
    Join Date
    Jan 2010
    Location
    Tampa Bay, FL
    Posts
    3,975
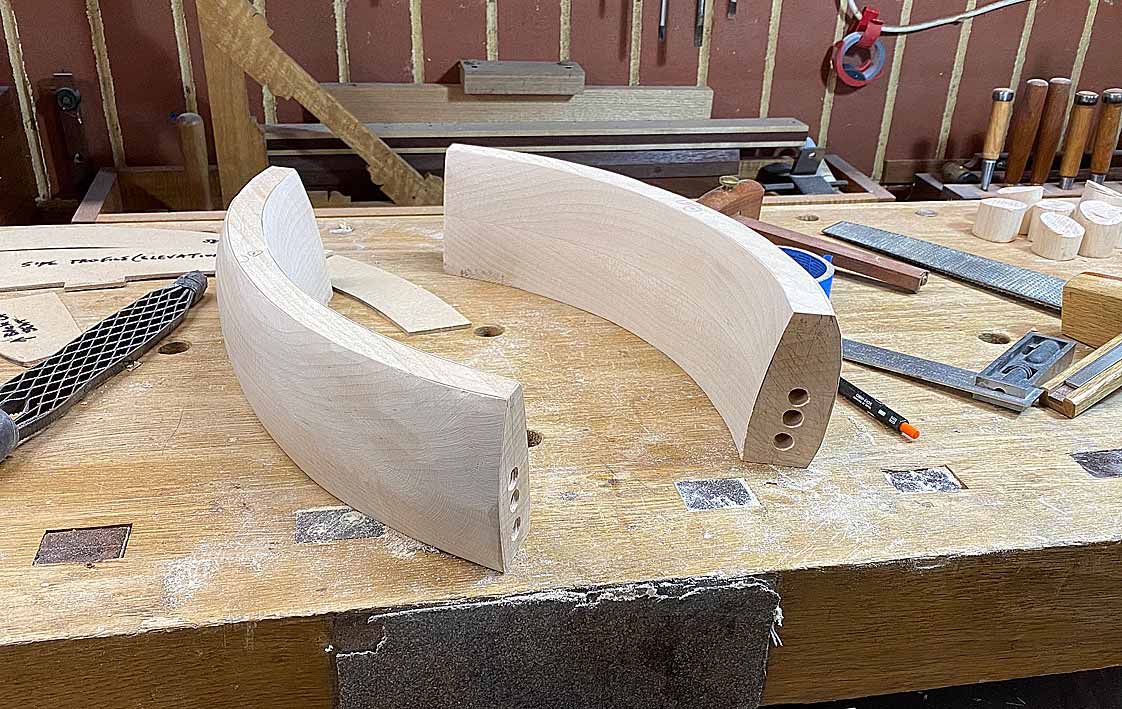
    Thanks Mike, Derek. That pattern bandsawing trick sounds like a great plan. And I do have a set of different sized bearings, so just in case could start on the router that way too.

    I think I do need a better pattern bit for the router, though. Infinity tools sells a nice spiral one with sufficient cutter length, and they are in my neck of the woods, so I might get that too.

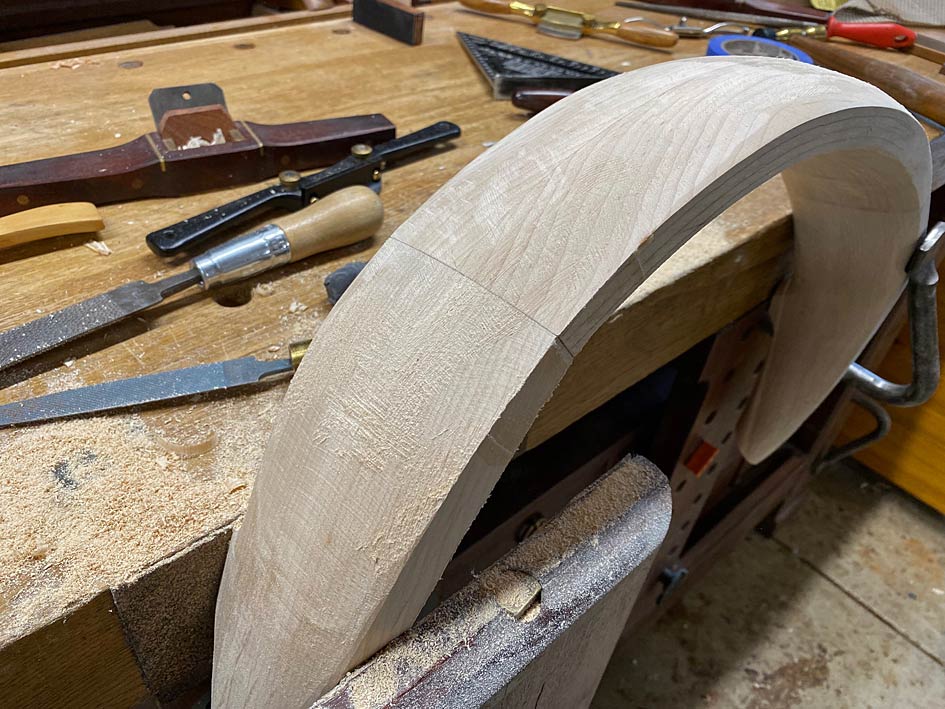
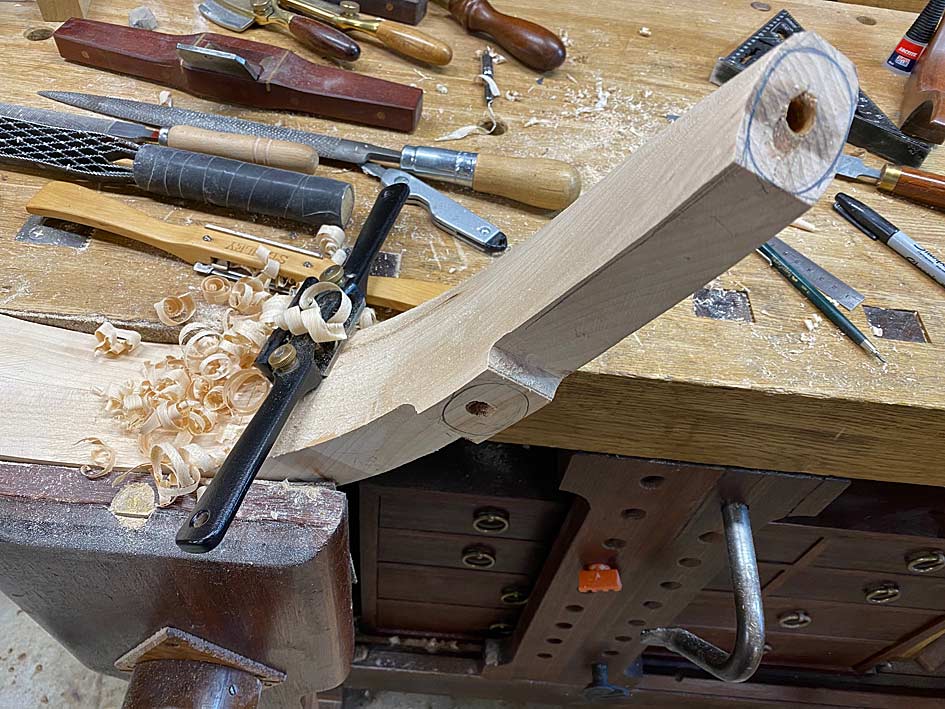
    Watching Michael Fortune cutting that close to the line on the bandsaw just proves that I'm no Michael Fortune. And yes, he could have also done with by steam bending, bent lamination, probably a billion other ways. He's very, very impressive. So is Brian Boggs, whose chairs are also very impressive as is his technique in Fine Woodworking.
    Last edited by Alan Lightstone; 05-20-2024 at 10:25 AM.
    - After I ask a stranger if I can pet their dog and they say yes, I like to respond, "I'll keep that in mind" and walk off
    - It's above my pay grade. Mongo only pawn in game of life.

  4. #169
    Join Date
    Jan 2010
    Location
    Tampa Bay, FL
    Posts
    3,975
    So, looking at the articles, Brian Boggs technique of making parallel curves with perfect arcs looks like the best for me:
    https://www.finewoodworking.com/proj...andsawn-curves

    He suggests using a 4TPI, skip tooth blade, which I don't have. I can't find any for my Felder FB710 (needs 201-5/8" long blade). Sawmillbladesdirect.com doesn't have any in stock, just 3tpi Lenox Tri-Master Carbide blades.

    Any good sources that would carry them? Timber Wolf sells them, but those are just steel blades. I'd much rather get a carbide blade for durability.
    - After I ask a stranger if I can pet their dog and they say yes, I like to respond, "I'll keep that in mind" and walk off
    - It's above my pay grade. Mongo only pawn in game of life.

  5. #170
    Join Date
    Feb 2004
    Location
    Perth, Australia
    Posts
    9,519
    Alan and all

    Look at this!


    Regards from Perth

    Derek

  6. #171
    Join Date
    Jul 2013
    Posts
    578
    Blog Entries
    1
    I've bought bands from https://www.industrialblade.net/ -- cheaper than bandsawbladesdirect.com

  7. #172
    Join Date
    Jan 2010
    Location
    Tampa Bay, FL
    Posts
    3,975
    Pretty amazing.

    Now if I only lived in London...

    Would look fine painted, and considering it's like MDF, I assume couldn't survive outside. Especially in a humid climate like mine. But for inside work, wow!
    - After I ask a stranger if I can pet their dog and they say yes, I like to respond, "I'll keep that in mind" and walk off
    - It's above my pay grade. Mongo only pawn in game of life.

  8. #173
    Join Date
    Jan 2010
    Location
    Tampa Bay, FL
    Posts
    3,975
    Ok, so progress.

    In my hands, using the technique that Brian Boggs uses to make parallel curves works pretty well for me. The wood surface doesn't look like it will take too much sanding and pretty well no tearout.
    Brian Boggs Parallel Arc Jig.jpg

    Now my next problem. The arcs I made are somewhat greater than 90 degrees, but less than 180 degrees. I'm going to start making them at perhaps 100 degrees or so, so that I can have a little excess to cut off to make perfect 90 degree angles.
    Arc before 90 degree cuts.jpg

    How do I make that cut?? I'd imagine it will be some sort of jig / table saw sled, but not sure how I could register the pieces to get perfect cuts 90 degrees to each other on that curve.
    Last edited by Alan Lightstone; 05-27-2024 at 6:06 PM.
    - After I ask a stranger if I can pet their dog and they say yes, I like to respond, "I'll keep that in mind" and walk off
    - It's above my pay grade. Mongo only pawn in game of life.

  9. #174
    Join Date
    May 2008
    Location
    Peshtigo,WI
    Posts
    1,440
    I'm thinking you could mark your pieces with a square, framing or purpose made, then cut the line on the table saw or maybe on a SCMS.
    Confidence: The feeling you experience before you fully understand the situation

  10. #175
    Quote Originally Posted by Alan Lightstone View Post

    How do I make that cut?? I'd imagine it will be some sort of jig / table saw sled, but not sure how I could register the pieces to get perfect cuts 90 degrees to each other on that curve.
    Easier to make the end cuts before you cut the arcs, as you can register from a straight edge. Otherwise you may need to make a cradle. I would assemble the segments prior to sawing the curves.

  11. #176
    Join Date
    Jul 2013
    Posts
    578
    Blog Entries
    1
    Well, you can scribe the arc with a trammel on a piece of plywood for the interior and exterior radius of your parts. Draw a line from the square edge of the ply to the center of the arc (where the trammel point was set) in both directions. That line is 90 degrees to your part. You can cut the ply to one of those lines and use the cut line as the cut line to trim your parts. Just build the jig so that the part lies in-between the scribed arcs. Use a couple of blocks with toggle clamps to hold your part. Put some screws into the blocks to adjust the distance that the part finds from the block so that it lies in-between the arcs. Position the part for the first cut so that the part overlaps the non-cut line from center to the edge and cut. Flip the part so that the cut (now 90 degrees to the tangent line) is exactly hitting the line from the center, and cut the other end.

  12. #177
    Join Date
    Jan 2010
    Location
    Tampa Bay, FL
    Posts
    3,975
    Quote Originally Posted by Kevin Jenness View Post
    Easier to make the end cuts before you cut the arcs, as you can register from a straight edge. Otherwise you may need to make a cradle. I would assemble the segments prior to sawing the curves.
    I thought of assembling the segments before sawing the curves, but because the diameter is so large, the piece would hit the back of my bandsaw fence. I've thought of making the cuts and making dominos to hold them together, but not gluing them and cut them separately, then reattaching.
    - After I ask a stranger if I can pet their dog and they say yes, I like to respond, "I'll keep that in mind" and walk off
    - It's above my pay grade. Mongo only pawn in game of life.

  13. #178
    Join Date
    Jan 2010
    Location
    Tampa Bay, FL
    Posts
    3,975
    Quote Originally Posted by Mike King View Post
    Well, you can scribe the arc with a trammel on a piece of plywood for the interior and exterior radius of your parts. Draw a line from the square edge of the ply to the center of the arc (where the trammel point was set) in both directions. That line is 90 degrees to your part. You can cut the ply to one of those lines and use the cut line as the cut line to trim your parts. Just build the jig so that the part lies in-between the scribed arcs. Use a couple of blocks with toggle clamps to hold your part. Put some screws into the blocks to adjust the distance that the part finds from the block so that it lies in-between the arcs. Position the part for the first cut so that the part overlaps the non-cut line from center to the edge and cut. Flip the part so that the cut (now 90 degrees to the tangent line) is exactly hitting the line from the center, and cut the other end.
    I think that plan's a winner, Mike. I was trying to think it through in my head, and you nailed it. That should work.
    - After I ask a stranger if I can pet their dog and they say yes, I like to respond, "I'll keep that in mind" and walk off
    - It's above my pay grade. Mongo only pawn in game of life.

  14. #179
    Join Date
    Mar 2003
    Location
    SE PA - Central Bucks County
    Posts
    66,096
    Quote Originally Posted by Alan Lightstone View Post
    I thought of assembling the segments before sawing the curves, but because the diameter is so large, the piece would hit the back of my bandsaw fence. I've thought of making the cuts and making dominos to hold them together, but not gluing them and cut them separately, then reattaching.
    Just make a fixture (sled) that holds the workpiece so you can make then end cuts at the right place and angle. I'll refer you to the Four Eye's channel on the 'Tube as that's a big part of how he makes a lot of precise cuts on "complicated" shapes for furniture.
    --

    The most expensive tool is the one you buy "cheaply" and often...

  15. #180
    Join Date
    Feb 2004
    Location
    Perth, Australia
    Posts
    9,519
    Hi Alan

    I am going to copy here a post I made on the hand tool side as it relates to some of the dangers and processes needed when you glue together the sections for the arc.

    First of all, I will summarise what came before, which may aid in understanding the sequence involved from beginning to end.


    I began with templates, which positioned the joins, then cut the parts and finished the ends. Here is a summary ...


    Ends cut on the slider ...


    And cleaned up ...


    First task was to glue the arms sections together. You will recall that they are reinforced with dowels (positioned with centre points) ...


    We are at the point of glue up. Now here is what I wrote in the current stage of my build ....


    In a similar build, where the sections needed to be clamped together, it was possible to leave "ears" as the blanks were wider/thicker. I could not do that here, and so decided to epoxy these ears on ...


    Well, it wasn't particularly successful, even allowing for 24 hours cure time. The ears broke off.


    ​All I could do was clamp the ear on, and pray this would hold.


    Later I realised that the problem was that the dowels I used were too tight, and the force needed to drive them home was unexpected. Lesson learned for all - if using epoxy, which is gap filling, the dowels has be a slip fit rather than a force fit. Of course, it would have been easier if I had known this beforehand!


    Once all was together, now in one piece (or two pieces if you count two chairs), the rasping and spokeshaving began ...


    The aim now was to get the arms closer. This is all slow work, a bit here and a bit there, return to check the symmetry and shaping, and a bit more off. Work stopped to redrill the dowel holes that hold the arms to the legs. There had been a little movement while I was away, or I have measured inaccurately the at the start. It is important that the arms-legs join with as little stress to the joint as possible.


    ​A couple of progress shots of shaping thus far - lots of shaping still to come, but its getting to look like the original chair now.


    Regards from Perth

    Derek
    Last edited by Derek Cohen; 05-28-2024 at 8:56 AM.

Posting Permissions

  • You may not post new threads
  • You may not post replies
  • You may not post attachments
  • You may not edit your posts
  •