Page 1 of 2 12 LastLast
Results 1 to 15 of 24

Thread: Oak wall cabinet

  1. #1
    Join Date
    Feb 2020
    Location
    Camarillo, CA
    Posts
    423

    Oak wall cabinet

    It’s pretty exciting to find this forum and a bunch of active discussions about working with hand tools. I just do small projects in my garage for fun and I find this style of working is really satisfying. Here’s a picture of my shop set-up as it is now.

    B33FF06E-D169-4B41-96B8-CBCB25264450.jpeg

    I’m making an oak wall cabinet to go over the blue cabinet that I keep my tools in. It will hold back saws, bench planes, and joinery planes. It will be about twelve inches deep, 22 inches wide, and 26 inches high. The body is out of one board that has some interesting swirling grain. I think it will look good, but it made prepping the stock more work than I expected. The grain reversed in several places in each board, so I had to take pretty fine cuts when planing them and had to re-sharpen my planes several times throughout the process.
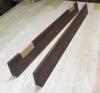
    I’ll put a frame and panel in the back, and since there will be a bit of weight I decided to set the back in a pretty deep rabbet. I used a plow plane to define the back edge of each rabbet, then tried two different approaches to remove the rest of the waste. The first one I chopped out most of the waste with a chisel, then used a block plane to clean it up. For the other three I used a ryoba saw to cut most of the waste. I then cleaned it up with a router plane. I think I preferred the second approach, but I may get myself a rabbet plane before too long.

    C07F2C9C-3CDA-4615-89DE-08297442D3DD.jpegC51F8FDC-B87F-4431-833F-78C41E48F6F8.jpeg

    So, all the pieces for the case are prepped, tomorrow I’ll lay out and cut the dovetails for them. The rabbets mean that the back will have a little quirk with the layout, but I decided to do it this way instead of mitering the very back to hide them.

  2. #2
    Join Date
    Jul 2014
    Location
    Edmond, Oklahoma
    Posts
    1,752
    Ben,

    Welcome to the creek!

    It looks like a great project, and I am looking forward to seeing the progress.

    Again, welcome!

    Regards,

    Stew

  3. #3
    Join Date
    Mar 2006
    Location
    Austin Texas
    Posts
    1,957
    Hello and welcome Ben. I noticed the stones laid out, ready for use so you must be a player! There are probably a couple of planes that would work for that rebate, but don't forget that a simple, no-fence, no-depth stop wood rebate plane either with a straight or skewed blade is a very handy, easy and versatile plane to have in the toolbox. Like Stew, I am looking forward to the next steps in the project.
    David

  4. #4
    Join Date
    Mar 2015
    Location
    SE Michigan
    Posts
    3,225
    Welcome Ben! Glad you found us. I think you’ll find there are a number of ways to get things done and we all find our favorite. No right or wrong, just what works for you. Also look forward to seeing the progress.

  5. #5
    Join Date
    Sep 2007
    Location
    Longview WA
    Posts
    27,479
    Blog Entries
    1
    Howdy Ben and welcome to the Creek.

    What part of the world do you call home?

    jtk
    "A pessimist sees the difficulty in every opportunity; an optimist sees the opportunity in every difficulty."
    - Sir Winston Churchill (1874-1965)

  6. #6
    Join Date
    Feb 2020
    Location
    Camarillo, CA
    Posts
    423
    Thanks for the welcome! I live in Santa Barbara.

  7. #7
    Quote Originally Posted by David Eisenhauer View Post
    Hello and welcome Ben. I noticed the stones laid out, ready for use so you must be a player! There are probably a couple of planes that would work for that rebate, but don't forget that a simple, no-fence, no-depth stop wood rebate plane either with a straight or skewed blade is a very handy, easy and versatile plane to have in the toolbox. Like Stew, I am looking forward to the next steps in the project.
    Welcome Ben, I agree with David, with a little practice a no fence rebate plane will do a better job than a fenced one. Well maybe not "better" but is easier to correct mistakes with.

    ken

  8. #8
    Welcome Ben. Glad you've joined us! This is a great site full of knowlegable, helpful people.
    "All that is necessary for the triumph of evil is that good men do nothing."

    “If you want to know what a man's like, take a good look at how he treats his inferiors, not his equals.”

  9. #9
    Join Date
    Feb 2020
    Location
    Camarillo, CA
    Posts
    423
    Got sidetracked the other day, but I’ve got all the tails cut and one set of pins cut and fitted. It was slow going chopping the waste on the tails, but eventually I got more comfortable being aggressive. I don’t usually saw out the waste, but I decided to go that route for the pins and was pretty happy with how that went. I’m not yet willing to try to saw real close to the line with a coping saw, but I’ll probably cut a little closer on the rest of the joints.

    i meant to use a half-tail at the back to hide the rabbet, and then I’d have a funny stepped pin on the top and bottom of the cabinet where it wouldn’t be noticeable. So of course when I was laying out I went on autopilot and laid it out with a half tail at the back. It will work fine but I’ll have to be careful to get that part of the joint to come together cleanly.

    ‘With 8 tails on each joint and hard wood, they really have to be precise to come together with no gaps. I had to do quite a bit of fine tuning to get thus first one together, and I was holding my breath as I hammered it together that it wouldn’t split. But, I’ll be pretty happy if I can get the other three to look like this.

    0AD4B69B-3A95-408E-9FE9-CCED60FC96A7.jpeg
    DE088B14-F90A-48FF-8079-5EF04B1790F8.jpeg

  10. #10
    Join Date
    Mar 2006
    Location
    Austin Texas
    Posts
    1,957
    Great start Ben. Looking good from here. Go ahead and saw that waste right next to the line for quicker waste cleaning.
    David

  11. #11
    Join Date
    Feb 2020
    Location
    Camarillo, CA
    Posts
    423
    The box is done and everything went together with some vigorous malleting. I’m pretty happy with how the joints came out. One or two little gaps that should be fine after I glue it up and plane everything flush. It’s within a sixteenth of square. Next step is to make the internal dividers for the saw till and shelves.

    there’s going to be a fair bit of planing and scraping to clean up the tear out, but I think this will look pretty good when it is done.

    913F80CC-9DA9-4A56-BCEA-D5BF2FA1D1C3.jpeg6DF36303-3235-4E11-A20C-6E3A2A751A9E.jpeg

  12. #12
    Join Date
    Sep 2008
    Location
    N. Idaho
    Posts
    1,621
    Hi Ben,

    Welcome to the Creek. Looks like a good space you have and you've made impressive progress in the past week. Will look forward to following along.

    Best,
    Chris
    "You can observe a lot just by watching."
    --Yogi Berra

  13. #13
    Join Date
    Feb 2020
    Location
    Camarillo, CA
    Posts
    423
    I had a good jack plane session to get the internal dividers thinned down from 4/4 stock. Then I made a few mistakes and got aggravated, so I set this project aside for a few days. First, when I was sawing the first dado for one of the dividers I went too far. So, I’ve got a little saw kerf I’ll need to fill with sawdust and glue. It is cross-grain so I think that will be less noticeable than trying to cut and fit a patch. Then I knocked one of the side panels off the bench and chipped a corner off it. I’ll need to flatten that, glue on a small piece, then get the patch flushed. Since it is on an angle it will be a little tricky to get the grain to match.

    i got the internal dividers fitted and installed. There was a little back and forth sneaking up on the fit. The vertical panels are still causing a slight bow to the top and bottom of the case, so I’ll have a little fine tuning to do before I glue it up. My plan is to glue up the carcass then slide in the internal dividers after the glue is dry. Everything fits snug so I don’t even think I need to glue them.

    i was originally planning to put another vertical divider in the bottom middle compartment, but now I’m thinking I’ll leave that open. That is where my plow plane and router plane will go, and I don’t think the vertical divider will be necessary. The long skinny space on the right is for a hand plane. I cut back the vertical divider to make it easier to get at, but after playing with it, I may cut that divider back some more. It is still a little awkward getting your hand in there.

    CFCBBDE3-4D8B-4CD8-AFB2-A8045D986FED.jpg
    A589E29E-96DB-4FC0-8501-70C720823F15.jpg
    BCC722BA-AB8E-424A-A02A-0ACEE1411525.jpg
    6F29E132-1EFC-4FD6-B5C9-B691DA5DEBCF.jpg

  14. #14
    Join Date
    Jan 2009
    Location
    N.E, Ohio
    Posts
    3,029
    Welcome Ben. You have made good progress and very nice work. Looking forward to seeing what the completion.
    George

    Making sawdust regularly, occasionally a project is completed.

  15. #15
    Join Date
    Sep 2019
    Location
    Lafayette, CA
    Posts
    844
    Quote Originally Posted by Ben Ellenberger View Post
    The box is done and everything went together with some vigorous malleting. I’m pretty happy with how the joints came out. One or two little gaps that should be fine after I glue it up and plane everything flush. It’s within a sixteenth of square. Next step is to make the internal dividers for the saw till and shelves.

    there’s going to be a fair bit of planing and scraping to clean up the tear out, but I think this will look pretty good when it is done.

    913F80CC-9DA9-4A56-BCEA-D5BF2FA1D1C3.jpeg6DF36303-3235-4E11-A20C-6E3A2A751A9E.jpeg
    Ben, nice set of dovetails. I'm traipsing along behind you and hope to be there myself in a few weeks or months.

    I've been Creeking for about six months, and I agree with you this forum is a priceless resource.

Posting Permissions

  • You may not post new threads
  • You may not post replies
  • You may not post attachments
  • You may not edit your posts
  •