Results 1 to 8 of 8

Thread: A different "sharpening thread"

  1. #1
    Join Date
    Jun 2010
    Location
    twomiles from the "peak of Ohio
    Posts
    12,183

    Question A different "sharpening thread"

    Seems I do have a Veritas tool in my shop..
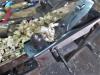
    Door plugs, plug maker.JPG
    I bought a plug cutter, a 3/8" Tapered Plug cutter. Back when these first came out.

    Begining to think it MIGHT be getting a little on the dull side....I also have to slow the drill press down to as slow as it will go, otherwise, it will burn the wood. It also is having "issues" with clearing the chips out, and snapping the plug off. Shank on the cutter is a Hex shape. 2 flutes. Used to be a bright gold colour.....

    So,.....how does one sharpen one of these? Starting the cut is a bit "rough", as it wants to shove the pine blank aside, taking my hand along with it.

    I really doubt IF Lee Valley would sharpen it back up.....and, I really need to make another 11 plugs, to complete a door build..now...
    Door plugs, 2 dozen.JPG
    Marks from where the cutter skittered across the surface....this is also about half of the plugs needed...
    Last edited by steven c newman; 04-03-2020 at 10:57 AM.

  2. #2
    Join Date
    Jun 2010
    Location
    twomiles from the "peak of Ohio
    Posts
    12,183
    Any ideas?

  3. #3
    Join Date
    Feb 2009
    Location
    Bucks County, PA
    Posts
    975
    The "Care and Use" section on this page has a PDF that shows how to sharpen these: https://www.leevalley.com/en-us/shop...g-plug-cutters
    And there was trouble, taking place...

  4. #4
    Join Date
    Sep 2007
    Location
    Longview WA
    Posts
    27,454
    Blog Entries
    1
    Marks from where the cutter skittered across the surface....
    A quick clamp would help immensely in preventing this.

    jtk
    "A pessimist sees the difficulty in every opportunity; an optimist sees the opportunity in every difficulty."
    - Sir Winston Churchill (1874-1965)

  5. #5
    Join Date
    Jun 2010
    Location
    twomiles from the "peak of Ohio
    Posts
    12,183
    Thank you!

  6. #6
    Join Date
    Apr 2007
    Location
    Columbus, Ohio, USA
    Posts
    3,441
    Disclaimer: I have never done this and following my thoughts will mostly likely destroy your plug cutter and end life as we know it..... and it will probably make you fat and ugly as well, I mean really, just look at me! 
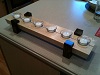
(don't tell my wife I said that).

    There are three obvious places to try and sharpen the plug cutter. Not sure how this will show up after I post, but, the first (labeled with the number 1 is on the tip of the cutter). You can use a stone, a file, diamond, or sandpaper (maybe on a stick). I would use a diamond hone or file since I have one. Although not obvious in the picture, this area is actually looks polished on mine. Not well polished mind you, but polished.

    plug_cutter.jpg

    The other refined edge is the inside section, which is circular (with a 2). So how do you "polish" or sharpen this section. I have heard of people handling this cutting edge in two primary ways.

    Some people directly sharpen or polish this inner edge. Use something round such as a stone on a dremel tool, sand paper on a dowel, or a round stone of sorts. I suppose if it were the same diameter as the cutting edge itself, you might be able to get a decent fit with minimal effort.

    I have also read something about a person sharpening the edge labeled 3. Clearly this was NOT done on mine, but, it looks like this might have been done on the sample in the photo that I took from the Lee Valley site. I checked an unused one and it has a burr on this edge that was not removed. You could certainly try to polish that edge. I read about one guy who had great success doing this (not with Veritas).

    Will be interested in what you try. If I cut more plugs (I have only done it a few times), I would probably try all three edges.

  7. #7
    Join Date
    Apr 2007
    Location
    Columbus, Ohio, USA
    Posts
    3,441
    Quote Originally Posted by Steve Wurster View Post
    The "Care and Use" section on this page has a PDF that shows how to sharpen these: https://www.leevalley.com/en-us/shop...g-plug-cutters
    So edges 1 and 3 then.

  8. #8
    Join Date
    Jun 2010
    Location
    twomiles from the "peak of Ohio
    Posts
    12,183
    Found a file ( more ways than one..)
    Tool Cabinet doors, cutter sharpened.JPG
    Filed away the crud/carbon, until shiny.

    To place the board in a vise...needed to joint the edges until the board fit..
    Tool Cabinet doors, new stock jointed.JPG
    That other board was way too wide...

    Quick clamp?
    Tool Cabinet doors, quick vise.JPG
    Cut a plug, move the board, cut the next one..
    Tool Cabinet doors, plugs made.JPG
    All 11 are done..and installed..
    Tool Cabinet doors, plugs completed.JPG
    can you see any of them?

Posting Permissions

  • You may not post new threads
  • You may not post replies
  • You may not post attachments
  • You may not edit your posts
  •