Page 1 of 2 12 LastLast
Results 1 to 15 of 16

Thread: Dewalt MBF 248

  1. #1

    Dewalt MBF 248

    00E0E_3nCaLGTV4lC_0CI0t2_1200x900.jpgFound 1958 Dewalt RAS. All there, need table . Didn't know if the motor ran till I got home. It ran but needed bearing.
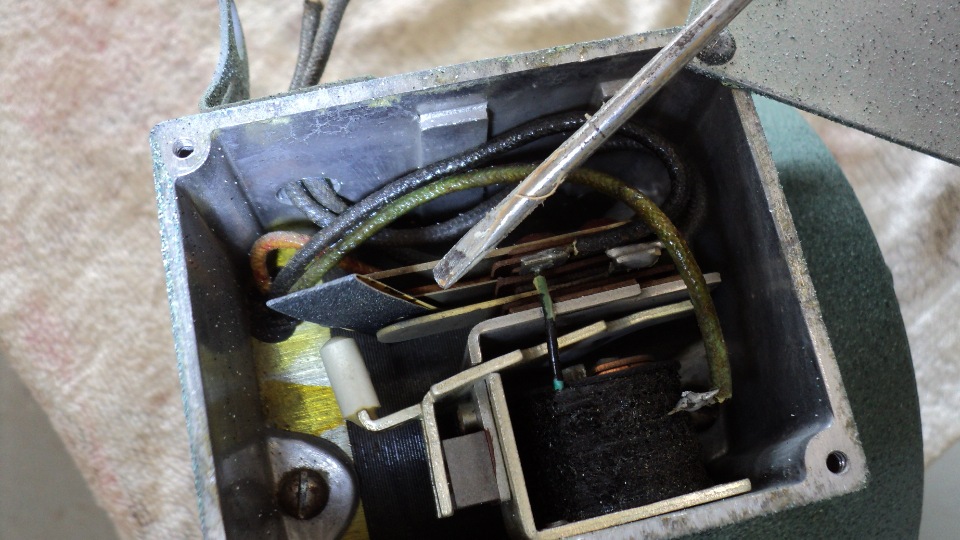
    OK got the bearing in and assembled and the motor wouldn't start . Figured it is the capacitor.
    Powered on the motor spins with a slight manual spin.
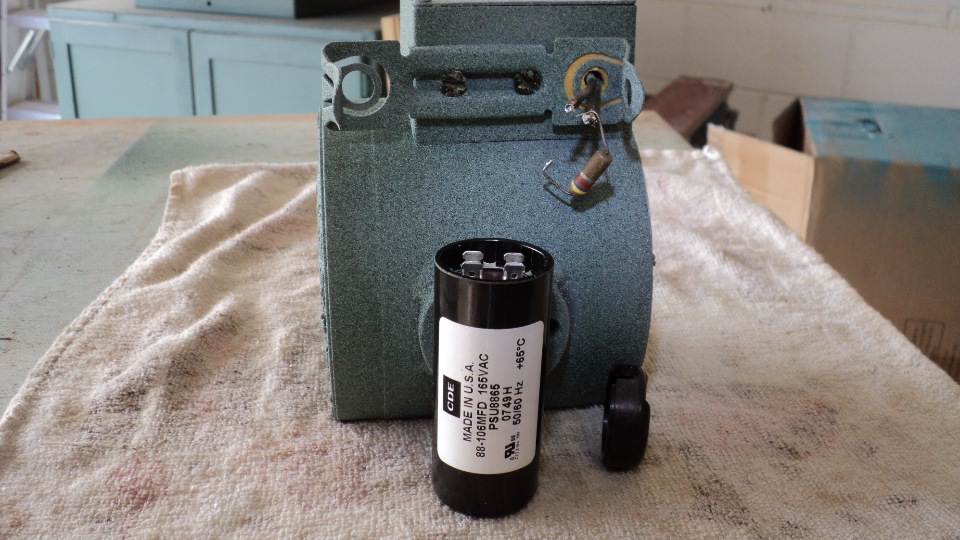
    I can't find a number on this one after removing the paint off of it. It does have a pretty large resistor on it.
    I would like a capacitor that fits in the prongs like this one does.Motor info.jpg20201017_082818.jpg
    Last edited by Daniel Kluk; 10-30-2020 at 11:43 AM.

  2. #2
    Join Date
    Jun 2017
    Location
    Landenberg, Pa
    Posts
    431
    Yep, replace the cap. You'll want McMaster-Carr part numbers 7245K11 (88-106uF) and 7245K106. Roundabouts $4. Reuse the old resistor, it is just a bleed down resistor, some saws had that. The new cap will certainly be smaller than the old one, this is not a problem. Either make yourself a spacer to fit in the old bracket, or get another bracket. The HB2 bracket from Allied Electronics fits the new capacitor. I'm sure there are other suppliers that may be cheaper. Allied stock number is 70186328, price is $8.93. Have fun, its a great saw when you get it completely dialed in. I have two working examples, love 'em.

  3. #3
    Thanks for the reply.Hope this is the best option.Have you done this with a saw you own? Any Pictures?

  4. #4
    Join Date
    Jun 2017
    Location
    Landenberg, Pa
    Posts
    431
    Here's a couple pics from another guy that did this, a pic of a cap that managed to fit without adjustment. The old capacitors (sometimes called a condenser in the old manuals/books) are sort of a rolled up paper. Over time they leak or otherwise degrade. Not a problem though, as long as you electrically match a modern equivalent. Those part numbers I gave you will do it - the second number is a new cap to go on the end. For the bracket, if the cap that arrives isn't the same length, I just cut a piece of dowel to match the cap diameter (I go with walnut because fancypants) to make up the distance. Just make sure its snug in there. Remove old one (it'll have the lovely green DeWalt paint that you can try to replicate, but it's hard!), unsolder the resistor, solder onto new cap and wire in as the old one was (the cap is unpolarized, so no worries which lead goes where). While you're in there, try to hit the relay contacts with some 400 grit to clean them up. If the relay is bad (which it really shouldn't be), your life will get a bit more complicated.


  5. #5
    I think I read your rebuild somewhere. Already took some 2000 grit on them. Did you break the ceramic in the box of the picture?
    By the way I kinda think the capacitor end cap would fit from my old one.
    Just got another idea and use my old end cap on the end without a cap and space out the difference .
    I am cheap until I can see that everything will work well.
    Last edited by Daniel Kluk; 10-30-2020 at 3:30 PM.

  6. #6
    Join Date
    Jun 2017
    Location
    Landenberg, Pa
    Posts
    431
    Nothing broken.

    Cheap? I had to re-read my post to make sure I gave you the right numbers. The cap is $4. I usually buy a couple because it gives me an excuse to get another saw. If you're careful you can look on amazon for an equivalent on prime shipping. C'mon open up the wallet. This is one of the things that makes these saws so wonderful - they're tanks and if you're willing to spend like $20 on parts, and a bit of sweat equity, you can have a saw that will work for another lifetime.

    Quote Originally Posted by Daniel Kluk View Post
    I think I read your rebuild somewhere. Already took some 2000 grit on them. Did you break the ceramic in the box of the picture?
    By the way I kinda think the capacitor end cap would fit from my old one.
    Just got another idea and use my old end cap on the end without a cap and space out the difference .
    I am cheap until I can see that everything will work well.

  7. #7
    I am up to 100 on the Dewalt. This one for purchased for $150. Did a new table and it looks perfectly sq.assembly2.jpg
    Its a delta 20a smaller one. My objective was to get a saw that I could pop the motor head off and move it around easier. Will drop new pictures with new table.
    Last edited by Daniel Kluk; 10-30-2020 at 8:43 PM.

  8. #8
    Join Date
    Jun 2017
    Location
    Landenberg, Pa
    Posts
    431
    Another nice one. Careful, it’s a slippery slope. I have way too many of these things.

    Quote Originally Posted by Daniel Kluk View Post
    I am up to 100 on the Dewalt. This one for purchased for $150. Did a new table and it looks perfectly sq.assembly2.jpg
    Its a delta 20a smaller one. My objective was to get a saw that I could pop the motor head off and move it around easier. Will drop new pictures with new table.

  9. #9
    I know what your talking about after restoring over 150 vintage Schwinn road bikes

    Any idea if it is OK to use 3 in 1 oil on the bearing plate housing where the king bolt sandwiches everything together?thumbnail (3).jpg
    Last edited by Daniel Kluk; 10-31-2020 at 4:26 PM.

  10. #10
    Join Date
    Jun 2017
    Location
    Landenberg, Pa
    Posts
    431
    I generally give the surfaces a good clean, then use paste wax and buff that off. Oil accumulates wood dust. I generally don’t use anything on the saw that might make dust stick.

    Quote Originally Posted by Daniel Kluk View Post
    I know what your talking about after restoring over 150 vintage Schwinn road bikes

    Any idea if it is OK to use 3 in 1 oil on the bearing plate housing where the king bolt sandwiches everything together?

  11. #11
    Makes sense Thanks for the info.

  12. #12
    Well the cap cover is backwards from the old one.
    So I use the old one, dug out the old cpacitor and I am forming it to fit the cut (old capacitor body) to the non wired end of the new cap . It might work. Tried to use a 1/2"socket to pick up the shotage to the bracket, but it isn't enough. Hate to buy the right braket for this capacitor cause I don't want to unsolder the wires. That may be the way to do this though.cap 1.jpgcap2.jpg
    Attached Images Attached Images
    Last edited by Daniel Kluk; 10-31-2020 at 4:25 PM.

  13. #13
    Forgot which side the thin washer goes to on the King Pin screw. It makes sense to go opposite side from the screwhead!
    Here is kinda what I was going for. I'll need to secure the new capacitor with the extension. probably some tape and hose clamp. Any other suggestion appreciated.
    Cap4.jpg
    Attached Images Attached Images
    Last edited by Daniel Kluk; 11-01-2020 at 7:01 AM.

  14. #14
    Join Date
    Jun 2017
    Location
    Landenberg, Pa
    Posts
    431
    I’d purchase the new end cap that fits better and make up the difference with a small coin cut from dowel or buy the bracket. Can use big heat shrink tubing to hold the capacitor and end cap together neatly and hide the label.

  15. #15
    Guess I didn't explain enough. I, in fact did buy the end cap but the cutout for the cord that goes into the box is opposite side of the bracket holder. That's why my old end cap is on the new capacitor. BTW The capacitor did function. Thanks for the number.

    cover.jpg
    Last edited by Daniel Kluk; 11-01-2020 at 11:32 AM.

Posting Permissions

  • You may not post new threads
  • You may not post replies
  • You may not post attachments
  • You may not edit your posts
  •