The plane being shown in this procedure is a Stanley #7, type 7. (ca. 1893-1899)
The only reason this plane might appeal to some is the low cost, $21.25 including tax. Other than that, the only thing that made me feel confident in buying this wreck of a plane was the wood is in decent shape and selling the knob, tote and hardware on eBay would likely recapture the purchase price.
Before pictures:
Side View.jpg
This plane has the look of having been left in a place where it became well acquainted with moisture.
Sole.jpg
Notice the "paisley" look on the sole. This is an indication of deep pitting. For comparison, look at the rust on the side. This is just surface rust and will come off easily. If the rust shows "blooms" or flaking on the sole, it is likely unrecoverable.
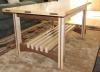
Blade Lapped.jpg
The blade on this plane may be saved by lapping, but it would be pretty thin. It would be better to get a quality replacement.
Blade Cap & Lever.jpg
Someone sprayed some silver paint on the frog and inside the lever cap.
There is a chip out of the left front.
I have made good users out of planes in worse condition.
I will not get into electrolysis or other chemical rust removal at this time. If one wants to repaint their plane to make a good looker for their user, then chemical rust removal is the way to go.
If the plane is to be repainted, it might be best to do this right after lapping the sole and making any adjustments to the mouth.
Fettling 101
The first thing done was to clean up the blade to see if it is as bad as it looked.
After doing a little work on the blade, it was used to make shavings. As bad as the blade is, it still works pretty good. Some of the damage is just too deep to lap out.
Bad Chip Breaker.jpg
The blade and chip breaker shown with the mess of wood is actually from a different plane. This is just to show what can happen if the chip breaker is not seating properly on the blade. This one may have to under go some torsional alignment. If when a blade and chip breaker are assembled there is light visible between the blade and chip breaker, then the situation needs correction.
In most cases with just a little bit of light visible, lapping the mating edge on the chip breaker is all that is needed. If possible, keep the top end of the breaker lower than the abrasive surface being used. This will put a slight bevel on the mating edge of the chip breaker to make the mating area a thin line. Make sure there are not sharp edges on the top side of the chip breaker to catch or snag shavings. Problems will make them self evident. If shavings continuously clog at the mouth, it is likely the chip breaker needing attention.
Continued...

 Reply With Quote
 ) I have a type 18, 3C that has some pretty significant pitting in one area of the sole, not near the mouth, I was going to re-grind it on a surface grinder, but have just left it alone.