I recently got into a little bit of carving as well. The cost per tool isn't bad at $30 but having to get quite a few tools, it's adding up pretty quickly.


 Member
I recently got into a little bit of carving as well. The cost per tool isn't bad at $30 but having to get quite a few tools, it's adding up pretty quickly.
Member
Bob, not to nit pick but you say you can "see" a $200.00 saw......not you'd pay $200.00 for a saw. My little helper is grown up and wants to go to Georgetown in the fall so while I'm not making saws I am making my own row boat. So what's this have to do with you? The transom is okume ply. I'm thinking of using the #54 lock wood dye on it for a classic look. Very nice on your table. I have scrap for a test. Any tips on application and mixing? I'd be encapsulated in urethane or west system epoxy. Man is it snowing........
 Member
I got my first set of Pfiel small size carving tools for $24.00 for the set of 12 in about 1965-66. I still have them,and added to them with the extra set of 6,but they were over $200.00 IIRC.
The trouble with carving tools and clamps is that you might need so many. Especially true of the clamps,at least.
It is too bad that carving tools I used to get for $2.50 up in the Pa. flea markets,have now become $30-$40 each. And not as choice as they once were,either.
It isn't too hard to buy 1/4" square W1 tool steel bars,and with simple tools forge out fishtail gouges.I have posted sets I made(not that I needed them). I just liked making them. You can probably find pictures of them if you do a search for"A set of carving tools I made,G. Wilson". I checked. That will bring them up. Flatten out the ends when red hot. Take various diameter steel rods. Get the chisel blank red hot again. Lay the steel bar on top,and hammer the chisel into a hardwood block while it lies on top of the wood. Make the "V" parting tool by filing with a triangular file on the inside. File up the outside to match.
I didn't make bolsters for mine,as they were push type carving tools. You could make quick bolsters by filing their tangs tapered(which you need to do anyway),and slipping a thick washer over the tang,so it jams most of the way up. Then,make handles,drill,and tap the tangs in. The steel is only about $4 or $6.00 for 36" pieces,and a Mapp gas torch is enough to harden their cutting ends.
Last edited by george wilson; 01-26-2011 at 10:12 PM.
Member
Wow, now that's my kind of post!Originally Posted by george wilson

I'm all about making my own tools by simple means. I had no idea that it was possible to make carving tools like this. I've been wanting to learn carving for months now. I tried it without the necessary tools and it wasn't any fun because I was fighting the tools the whole time and couldn't get the results I wanted. Even a simple project takes a handful of tools, and at $30 each that's quite an investment for a young guy putting together a shop.
This is right up my alley. As soon as I get my shop under control and get caught up on a few things, I think I'm going to tackle this project. I had given up on being able to learn carving for now as I needed the tool money for other things. Maybe I'll be able to start learning sooner than I thought...
Dustin
Member
George Wilson is totally correct on this. I doubt that mine are up to his standards, but they do good work. These are easy to make. I usually buy W1 drill rod for this sort of stuff. 3' of it will make 4 pieces just under 9" and should cost you under $5. W1 is quite forgiving and easy to work. For a lighter tool, I will take a 9" section heat the end to cherry red, but not quite sparking and then hammer it till it turns amber. Easy to fan the end, even shape a basic edge. If I need a larger sweep, I will start out by heating and pounding the end, so it becomes thicker. Then I reheat and hammer it flat. It may have to be heated several times so I usually do four or so at a time, heating the ones not being hammered.
After they are shaped, I heat them to dull red and plunge them into water and stir. Then I sand them a bit so I can see the metal and then I start heating the metal well back from where I plan to have it hold and edge. I heat the body to blue, not glowing, just discolored. as I heat it, I want the cutting edge to turn gentle straw or amber. This way the body will be closer to a spring temper, and just the area that will hold an edge is at a hard but more brittle temper. Once it is at the right color, I stop it by plunging it into water and stirring.
Then the shape and edge gets refined by grinding. I take a natural, but not animal hair, brush and dip it in water. This sits on the tool as I grind it. As the brush dries I will stop and wet it again so the tool stays damp as it is ground. This keeps the temperature down and maintains temper on the edge.
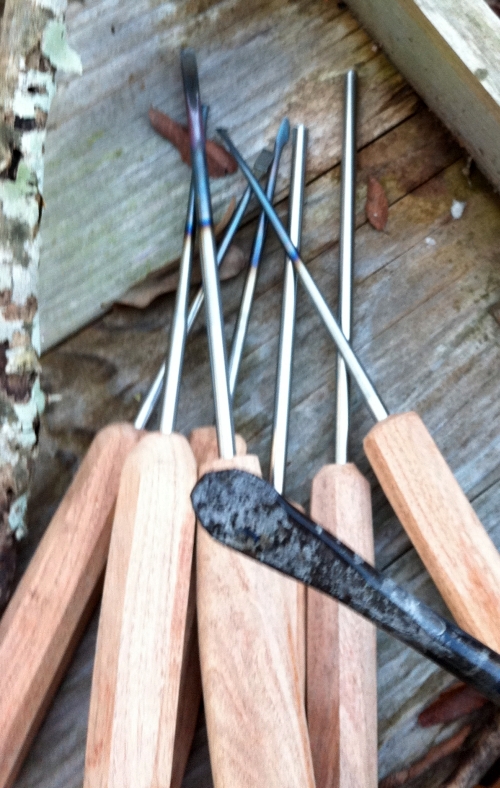
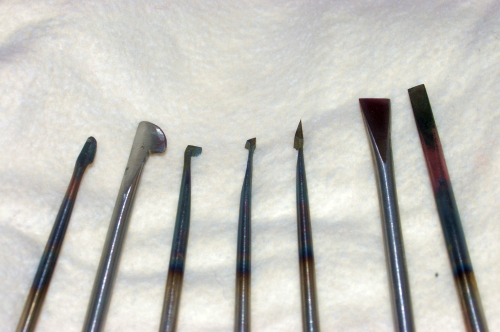
I 'needed' some quick tools for making a few precision mortises, so I made these. Since I am using 1/4" w1 drill rod for these, I drilled holes in a few blocks of wood so I could have handles while I worked the steel.
These are hardly up to the standards set by George, but they will do me fine for years to come. They also took very little time to make and hold a rather brilliant edge.
Making a nice octagonal handle is much harder than shaping the steel.
Bob
Member
Every carving tool I've made is not made to fully finished standards. If I'm carving and need a quick and dirty tool,I make up ones that will do the job as needed. I just don't post those.
Grinling Gibbons made them on the spot as required,too. I wasn't able to see his tools in England (completely forgot to look for then).but I hear they were rough too,except at the business end. He was carving for a living,and not making tools as finished objects.
Round drill rod is easier to find than square. MSC sells square W1 rod stock up to 1" square(I think it gets that big). 01 is easier to find,but why buy precision ground metal just to beat on? I prefer the cold drawn stock,and it is a lot cheaper,not having been ground. Ground drill rod is just as cheap as any. If you use 01 drill rod,just buy a large jug of vegetable oil to quench it in. The quench in any case needs to be large enough that the tool doesn't heat it noticeably. That would slow down the quenching speed,and the steel might not harden fully. Automatic transmission fluid is what we used at the shop. It works fine,too. Just DO NOT use USED motor oil. It will leave a thick,black coating on your metal that is hard as blazes to get off due to the carbon and crud in it.
To make a BRINE quench,add ice cream salt to water till a potato will float in it. Brine is better than plain water,as it prevents a gas envelope from forming around the tool,causing uneven quenching. You really don't need to worry about that for small tools,though. Brine WILL rust your tongs though,even if you carefully rinse them clean after every use.
Ice cream salt is the best salt. I don't know why. That's what the blacksmiths recommend. Harry,what say you???
Last edited by george wilson; 01-29-2011 at 9:30 AM.
Member
Dustin - If you think you'll set up a small forge and make quite a few of these (most of us carvers have 200+ tools, though aquired very gradually), a swage block might be a good investment. You can make one of these yourself from a chunk of mild steel - while buying a 15 lb. block of mild steel might be pretty pricey from a supplier like MSC, you can usually get something serviceable for next to nothing by visiting a local steel fabrication yard - such pieces are "off cuts", and the steel yard is typically just selling them off as scrap.
There are many resources on the net for setting up a small forge suitable for forging carving tools, blades and other small objects. You might be surprised at how inventive these folks are, and how inexpensive cobbling the parts together are when compared to purchasing a ready-to-go forge, anvil, blacksmith tools, etc... One site I read through had a pretty neat way to make a casting furnace out of a garbage can, alumina cement and a small blower. With it, the gentleman was able to heat bronze and brass up to the liquid state, and do his own backyard investment casting.
Member
George - I wonder if this has something to do with iodine; just about any table salt will have a trace amount of sodium iodate or equivalent salt to it to meet the nutritional requirement for iodine. Ice cream salt, as well as ice-melt salt, is unadulterated.
[OP]
Member
George, thanks for the "roll your own" encouragement. Since my small shop space won't accommodate a metal working area, I've been reluctant to try my hand at some "light duty" smithing because of safety concerns, but I'm now thinking it may be possible to cobble together a mobile station that could roll around (and be moved outside). Some heavy duty casters, a small anvil, a place for a grinder and a machinists vise...might just be doable (once I finish my current two projects).
Member
It has only been in recent years that I have had an actual anvil. Only the past 5,actually. I just didn't have space for 1 other years,till I moved and built this larger shop. All the other years I just used a thick piece of junkyard steel. It worked fine,just don't hit the steel with a hammer directly. Hit the tool you are forging,and you won't dent your soft piece of steel "anvil".
Unless you can get a REAL anvil in a small size,those little cast iron ones are even softer than a block of mild steel. You need to see that your small anvil has a tool steel top welded onto it. Test the top with a new,smooth cut file. A new,smooth cut file will cut harder steel than a new,coarse cut file. Don't over do it,though. You will ruin your file. Generally,I just test with the tip end for maybe an inch. A triangular file works too,as long as it is fine cut,like you'd sharpen a saw with.
Last edited by george wilson; 01-29-2011 at 2:19 PM.
Member
If you go to a junkyard and get a section of rail road track, you will have a pretty nice anvil. Any of the mass market cast iron guys absorb shock and will make you work twice as hard. If you have a good anvil, everything is easier. If you get serious about blacksmithing then a real is probably a good investment. I have a section of rr track and what some blacksmiths call an ASO or Anvil Shaped Object. The rr track is better for just about everything.
Bob
Last edited by Bob Strawn; 01-29-2011 at 4:37 PM.
 Moderator
I'll disagree with George on one small point on quenching O1 tool steel. If you have to do your work in the house or basement as I do,, as opposed to the garage or a separate shop, use either peanut oil or walnut oil for the quench. I used ATF once many years ago in my basement shop. It worked fine, but the major compaints and the amount of static I received from management about the smell required a promise never to do it again. My wife is generally very tolerant of my hobby and what I do, but this one set off a major "seismic event".
Dave Anderson
Chester, NH
Member
Of course,I wasn't thinking about the smell,as we were using it in a regular shop UNDER a double exhaust fan with a big hood we built,too!!Oil WILL catch fire,too,for a moment,when you are quenching larger objects,like a 6" wide molding plane iron. I seriously doubt your small carving tools would ever do that. Maybe you SHOULD stick to water hardening steels if you are working in your garage or basement. you might set off smoke alarms,OR smoke up your paint. Your wife MIGHT give you a dirty look over that!!
[OP]
Member
Bob,
I have a decent scrap metal place close by but I have not seen any track. They do have some fairly thick chunks of steel but it's probably not too hard. I must confess to being a total neophyte about anvils. I have seen a CL add for a track anvil for a fair price.
My knowledge of anvils has been limited to "you're so dumb you could mess up an anvil...". I always thought they were just a big chuck of metal you could pound on. The comments from George about selecting one were an eye-opener.
After some craigslist and other searches, it's not clear to me how much one of these puppies should fetch. Most prices seem a bit steep and are for "big iron". I've seen some YouTube videos about exploding/launching anvils. Maybe that sport is driving up the price?
Needless to say I will approach my next anvil with a lot more respect!
Contributor
I like the "roll your own" approach as well. Coming from somewhat of a machinists background (I'm no real machinist, but I've had to make plenty of my own parts to get my job done), it's very common to simply make tools. It's sort of how woodworkers make jigs. You just do it. I love that so many have gotten buy just by simply sharpening screwdrivers for chisels! I don't really do this sort of stuff anymore, mostly because I'm concentrating on my craft and can't afford any more distractions (I really can't plus now that I've quit my day job I don't have the facilities anymore), but it's amazing what's been done with a sharp edge on a screwdriver. With a bit more knowledge and work you can make some really usable tools.
George: I wish you would post some of your rougher creations if for no other reason than it would make the rest of us feel better about the kludges we toss together
 Posting Permissions

 Reply With Quote