Does anyone know of a simple Box joint jig that will accept at least 24" long pieces?


 [OP]
Member
[OP]
Member
Does anyone know of a simple Box joint jig that will accept at least 24" long pieces?
Member
The most simple box joint jig I can think of is one for a TS that involves a "finger" the same width as the kerf to produce a uniform cut across a board. I don't have pics but I'm sure someone here has. Myself, I use a table mounted router and an Incra Ultra/Intellifence rig with templates for a wide variety of joints which is consequently neither simple or inexpensive
...but damn, it works nicely!
J.R.
Member
There are lots of plans out there for box joint jigs and most all are simple to make. Several years ago I wanted to start making them and bought the plans from the New Yankee Workshop. After building the jig, you can cut your box joints on the table saw. With the box joint jig plans you also get plans for 4 or 5 other jigs that are handy in the shop. Without trying to sound like a comercial for NYW, try their site and look up Jigs - Item #0101, the plans are cheap to buy, you can even buy a DVD of it being made by Norm, and you can build your box joints as long as you want.
Last edited by Terry Sparks; 08-03-2008 at 11:43 PM.
 Member
You are a bit vague in that you don't state how much you are willing to pay and or build..etc I will post some options for you:Originally Posted by "Jacob Robinson"

option 1)
For low budget build you own go with something like this-
http://www.plansnow.com/boxjoint.html
Unlimited sizes on these.
option 2)
Again in the low budget build it yourself theme you can do the same thing as above and use it for the router using what ever size bit you want.
option 3)
For less than $100 you could buy a dedicated blade from Freud which comes with plans as well-
http://www.freudtools.com/p-316-box-...utter-set.aspx
option 4)
http://www.incra.com/
that says it all pretty much but you don't need the tip top high end to do box joints for sure
option 5)
stay tuned to this thread and trust SMC. There are many folks here way smarter than I who will soon provide you with the eureka moment!
Dewey
"Everything is better with Inlay or Marquetry!"
Hi Jacob,
I dug up some photos of past box joint jigs I have played with...
The first is just a pair of miter guages, linked by scrap of MDF.
Position of scrap is marked, a dado is run through, scrap is unfastened
and shifted by desired finger and stock width, scrap is re-fastened.
A precise little block is made to finger width, and used as indexing pin.
Capacity unlimited - the only limit is your imagination in rigging and jigging.
This approach yielded perfect finger joints for me. (jig is square-pics distorted)
Just time, effort and care... cost me nothing, and was fun.
Another effort to follow...
Last edited by Walt Caza; 08-04-2008 at 6:59 AM.
There are no shortcuts to anywhere worth going! WCC
Be who you are and say what you feel, because those who mind don't matter and those who matter don't mind - Dr. Seuss
Crohn's takes guts. WCC
This is another box joint jig I played with more recently...
I guess you would call it a box joint sled. (?!?)
It is built like a crosscut sled, and slides and tracks like a dream.
Rather than your stock sliding on the tablesaw surface, it rides on top
of this sled. I took care tuning this one, and it performs flawlessly.
The high fence allows clamping of longer, and thus 'taller' stock.
A little wax and a precise index block, and this one is a joy to use.
I like 5/8" fingers, but other sizes are readily accomodated by a false
fence added in front of jig's fixed fence.
Long ago, I used to do finger joints on a router table.
I would make a thin, sheet stock overlay...with a dado groove to receive
a fence 'stick' with the same cross-section as desired fingers.
This plywd overlay was clamped onto table top, bit protruding thru a hole,
and the distance from bit outer radius to the inner fence edge was equal
to the finger spacing. (clear as mud?)
First cut was run through along fence, making first finger.
Subsequent cuts were made, with each straddling the fence stick.
Adjustments for fit, were readily made by light taps to shift overlay in
relation to router bit.
A backer board eliminates tear-out. (which is the bane of good box joints)
I have only used these joints a few times, and used a different
approach each time. More lessons and playing! shrugs
Good luck with your joinery,
Walt
Last edited by Walt Caza; 08-04-2008 at 3:54 PM. Reason: sp
There are no shortcuts to anywhere worth going! WCC
Be who you are and say what you feel, because those who mind don't matter and those who matter don't mind - Dr. Seuss
Crohn's takes guts. WCC
 Member
I have 3 box joint jigs.. The smallest is 1/4" .. There is a 5/16" and a 3/8" ...
They are a bit bulky, but accurate, fast and durable.. lol..
Two of them are at least 4 years old and work great.
That little block of 1/2" Baltic birch at the front, where the blade passes by, is for setting the blade height.. Its exactly 1/2".. Lazy and un-needed.. but its faster..
I write the directions on the back.. 1/4" Plus shim... So in a year, when I pull it down, I can just set it up ...
The other two, sitting up on a shelf..
They take about 45 minutes to make, but last forever .. They have a sort of ZCI built in, so I dont need a backer board to avoid splintering the backside.. .
The only real difference between mine and Walt's is that I built a blade protector in the rear.. Technically its designed so if the blade is 1/2" higher than the platform, I cant cut myself, no matter how far I push forward. The Biggest benifit of the zero clearance is that I can cut two sides at once.. I pin them together with a couple of 23ga pins.. Box joint them, and pull them apart.. Making a box joint drawer is faster than installing the dado blade on the saw..
Last edited by Rick Fisher; 12-11-2009 at 4:25 AM.
 Member
This one was from plans in one of the mags. Adjustable from 1/4 - 1".

 Contributor
Mine works on the same concept as Ricks - except it is a free-standing back fence that I clamp onto the primary back fence of my small cross-cut sled.
Which - yes - means I have a 1/2" kerf in the bottom of that sled. I drop a piece of whatever plywood is laying around onto the bottom, fire a few screws to hold it, and cut a new ZC kerf when needed.
I feel a whole lot more like I do now, than I did a little while ago.
I believe Wood Magazine showed how to make that one. I have the same jig made from Maple.
Lee Schierer
USNA '71
Go Navy!
My advice, comments and suggestions are free, but it costs money to run the site. If you found something of value here please give a little something back by becoming a contributor! Please Contribute
Member
Make this as long as you need. At 24" the table saw jigs will have "accumulated errors" at these dimensions. http://www.leestyron.com/lynnjig.php
PDF will have instruction on how to build/use.
Larry
Member
Here is mine, somewhat of a copy of the rockler jig for the router table, minus the $80 price tag. hold it down to the miter/t-track on the router table. i just make a new auxillary fence with whatever pin size i need and clamp it on. I think i will cut some sloted holes in the fences so i can bolt them on and be able to adjust, right now i clamp it down but for wider pieces the clamps would get in the way. Im thinking with the right bit i could use this for making beaded face frames, sort of like the kreg system.
Sorry about pic quality, can't find my camera so i had to use the phone.
 In Memoriam
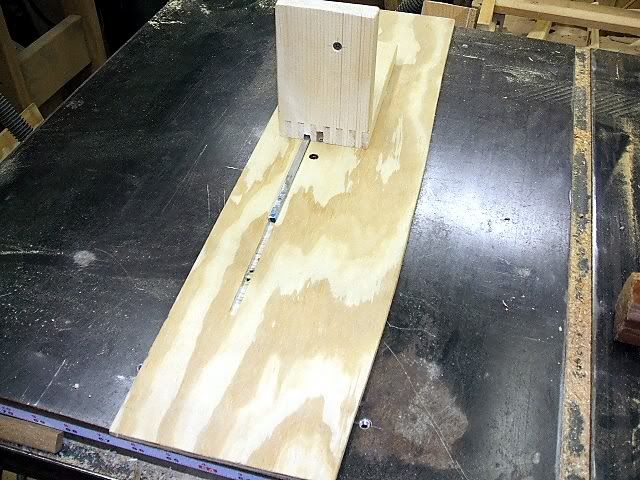
Nothing complicated about a simple box joint jig. A piece of 1/4 ply with a slight depression routed in it, and a 12 inch piece of keystock from the local hdwe store screwed to it from the bottom and a square push fence with a a slot in the bottom to go over the keystock, and a hole for the router bit to fit thru, clamp it to your router table top, use a 1/4 inch or other set up bar to space it and make joints.
Jr.
Hand tools are very modern- they are all cordless
NORMAL is just a setting on the washing machine.
Be who you are and say what you feel... because those that matter... don't mind...and those that mind...don't matter!
By Hammer and Hand All Arts Do Stand
 Posting Permissions

 Reply With Quote


