Results 1 to 13 of 13

Thread: Shop cabinets under construction

  1. #1
    Join Date
    Nov 2007
    Location
    Denver
    Posts
    497

    Shop cabinets under construction

    OK, so I finally started that shop cabinet project that I have talked about for 6 months! I talked about it last week in another thread.

    I used Chris McDowell's approach and took suggestions from Jim Becker and others. I used some tips from Danny Proulx's book -- great book BTW.

    This project encouraged me to make a couple of jigs -- I always like that. Takes me longer for this project, but saves me lots of time on future projects.

    One jig that I made was the shelf pin hole jig in Danny Proulx's cabinet book. It has a piece of steel with hole drilled and spaced 32mm OC. I made it large enought to handle 45 inch cabinet sides. I made a hole in the base to hold a dowel and when I use the jig, I push the cabinet side to the top, drill the bottom most hole first, and then push in the dowel to hold the side in place while I drill the rest. I can do the holes for a 42 inch cabinet side in less than 3 minutes! It use to take me 15 to 20 minutes per side. (I won't even tell you how I was doing it before.)

    Last week I made a very simple outfeed table. That is making my life a lot simpler?

    Another jig that I made was a Drill press fence to make the shelf hoe jig. I made a fence about 2 feet long. I drilled a 1/4 inch hole and put a dowel in it. I then lined up my drill press to be 32 mm OC from the dowel hole and drilled a second 1/4" hole. This allowed me to drill a hole in the steel, and then move it over to be on the dowel -- making the next hole exactly 32 mm OC.

    I also used my router fence for the first time. I guess that is what you call it. It attaches to the router so that you can route a groove a given distance from the edge of a board. I put a small wooden face on it and used it to put the grooves in my side panels for inserting my cabinet back. Worked like a charm. The wooden fence was about 14 inches long and made it easier to keep the router going straight. I found that the wooden fence was catching on the plywood edge, and so I waxed it. That made it move much more smoothly.

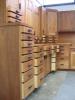
    and so ... I cut all of the sheets for the cabinets. I drilled the shelf pin holes. I made the groove for the back. I sanded and poly'd the cabinet pieces. I assembled the face frames. The only mistake that I know that I made so far is that I forgot to cut the stiles down from 1.5" to 1". That should be easily fix with my table saw -- just trim .5" off the sides before finishing.

    Today, I will put the poly on the last couple of pieces that I didn't have room to do lastnight, and then I will put the pieces together.

    You may notice that I didn't mention cabinet doors. I am going to do those as a future project. I am just going to get this up and start organizing some of my things. -- The LOML is anxious for me to make a bed for my daughter -- and I will request design ideas on that in a separate post.

    All in all, a GREAT weekend and a great project. I learned a ton. I created a spreadsheet that takes the cabinet dimensions and calculates the dimensions of each piece. If you want it, let me know and I will post it. It is just like the table in Danny Proulx's bookd but adjusts the dimensions to allow a slide-in back in a groove in the cabinet sides and then screw to the back of the top and bottom (as I was taought by Crhis McDowell.

    I have neve posted pictures, but I will try to learn how in the next day or so and post pictures of everything.

    BTW, I went back and got some bass ply for me cabinet backs -- in case you were following my previous thread.

    Ray

  2. #2
    Join Date
    Aug 2008
    Location
    Brookhaven, MS
    Posts
    67
    cool! Would definitely like to see some pics for inspiration!

  3. #3
    Join Date
    Mar 2003
    Location
    SE PA - Central Bucks County
    Posts
    65,850
    Sounds good, Ray, but you really do need to get the pictures in here...that's the primary purpose of this particular part of the forum! To display our projects!
    --

    The most expensive tool is the one you buy "cheaply" and often...

  4. #4
    Join Date
    Nov 2007
    Location
    Denver
    Posts
    497

    Spreadsheet for parts dimensions

    This can be used to input all of the piece dimensions into a cutlist program.
    Attached Files Attached Files

  5. #5
    Join Date
    Nov 2007
    Location
    Denver
    Posts
    497
    <Jim Becker: Sounds good, Ray, but you really do need to get the pictures in here...that's the primary purpose of this particular part of the forum! To display our projects! >

    I know! I will see what I can do. I have never posted a picture ... and my wife is the keeper of the camera. Ok, i will really try to do it tonight! No, really!

  6. #6
    Join Date
    Nov 2007
    Location
    Denver
    Posts
    497

    More progress!

    Well, yesterday I put all of the carcasses together. I put the BLO on the face frames. Everything is ready to complete the project as soon as the face frames cure and I can put some poly on them -- they should go on the wall on Saturday.

    During the construction/assembly, I did pretty well in not making mistakes. I marked all of the pieces with chalk, and I marked the edges with notes. Everything was going really well until I noticed that I put screws in from the exposed side of the end panel. AAAAARRRRGGGG! I had detemined which plywood panels were going to be on the ends, and I marked them and prepared them for pocket screws ... and then I got so caught up in what I was doing, that I screwed them together just like the other sides!

    Oh, well. I can just buy some additional maple (used for the face frames) and make some faux frames to put on the end panels. It will look like I meant to do it that way.

    Any one look at the spreadsheet that I posted? Is it useful?

    Ray

  7. #7
    Join Date
    Nov 2007
    Location
    Denver
    Posts
    497

    Pictures!

    The first picture (91) is the aftermath of cabinet building! It shows my 4 carcasses and two of the face frames.

    The second and third pictures (92, 93) show the jig that I made for drilling the shelf hole pins. You can see in 93 in the lower left, I made a hole to hold the dowel that I use as described in previous reply. That hole is also the depth for setting the drill depth stop that I use on the 1/4" drill bit so that when I want to set the depth, I can just stick the bit in the hole and tighten the depth stop. I also made a hole to hold a shelf pin so that I can test the fit on random holes to make sure that I am not under-drilling.

    The fourth picture (94), shows the drill press table jig that I used to drill the holes in the shelf pin jig. Notice the dowel and the hole that is exactly (more or less) 32 mm from the dowel (OC -- of course).

    OK, I am no longer a picture posting virgin! Enjoy! (Comments welcome.)

    Ray
    Attached Images Attached Images

  8. #8
    Join Date
    Nov 2007
    Location
    Denver
    Posts
    497

    I knew that I forgot something

    I also made this miter saw extension. I was using a bare miter saw for several years and this made my life so much easier over the weekend!

    and I guess I will add that ...
    I used my Dowelmax to make the face frames, and I am using my Kreg pocket hole jig to put attach them to the carcass. The screws that I used for the carcass construction were Ultimates from Woodworkers Hardware. They are awesome. I did not drill pilot holes. They are self-drilling and have nibs for self-countersinking. They do not have threads at the top so that they are great for attaching a side panel to a bottom or top. I used 2" screw and used five per butt joint. I used 1 1/4" to attach the back to the top and bottom. I glued the back into the grooves (in the sides).

    I am going to order a whole bunch of those ultimates and they may be the only screw that I use from now on ... except using confirmat screws in PB and MDF. ... and maybe some Spax screws occasionally.
    Attached Images Attached Images
    Last edited by Ray Schafer; 09-17-2008 at 10:06 AM. Reason: add text.

  9. #9
    Join Date
    Mar 2003
    Location
    SE PA - Central Bucks County
    Posts
    65,850
    Nice work, Ray. You're off to a great start on your project!
    --

    The most expensive tool is the one you buy "cheaply" and often...

  10. #10
    Join Date
    Nov 2007
    Location
    Denver
    Posts
    497

    Picture of cabinets on wall

    I still haven't done the doors, but here are the cabinets.
    Attached Images Attached Images

  11. #11
    Join Date
    Mar 2003
    Location
    SE PA - Central Bucks County
    Posts
    65,850
    Beautiful work on those cabinets, Ray!
    --

    The most expensive tool is the one you buy "cheaply" and often...

  12. #12
    Join Date
    Mar 2007
    Location
    Stony Plain, Alberta
    Posts
    2,702
    Can't have too much storage.

    Looking good Ray. Make sure to give us a pic when you get the doors on.

  13. #13
    Join Date
    Nov 2007
    Location
    Denver
    Posts
    497
    I will ... but it is going to be a while. I have lots of other projects in progress and doors on the shop cabs is low on the list!

Similar Threads

  1. Time to Build Some Shop Cabinets
    By Sam Chambers in forum General Woodworking and Power Tools
    Replies: 25
    Last Post: 02-17-2007, 8:21 AM
  2. Day Two Shop Construction Pics.........
    By John Dingman in forum Neanderthal Haven
    Replies: 9
    Last Post: 05-12-2005, 10:44 AM
  3. Shop Cabinets out of mdf???
    By Chris Lee in forum General Woodworking and Power Tools
    Replies: 10
    Last Post: 04-15-2005, 12:12 PM
  4. Faceless frame construction on kictchen cabinets
    By Rick Reinsma in forum General Woodworking and Power Tools
    Replies: 2
    Last Post: 03-16-2005, 8:04 AM
  5. Another Newbie building & outfitting a shop.
    By Mike Holbrook in forum General Woodworking and Power Tools
    Replies: 28
    Last Post: 01-29-2005, 6:52 PM

Tags for this Thread

Posting Permissions

  • You may not post new threads
  • You may not post replies
  • You may not post attachments
  • You may not edit your posts
  •