Results 1 to 11 of 11

Thread: True ZC insert for tablesaw (10 pics)

  1. #1
    Join Date
    Oct 2006
    Location
    Windsor, ON
    Posts
    657
    Blog Entries
    3

    True ZC insert for tablesaw (10 pics)

    I needed a zero clearance insert for my tablesaw. The SawStop cabinet saw
    insert is called zero clearance, but it was inadequate for my needs.
    That insert is narrow around the blade, but opens wider around the riving knife.

    I decided to whip up a quick but serviceable true ZCI overlay from 1/8" hardboard.
    The way I see it, an insert is only ZC if the actual cutter you want to use with it, did the cutting through it!
    The SS insert does offer a bunch of nifty features, but would be tricky to make homemade, and take longer too...
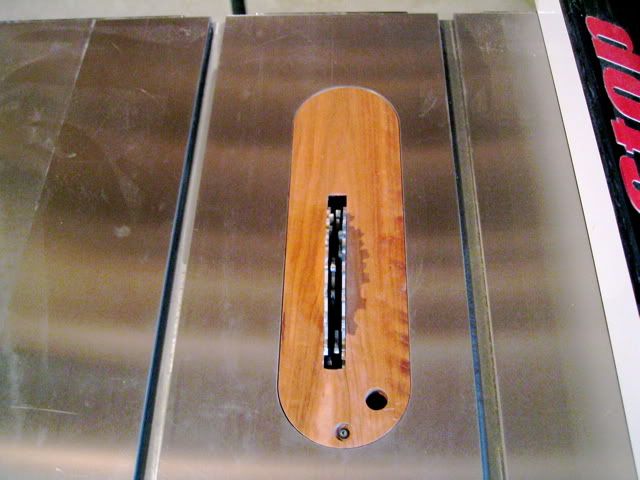
    pics are:
    -table insert topview (sorry, only pic I found of insert, or stealth gloat!)
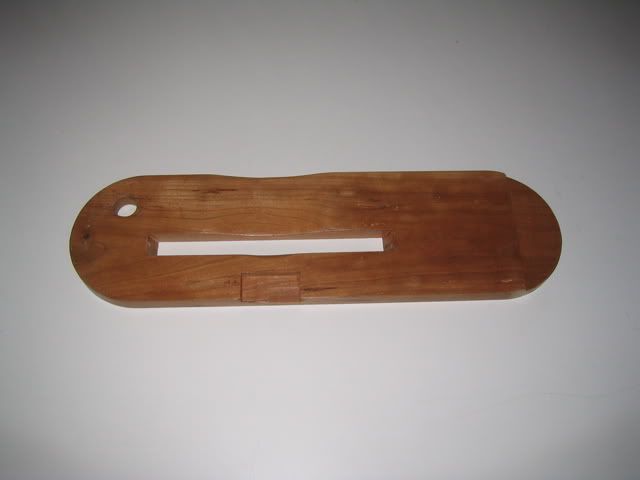
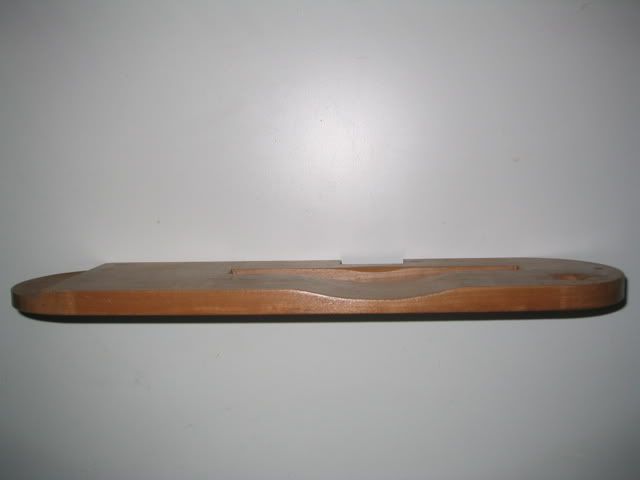
    -bottom view
    -a screw is used to hold the overlay from feeding along with the stock (locate it clear of stock)
    -remove riving knife, pin overlay down with a fat scrap, and plunge cut
    (thanks to team Swenson for paying full price on that lesson)
    -clamp a fence position restorer, because you need to slide the fence away to reinstall riving knife

    continued next post
    Attached Images Attached Images
    Last edited by Walt Caza; 07-31-2008 at 6:52 PM.
    There are no shortcuts to anywhere worth going! WCC

    Be who you are and say what you feel, because those who mind don't matter and those who matter don't mind - Dr. Seuss

    Crohn's takes guts. WCC

  2. #2
    Join Date
    Oct 2006
    Location
    Windsor, ON
    Posts
    657
    Blog Entries
    3

    True ZCI for tablesaw (continued)

    pics are:
    -overlay is held by 2 part retainer system--the bump screw and also magnet featherboard
    (I prefer not to clutter my outfeed path, such as with a clamp)
    -the stock is fed by sacrificial pushstick (an old one) and also a block of scrap keeps it to the fence
    -true zero clearance support, and no catches, such as onto or off insert
    -these are the 3/32" thin veneers I was after, nice and parallel by rip fence (no bandsaw marks)
    -the blank and 4 slip matched veneers. Blank is jointed after each slice, yielding one glue-ready side per sheet

    Added bonus, this strip of 1/8" hardboard was previously used to cut laminate
    for my barebones router table. It serves to keep the laminate from binding
    and catching underneath the ripfence.
    It will still serve that original purpose too...

    I was fine with the yield from my blanks, the thin kerf rip blade did not eat too much...
    It seems every time I try to do one thing in the shop, I have to solve another!
    Walt
    Attached Images Attached Images
    There are no shortcuts to anywhere worth going! WCC

    Be who you are and say what you feel, because those who mind don't matter and those who matter don't mind - Dr. Seuss

    Crohn's takes guts. WCC

  3. #3
    OK, what am I missing??
    You can't make the insert to fit flush to the table top?
    I've been thinking of getting a blank SS dado insert and making a better ZCI. I don't use the blade guard so the large opening in the back of the standard insert isn't needed.
    Last edited by Brian Penning; 07-31-2008 at 7:09 PM.

  4. #4
    Join Date
    Mar 2006
    Location
    SoCal
    Posts
    22,509
    Blog Entries
    1
    I agree with your definition of a ZCI Walt. I keep a half a dozen or so in play; one for each blade plus a couple for blades at 45* and of course a few for common dado settings. As they get a little "loose" I toss them and make a new one out of the many blanks I make whenever I need a new supply. I always say, if you're gonna set up to make one, make more!
    "A hen is only an egg's way of making another egg".


    – Samuel Butler

  5. #5
    Join Date
    Oct 2006
    Location
    Windsor, ON
    Posts
    657
    Blog Entries
    3

    Cool ZC overlay for the Tablesaw - revisited

    Hi Brian,
    Sorry for the late response, I just saw your comment now.
    Better late than never?

    I guess the reasons I went with the overlay were two-fold:
    -To make an actual flushed table insert would require more time and effort than my quick workaround.
    There are lots of spots that need to be relieved underneath the insert.
    The overlay took just 2 minutes, and can go back on even quicker.

    -A flush insert would not address the slight gap under the ripfence issue.
    The overlay allows a sharp bevelled point to be guided against the fence without danger of snagging and kickback.
    Which is why it also works great for sizing laminate along the fence.

    I have now used the overlay twice on my Morris chair...
    -to cut 3/32" leg veneers, to be dressed down to 1/16" thin after mounting
    -to cut the double bevelled seat cleats, to match the seat angle
    Unlike most things claimed to be such, this actually proved to be quick, cheap and easy!

    Yes, I can make a flush insert fit to the tabletop...
    I have yet to get around to playing with that...
    what little shop time I get, I prefer to build furniture as much as possible.
    If anyone has made a homemade SawStop table insert, I would like a peek at it!

    Thanks for your interest,
    see you in the sawdust,
    Walt

    ps Glenn B's idea makes sense...
    if you are gonna set-up to make one, make more!
    Last edited by Walt Caza; 11-09-2008 at 7:07 PM.
    There are no shortcuts to anywhere worth going! WCC

    Be who you are and say what you feel, because those who mind don't matter and those who matter don't mind - Dr. Seuss

    Crohn's takes guts. WCC

  6. #6
    Join Date
    Nov 2005
    Location
    Seabrook TX
    Posts
    475
    Quote Originally Posted by Walt Caza View Post
    Hi Brian,
    If anyone has made a homemade SawStop table insert, I would like a peek at it!
    No pictures yet. But I've made half dozen Sawstop ZCI using the walnut dado insert as a blank. The walnut insert does not have a slot for the riving knife, so it's easy to rout 1/2" BB to size. There were a couple of problems. First, the arbor is close to the table top and precludes using a 5/8" -3/4" ZCI without routing an internal groove. 1/2" BB or MDF worked better. Second, the ZCI is more stable if the riving knife groove doesn't go completely through the back side. Finally, the back set screws both support and lock the ZCI in place. I never found an adequate replacement for the headed set screws. Adding a side setscrew kept the ZCI from shifting ever so slightly.

    The current ZCI is the original SS insert covered with 1/16" thick veneer. 3M glue doesn't stick well to the plastic surface, so I'll try something else next time. But it was easy to attach a thin sheet that had holes drilled for the set screws instead of making a new ZCI from scratch. The new BB ZCI will be dedicated to different width dado blades.
    Last edited by David Giles; 11-10-2008 at 5:53 PM.

  7. #7
    Join Date
    Oct 2006
    Location
    Windsor, ON
    Posts
    657
    Blog Entries
    3

    Lightbulb SawStop ZC inserts

    Hi David,
    Thanks for sharing your experience and solutions with SS ZC inserts.
    I will factor in your ideas, when I get around to making a few.
    Now you have me curious about finding a source for those back hold-down screws.
    Maybe Sawstop would be willing to help us with that?

    Since I got my cabinet saw, I have wanted another screw as a back-up for the front of the table insert.
    It is a very specific screw, and I have had zero luck locating a source.
    It is not hard to picture dropping that screw down the saw throat,
    and stopping progress until you can find it again.
    Murphy would probably make that happen, when you are nearly finished
    doing something important, and maybe under time pressure too!

    I appreciate your reply,
    and would like to see pics if you can find the time...
    hope you get some shop time,
    Walt

    ps I have never made an issue of it, to seek resolution, but my SS walnut dado insert is less-than-flat.
    Thus, I see value in your suggestion of baltic birch plywd, or MDF.
    My guess is that the walnut insert is thought to be more readily machinable for the plungecut than some plastics.
    A friend asked me to cut some plastic sheeting, cannot recall if it was polycarbonate or acrylic...
    I just remembered dodging it, not wanting to risk gunking up my brake sensor works.
    Perhaps I erred towards caution on that one?
    There are no shortcuts to anywhere worth going! WCC

    Be who you are and say what you feel, because those who mind don't matter and those who matter don't mind - Dr. Seuss

    Crohn's takes guts. WCC

  8. #8
    I'm just curious, I have the Incra Miter Express. They describe it in their literature as partly being a good zero clearance insert. Anyone think this is accurate?

    I have not used it yet.

  9. #9
    Join Date
    Oct 2006
    Location
    Windsor, ON
    Posts
    657
    Blog Entries
    3

    if a blade cuts it own clearance...

    Hi Sean,
    I am not quite familiar with their miter express.
    If it is a version of what's commonly referred to as a sled...
    and the blade makes it's own path through the bed...
    then it could serve as an effective Zero Clearance stock support.

    The working principal is to support the neighbouring wood fibers as much as possible, in an effort to minimize tear-out.

    There are other benefits to ZC set-ups, such as filling gaps to prevent snags, or preventing small parts from dropping through the table.
    My favourite is that it can allow you to quickly cut to a pencil line, because
    you can see where the blade is going to cut.
    Pretty decent accuracy, if appropriate for application, and you are not going to use a 'stop' for repeated parts.
    Sometimes it is close enough, and quick to do. Plus you feel more involved, when using your eye.
    Stops work amazing for exact copies, but feel more robotic!

    Now, if you were to enlarge the kerf opening on a sled, say by making bevel cuts, you could quickly diminish the ZCI benefit.
    The tighter the clearance the better.

    hope you get some shop time,
    Walt

    ps what are you building next?
    There are no shortcuts to anywhere worth going! WCC

    Be who you are and say what you feel, because those who mind don't matter and those who matter don't mind - Dr. Seuss

    Crohn's takes guts. WCC

  10. #10
    Here's my dado plate that I made for the SS. I didn't want to spend the money for the factory one. Its made out of cherry sealed with poly.


  11. #11
    Join Date
    Oct 2006
    Location
    Windsor, ON
    Posts
    657
    Blog Entries
    3

    Thumbs up cherry table insert!

    Hi Mark,
    Nice job on the cherry SS zero clearance insert.
    I love the machine, but find the extra step of swapping brake cartridges to
    mount a dado and back, feels like a drag.
    I guess like most things, the benefits come with trade-offs.

    May I ask...how did you handle levelling for flush?
    Did you add set screws?
    I know many who use tape 'stacks'.

    How did you relieve for the arbour?
    Good job, sweet cherry, and thanks for showing us.
    Hope you get some shop time,
    Walt
    There are no shortcuts to anywhere worth going! WCC

    Be who you are and say what you feel, because those who mind don't matter and those who matter don't mind - Dr. Seuss

    Crohn's takes guts. WCC

Similar Threads

  1. Beginner guide to making a zero clearance insert
    By Derek Larson in forum General Woodworking and Power Tools
    Replies: 10
    Last Post: 04-17-2008, 1:00 PM
  2. Gotta get out of NJ - TN bound...?
    By Mitchell Andrus in forum Off Topic Forum
    Replies: 72
    Last Post: 04-15-2008, 6:08 PM
  3. G0490 Jointer - Initial Impression with PICS
    By John Hedges in forum General Woodworking and Power Tools
    Replies: 41
    Last Post: 02-13-2006, 11:52 AM
  4. Saw mills pics
    By Doug Jones in forum General Woodworking and Power Tools
    Replies: 0
    Last Post: 07-29-2003, 9:15 PM

Posting Permissions

  • You may not post new threads
  • You may not post replies
  • You may not post attachments
  • You may not edit your posts
  •