Page 23 of 46 FirstFirst ... 1319202122232425262733 ... LastLast
Results 331 to 345 of 676

Thread: The Great Morris Chair project

  1. #331
    Join Date
    Oct 2006
    Location
    Windsor, ON
    Posts
    657
    Blog Entries
    3

    Red face ...tumbleweeds

    Good Day to All Creekers,
    This thread has been quiet for a while.
    Life does not always go the way we planned.
    At any rate, I am aiming to resume building my chair...
    hopefully within the next two weeks.

    It seems that as a hobby woodworker, all the things that pop up in life,
    do so at the expense of shop time.
    I imagine many wish they could find more hours to play in the sawdust?

    I'm gonna blow the dust off of my half-chair next week.
    There are tumbleweeds blowing through my ghost-town, I mean, workshop.
    It's gonna be quite a trick to figure out what I was gonna do next?

    I did not see my long layover coming...
    but I kinda wish I had left myself a note.
    (Dear me: handtune the backrest tenons and do a dry test fit before glueing)

    Hope to see you in the sawdust,
    and soon!
    Walt

    ps Anyone building a Morris chair in progress?
    There are no shortcuts to anywhere worth going! WCC

    Be who you are and say what you feel, because those who mind don't matter and those who matter don't mind - Dr. Seuss

    Crohn's takes guts. WCC

  2. #332
    Join Date
    Oct 2006
    Location
    Windsor, ON
    Posts
    657
    Blog Entries
    3

    Question question for Luciano?

    Quote Originally Posted by Luciano Burtini View Post
    the way the chair is designed, the bottom ends of the back frame dig into my cushions a little bit. Either the sides should be shortened, the pivot raised or the seat dropped slightly to allow more clearance. This is not a big problem as the back does not pivot far and will seldom if ever be adjusted. In fact, I can probably remove the back and shorten the sides a little bit with my current chair as they extend well beyond the pivot point. Finally, I think I would consider making a brass pivot point and recline adjustment next time. While I like the look of the wood, I think it is a bit of a weak spot and the adjustment range is too coarse.
    Hi Luciano,
    I really appreciate the leather upholstery on your Morris chair.
    Gary Z. and Nathan C. have both finished a pair of chairs.
    However, neither have yet gone ahead with cushions.
    (come on boys, we wanna see'em!)

    So your sharing that the backrest is long enough from the pivot down,
    to interfere with your cushions is a bit of a revelation.

    Your 3 proposed solutions were:
    -shorten sides below the pivot point
    -raise the pivot point on the backrest
    -or drop the seat height

    Well, my backrest is already machined and mortise & tenoned,
    so I will not be shortening the backrest sides. (uprights)
    My seat frame is already done and mounted in place,
    so that's out, too.

    Which leaves me to modify the pivot point.
    My first thought is to leave the pivot point on the chair legs as per plans.
    But, lower the pivot point on the backrest sides, thus raising the entire
    backrest, relative to the pivot point.
    This leaves less backrest below the pivot point, reducing cushion interference.

    Clunky to describe, easier done than typed.
    Since I will be drilling all 4 of my backrest pivot points later this week,
    I would really appreciate any suggestions you are willing to offer.

    The big money question is:
    How much backrest to leave below the pivot point?

    The original plans call for a 5/8" diameter hole, bored not all the way through...
    with the center located 1.5" up from the bottom end of the backrest sides. (uprights)
    Note: the bottom backrest rail mortise starts at 3" up from the upright bottom, thus limiting shifting the pivot.

    The center of the 5/8" pivot holes on the legs are up 13.25" from the leg bottoms. (rear legs only... no oopsy)

    How much shift would relieve your cushion interference?
    The risk being to leave too little material below the pivot hole, thus weakening the crux of the assembly.
    What is the overall thickness of your whole seat cushion?
    Do you recall how thick your seat foam was on it's own?
    I just discovered how pricey good upholstery foam can be. eek

    Thanks for your input,
    Walt

    ps It has been mentioned earlier in this thread, that an alternative to the wooden pivot and adjustment pegs,(4 in total)
    would be to use wood for the visible portion, and embed metal rods for the unseen, and hard working portion.
    This allows smaller diameter adjustment holes, and more of them...
    offering finer adjustment.
    Last edited by Walt Caza; 06-29-2009 at 5:22 PM.
    There are no shortcuts to anywhere worth going! WCC

    Be who you are and say what you feel, because those who mind don't matter and those who matter don't mind - Dr. Seuss

    Crohn's takes guts. WCC

  3. #333
    Join Date
    Jul 2006
    Location
    Okanagan Valley, B.C.
    Posts
    107
    Quote Originally Posted by Walt Caza View Post
    Hi Luciano,
    I really appreciate the leather upholstery on your Morris chair.
    Gary Z. and Nathan C. have both finished a pair of chairs.
    However, neither have yet gone ahead with cushions.
    (come on boys, we wanna see'em!)
    Thanks Walt. I too am interested to see others finished chair

    Quote Originally Posted by Walt Caza View Post
    Your 3 proposed solutions were:
    -shorten sides below the pivot point
    -raise the pivot point on the backrest
    -or drop the seat height

    Well, my backrest is already machined and mortise & tenoned,
    so I will not be shortening the backrest sides. (uprights)
    My seat frame is already done and mounted in place,
    so that's out, too.

    Which leaves me to modify the pivot point.
    My first thought is to leave the pivot point on the chair legs as per plans.
    But, lower the pivot point on the backrest sides, thus raising the entire
    backrest, relative to the pivot point.
    This leaves less backrest below the pivot point, reducing cushion interference.

    Clunky to describe, easier done than typed.
    Since I will be drilling all 4 of my backrest pivot points later this week,
    I would really appreciate any suggestions you are willing to offer.

    The big money question is:
    How much backrest to leave below the pivot point?

    The original plans call for a 5/8" diameter hole, bored not all the way through...
    with the center located 1.5" up from the bottom end of the backrest sides. (uprights)
    Note: the bottom backrest rail mortise starts at 3" up from the upright bottom, thus limiting shifting the pivot.

    The center of the 5/8" pivot holes on the legs are up 13.25" from the leg bottoms. (rear legs only... no oopsy)

    How much shift would relieve your cushion interference?
    The risk being to leave too little material below the pivot hole, thus weakening the crux of the assembly.
    What is the overall thickness of your whole seat cushion?
    Do you recall how thick your seat foam was on it's own?
    I just discovered how pricey good upholstery foam can be. eek
    Lot's of questions.... Let's see.

    First off, I don't think the interference is critical and can probably be safely ignored. However, interference is interference and I would rather not see it at all. To eliminate it completely on my chair, the bottom of the back would have to be raised 1.5" - quite a lot.

    Possible solutions.
    Shorten the back extensions. The back protrudes 1.25" below the bottom of the pivot hole. This could be shortened between 0.25-0.5" without seriously affecting the strength.

    Raise the pivot. There is no real limit to how far this can be moved, other than it will affect the overall look of the chair.

    Shrink the cushions. I used 6" foam for the seat cushions. This could be reduced to 5" form which would all but eliminate the interference issues. Be careful, though. Going with thinner foam could raise issues at the front of the chair. You want foam deep enough to ensure that your legs do not compress the cushion enough to allow them to rest on the front cross member.

    Lower the back of the cushion frame. This is also possible, however, to lower the back of the frame, you would have to redesign some of the support. I already have the support at the bottom of the rear cross member. The upside of this change is that the cushion would have more slope, which I think may make it slightly more comfortable.

    Redesign the cushion to allow clearance at the back for the supports. This could be accomplished by shortening the cushion and keeping it pushed forward, or by allowing cutouts in the cushion for the supports to pivot through. Either solution is probably too much trouble to bother with.

    Probably the best option is some combination of the above.

    Quote Originally Posted by Walt Caza View Post
    ps It has been mentioned earlier in this thread, that an alternative to the wooden pivot and adjustment pegs,(4 in total)
    would be to use wood for the visible portion, and embed metal rods for the unseen, and hard working portion.
    This allows smaller diameter adjustment holes, and more of them...
    offering finer adjustment.
    I think if I do another chair, I will consider making a brass/steel mechanism which will allow more and finer adjustment.

    In any case, the chair is a really nice piece of furniture, although it is very large. This should be considered by those with smaller rooms. Also, this chair does not move when you bump into it with a toe or shin. Ask me how I know this!

    Hope this helps.....

    Come on Gary & Nathan, I would like to see your chairs as well....

  4. #334
    Join Date
    Nov 2007
    Location
    Milwaukee, WI
    Posts
    900
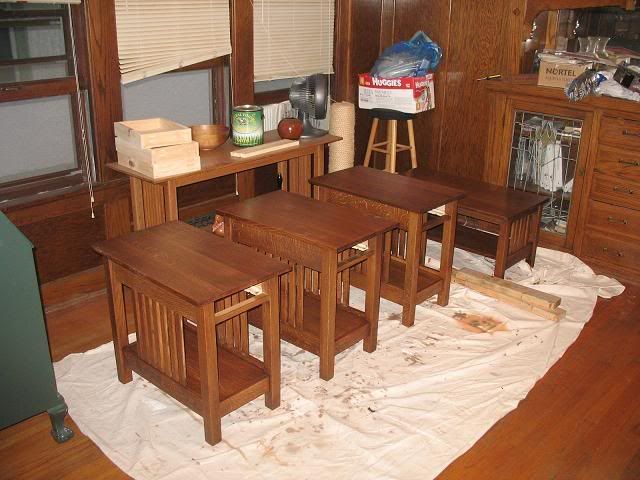
    Here is my Morris Chair and Ottoman (along with some other A&C pieces that I did for my lake home. Yes, I was using my dining room for finishing, doesn't everyone? ). Variation from the plans in Woodsmith IIRC. Had it done in some very nice black leather.


    I used a lock miter joint to make up the legs rather than using a veneer. Worked out well.


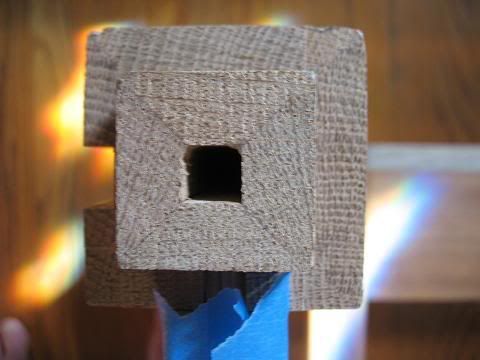
    Pinned my tenons with square pins. Just reduced some cut-offs to 1/2"x 1/2" on my Performax, and used the mortiser to "drill" the holes. Stained the pins black with india ink and sanded a pyramid end that stood proud. I think there is a pic in another thread but can't find the photo so here is one of my cat instead

  5. #335
    Join Date
    Oct 2006
    Location
    Windsor, ON
    Posts
    657
    Blog Entries
    3

    Wink tree fluff and stubbed toes...

    Quote Originally Posted by Luciano Burtini View Post
    Also, this chair does not move when you bump into it with a toe or shin. Ask me how I know this!

    Hope this helps.....

    Come on Gary & Nathan, I would like to see your chairs as well....
    Hi All,

    Hehehe,
    Ya, I suppose I have banged into my half-completed chair in the shop a
    couple times... it certainly did not move.
    Excellent tip there!
    Thanks for doing the research Luciano.
    What are you building next?

    Wow George,
    What a handsome pile of handcrafted A&C furniture.
    The place looks great decked out in QSW oak and black leather.

    You achieved a very pleasing colour.
    Any chance you wanna share your finish recipe with us?
    Nice shot of kitty!

    I have dusted off my half-chair, and resume my build tonight.
    I will post progress as soon as I make some...

    see you in the sawdust,
    Walt
    There are no shortcuts to anywhere worth going! WCC

    Be who you are and say what you feel, because those who mind don't matter and those who matter don't mind - Dr. Seuss

    Crohn's takes guts. WCC

  6. #336
    I just clicked through all the pages of this thread and I have to say it was very enjoyable watching the process and progress to the finish product. Even more interesting is the variations some folks made.

    I'd like to propose a second related thread where everyone posts pictures of just their finish product... no construction or status posts, just the finished chair (and related ottoman, side tables, etc).... maybe info that could be included could be the type of wood and finish used.

    Just a thought.
    fledgling weekend warrior

  7. #337
    Join Date
    Nov 2007
    Location
    Milwaukee, WI
    Posts
    900

    Wink

    Quote Originally Posted by Walt Caza View Post
    Wow George,
    What a handsome pile of handcrafted A&C furniture.
    The place looks great decked out in QSW oak and black leather.

    You achieved a very pleasing colour.
    Any chance you wanna share your finish recipe with us?
    What's colour? Here you go:

    http://www.sawmillcreek.org/showpost...25&postcount=4

    I got luck with the black leather, the upholster called and said he had one hide of an old school leather in black...much thicker then modern offerings...sitting around and he recommended it over the back that I picked out. Sent me a sample and I went with it. twice as thick. And dyed through and through. Amazingly plush and comfortable. While he was waiting for me to pick it up he had many offers from customer walk-ins to buy it.

    And as others have said, the chair doesn't move. Have had more then one shin incident with mine.

  8. #338
    Join Date
    Oct 2006
    Location
    Windsor, ON
    Posts
    657
    Blog Entries
    3

    Red face the backrest shuffle... (4 fresh pics)

    Good Day to the Creek,
    After a looong and unforseeable layoff, I finally dug out my half-built chair and dusted it off.
    Life is all the stuff that is happening to us, while we are making other plans.

    After discussing the fresh topic of backrest/cushion interference...
    I decided to go ahead with the backrest pivot holes as per the original plans.
    I did end up raising the hole for the pivot in the rear legs.
    That will provide some breathing room for the backrest, without altering it.
    I had already built my backrest taller than the plans, and did not wish
    to further stress the critical pivots.

    Aiming to match my backrest pivot holes on the backrest uprights, I made a 2 minute quickie flip jig.
    The end alignment block overhangs both sides, so that it can align both the left and right-hand uprights.
    By referencing both holes from the front corner of the uprights, marked with
    corner slashes to keep track of them, the pivot holes will match.
    Once again, yellow dots indicate the spots.

    Upon glue-up, my hand-tuned tenons gave panic resistance, and caught me
    playing beat-the-clock again. I barely got the joints closed tight,
    while the yellow glue was seizing on a hot day. tick... tick...
    Plenty of mallet, and plenty of clamps got her done. Whew

    More stressful than it needed to be...
    was it Tage Frid who famously quoted... "you gotta leave room for glue"?
    *Note to self: One of these days I outta buy and read his lessons.*

    My thanks to Luciano for raising the interference issue, and sharing his ideas on solving it.
    I found that high density, highest quality upholstery foam is very expensive.
    The 6 inch was much more money than the 5 inch.
    I bought the 5 inch foam, as advised by my upholsterer. (also some 1/2 inch, 1 inch foam, and polywrap batting)
    I am told it is common practice to glue layers of foam together to build up desired size.

    Bonus: My foam sandwich offers some flexibility in working toward overall thickness.
    (and thus another possible source of interference relief)

    I plan on hand sanding and staining my chair this week.....
    Although time has shown little interest in what I am planning.
    Thanks for looking,
    see you in the sawdust,
    Walt

    ps ya, I know that is alot of clamps... I like to use many, but gently!
    (no doubt a response to working so many years without good clamps)
    Attached Images Attached Images
    There are no shortcuts to anywhere worth going! WCC

    Be who you are and say what you feel, because those who mind don't matter and those who matter don't mind - Dr. Seuss

    Crohn's takes guts. WCC

  9. #339
    Join Date
    Oct 2006
    Location
    Windsor, ON
    Posts
    657
    Blog Entries
    3

    Wink chair starter kit...

    Good Day Morris fans,
    Well, I got some good shoptime and made some good progress.
    All the oak elements of my chair are handsanded and ready for oil stain.
    I'm gonna custom blend a colour on the fly, and have
    been thinking about darker oak with lighter cushions.(?!?)

    My upholsterer has been dazzling me with myriad samples of fabric, vinyl and leather.
    There are countless options in a rainbow of colours and patterns.
    Modern tall dollar vinyl approaches leather in feel, and rivals it in price.

    Having converted the Wood mag plans from groove and fillers to traditional
    mortise and tenons, I'd rather not feel I compromised on cushions.
    The obstacle for me is not knowing what I am gonna do with this chair.(?)
    Doubtful a good idea to bring fresh leather home to a pair of silly housecats? (with all their claws... eek)

    The group build has been enjoyable, even if I never intended to bring my chair home.
    After visiting my workshop back in Oct 2008, Creek moderator Glenn Clabo let that cat out of the bag here:
    http://www.sawmillcreek.org/showpost...5&postcount=11

    As it turns out, I did not build the chair for me, but rather was up for
    a shared adventure in the sawdust. I hope it was good for you too.
    Things did not always run straight and true, but they were always interesting.
    And like the Chinese say: may you live in interesting times...

    I hope to apply stain this weekend, and topcoat next weekend.
    Then I will just need to insert tab A into slot B, to near completion of my first chair build.

    pics are: backrest, pivots with brass screws, half-chair and seatframe

    I cannot wait to see the stain reveal the grain.
    Hope to see you in the sawdust,
    be well,
    Walt

    ps If you wanna see the photo that Glenn took of us together in my shop:
    http://www.sawmillcreek.org/showthre...=Creeker+Clabo
    (he's a bigtime camera buff... and figured out my unused timer instantly)
    Attached Images Attached Images
    Last edited by Walt Caza; 07-24-2009 at 11:37 AM. Reason: oops, hit return too soon
    There are no shortcuts to anywhere worth going! WCC

    Be who you are and say what you feel, because those who mind don't matter and those who matter don't mind - Dr. Seuss

    Crohn's takes guts. WCC

  10. #340
    Join Date
    Oct 2006
    Location
    Windsor, ON
    Posts
    657
    Blog Entries
    3

    Wink ...in living colour (more pics)

    Good Day All,
    After a long and winding road, I finally get to see my white oak
    grain highlighted by some colour.
    I poured three colours of oil stain into an old jar to make a custom blend.
    Wiping each version onto scrap guided me towards the next addition.
    It may not be an authentic Arts & Crafts finish...
    but I like the colour as it turned out.

    Many coats of wipe-on poly seal and protect on top.
    I used satin for all layers, knocking down nibs with a fine grey scotchbright pad.
    Oh, and I did use a tack cloth after 'sandings'.

    I gently drove the pivot dowels home, and secured them with 1.25 inch brass screws.
    The backrest pins will be turned on my fresh new first woodlathe.
    (although I will have to fake the skills to make them...)
    Quick clamps will hold the backrest upright until I rig the adjustment holes.

    Sitting in the chair reveals that the 'sweet spot' recline angle is very fussy.
    Too far back... feels a bit dizzy... like the dentist is filling your molar.
    Too upright... feels like the captain has ordered all traytables and seats returned to their landing positions.
    My guess is that once the backrest is dialed in, it will remain there for decades to come.

    It seems unlikely that a rider would get out of their chair, go around back and move the pegs, and then sit down to a nap?
    My bet is that the chair will stay in the upright sweetspot all the time.
    I will explore rigging a finer adjustment in an effort to find that ideal position, before I drill my arms for the backrest pegs.

    Keen eyes may notice that on the backrest I used wild slats, in a frame of quieter, but very straight grain.
    Trying to get better at choosing and using my hardwood.
    Next, I must cut the dense foam for the cushions on the bandsaw.
    I am still undecided on the upholstery. There are sooo many options.

    These pics were diminshed by rainclouds... sorry.
    It started raining, and I had to hoist the heavy chair with a helper back inside!
    I'm just glad to have gotten this far, and happy to have chair pics to share.

    Hope you get some shop time,
    and thanks for looking,
    Walt

    ps The seat rails are screwed and glued to the stretchers. (middle pic)
    I plugged the screw holes with contrasting walnut on a lark, in tribute to my lesson from Sarge.
    He called me out on it - in a prior project thread - and I improved.
    (it was the bottom of the cleats of my umbrella stand, which face the floor)
    He said we should not show screws in finished furniture-thanks Sarge!
    Attached Images Attached Images
    Last edited by Walt Caza; 07-31-2009 at 10:28 AM. Reason: gave a tip of the hat to John Thompson
    There are no shortcuts to anywhere worth going! WCC

    Be who you are and say what you feel, because those who mind don't matter and those who matter don't mind - Dr. Seuss

    Crohn's takes guts. WCC

  11. #341
    BEW-TEE-FULL work Walt! Nice to see it all coming to together.
    Glenn Clabo
    Michigan

  12. #342
    Join Date
    Mar 2007
    Location
    Stony Plain, Alberta
    Posts
    2,702
    Sweet looking chair Walt.
    Nice to see a plan come together. Even if it takes a long time.

    Lets hope it doesn't take us forever to get the leather done.
    My 2 have been in my shop for so long Geri has now changed her mind on the color of the leather for the cushions...

  13. #343
    Join Date
    Dec 2006
    Location
    Atlanta , Ga.
    Posts
    3,970
    Walt.. this thing is coming together nicely and don't worry about the time it takes. Not eveyone is retired (gloat) so other priorities have to come before the shop...

    You are quite close at the point of reaching the "promised land" and soon will pass through the gates of the "land of milk and honey".

    Regards...
    Sarge..

    Woodworkers' Guild of Georgia
    Laissez Les Bons Temps Rouler

  14. #344
    Join Date
    Apr 2009
    Location
    Manassas, Virginia
    Posts
    889
    Just AWSOME Walt!

    Very impressive! I hope mine comes out half as nice as yours! And I'm almost finished building my dream shop and the first project will be two of these guys. That eliminates fighting when I go to the big tablesaw in the sky!

    Now I have to figure out which one gets the Stubby

    Thanks for sharing!
    Harv

  15. #345
    Hi Everyone,Let me say I very much enjoy this thread. After reading this thread you all entice me to build myself one. I've never done anything like this before and this will be my 3rd project if I ever finish the 2nd project I started.
    Do you think I'm over my head as a newbie?
    Is there on set of plans bertter than another?

    TIA

    Richard

Similar Threads

  1. Spindle Captains chair
    By Tom Spallone in forum General Woodworking and Power Tools
    Replies: 3
    Last Post: 01-25-2007, 9:27 PM
  2. Chair information
    By John Timberlake in forum General Woodworking and Power Tools
    Replies: 1
    Last Post: 10-29-2006, 10:50 PM
  3. Lets improve this chair
    By Jeff Horton in forum Design Forum
    Replies: 4
    Last Post: 09-18-2006, 1:00 PM
  4. Chair for a secretary
    By Alfredo Rodriguez Garcia in forum Neanderthal Haven
    Replies: 6
    Last Post: 05-15-2006, 11:12 PM
  5. Mantle “Capper” Project Complete & Installed
    By Jim Becker in forum Woodworking Projects
    Replies: 32
    Last Post: 03-24-2005, 7:24 PM

Tags for this Thread

Posting Permissions

  • You may not post new threads
  • You may not post replies
  • You may not post attachments
  • You may not edit your posts
  •