Page 1 of 2 12 LastLast
Results 1 to 15 of 16

Thread: umbrella stand

  1. #1
    Join Date
    Oct 2006
    Location
    Windsor, ON
    Posts
    657
    Blog Entries
    3

    umbrella stand

    Good day to the Creek,
    With my latest shop time, I built an umbrella stand, for our recyling program.
    We had been accumulating waste paper in open bins, which were nasty in the house, and even worse outside...rain, snow and wind blown!
    We are now taking part in a pilot project using larger, lidded and wheeled bins. The trucks hoist'em with a hydraulic arm to spare the driver, as they get heavy.

    White oak, arts and crafts style, function over form.
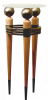
    It was the first time I played with 2pc legs, worked out alright, but kinda a frantic glue-up, and hard to get enough clamping both ways.
    I decided it would be easier to make up full frames and then cut the bevels.
    Each pair of legs and each pair of upper and lower stetchers were taken from the same board, all the way around.
    The 3 pairs of slats I resawed for bookmatch.
    I custom blended a few spashes of oil stain, less dark and less red than my last posted project.
    I did not pop the rays this time, but muted them unless in strong raking light. I find it fun to mix'em up, and mix it up!

    At least now there is no more eyesore in the back room, and the paper grocery bag filling up with recycle no longer falls over.
    This was fun to build, and is already put to good work in our home.
    It took me a weekend to design and dress stock, a pair of weekends to build, mostly waiting on glue-ups, and a fourth weekend to finish.
    Who the hell has a bunch of umbrellas anyway?!?

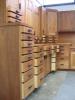
    pics are: slats, 4 frames, grain matches, mitered bottom and leg **more pics follow**
    Thanks for looking,
    Walt
    Attached Images Attached Images
    Last edited by Walt Caza; 06-03-2008 at 12:01 PM. Reason: added pics
    There are no shortcuts to anywhere worth going! WCC

    Be who you are and say what you feel, because those who mind don't matter and those who matter don't mind - Dr. Seuss

    Crohn's takes guts. WCC

  2. #2
    Join Date
    Oct 2006
    Location
    Windsor, ON
    Posts
    657
    Blog Entries
    3

    more umbrella stand pics

    More pics are:
    top view
    recycle bag view
    old bin vs new
    out to curb
    the Boogie man !! [they tell me that there is no back, so we'll call this my less-preferred face...]
    Attached Images Attached Images
    Last edited by Walt Caza; 06-03-2008 at 12:00 PM.
    There are no shortcuts to anywhere worth going! WCC

    Be who you are and say what you feel, because those who mind don't matter and those who matter don't mind - Dr. Seuss

    Crohn's takes guts. WCC

  3. #3
    Very nice work Walt. I had given up and just brought my recycle bin inside the house. It looks pretty ghetto, so I will probably build something like this in the near future.

    Very good job on the build. Flawless miters at every corner. Are they reinforced at all?

  4. #4
    Join Date
    Mar 2007
    Location
    Stony Plain, Alberta
    Posts
    2,702
    Walt

    From one mission guy to another, Sweet looking recycle/ umbrella bin...

    Excellent matching of the wood, and I love the design. I hope you don't mind if I steal the design and build one. How about a quick detail of the dimensions...

    Whats the next arts and crafts project? Maybe we should make a couple of morris chairs in QSWO.

    Great job again.

  5. #5
    Join Date
    Oct 2006
    Location
    Windsor, ON
    Posts
    657
    Blog Entries
    3

    Lightbulb still more pics:

    Now that's alot of pics for such a tiny project!
    Yes Jeremy, I did reinforce corners:
    Typically most biscuit joiners would do this with the fence set at 45 degrees.
    The PC557 joiner fence allows 45+90=135 degrees, for a nice positive locate. (had hoped that might come in handy some day)

    pics are:45 biscuit cutting, vs 135 biscuit cutting, biscuits on bevels, raw corner, and stained corner

    I feared that if all the corners were not tight and tidy, this project would be burnt toast. Execution went ok, but had I better planned for glue-up,
    I would have bought some white glue, as the open time on the yellow proved murder for this one.

    Ya, those bins are ghetto fabulous! Thanks for your kind words.

    Ahh...and what do we have here...upon completing a project, Mr.Zimmel shows up to ask me what is next! I love that...
    as evidenced ad nauseum right here...
    http://www.sawmillcreek.org/showthread.php?t=84840

    Gary the paper bags are about 12x7 x17"tall, so the 3/4" dressed stock
    dictated the dimensions. If you're just being kind, thanks.
    If you want specific dimensions I will gladly share them, and be both surprised and a tad flattered!
    Thanks for your kind words,
    Walt


    ps I am gathering skills, and not quite ready...but would love to build
    remote Morris chairs with you and any other Creekers together!
    See that...now this guy pulls another idea rabbit out of his hat...
    Attached Images Attached Images
    Last edited by Walt Caza; 06-03-2008 at 3:48 PM.
    There are no shortcuts to anywhere worth going! WCC

    Be who you are and say what you feel, because those who mind don't matter and those who matter don't mind - Dr. Seuss

    Crohn's takes guts. WCC

  6. #6
    Great design !!

    Some AWESOME patterns on that qswo !!!!

    Carl

  7. #7
    Join Date
    Dec 2006
    Location
    Atlanta , Ga.
    Posts
    3,970
    Next time around I would consider plugging the screw holes I saw in one of the pictures with a plug you make... or you can buy them already made. It would do more justice to your work not to allow the screw head to show. You could even contrast the color of a plug just for effect.

    Now... with that said which is a very minor thing as most probably wouldn't even notice or you could have done it on purpose to send a sub-limenal (however they spell it) message or somthing..

    Bottom line when I saw it was the great design for it's function.. choice of wood excellent.. execution of joints well done and the grain matching you did is nothing short of outstanding which all adds up to an outstanding piece of work.

    You should celebrate this piece by treating your wife and self to a trip to DisneyWorld in tribute to a job extremely well done.

    Start another project immediately while you are "on a high roll".

    Regards...

    Sarge..

  8. #8
    Join Date
    Jul 2003
    Location
    Wixom, MI
    Posts
    1,163
    Walt, that really is very nice!!!

    I generally am not a fan of a darker finish like that, but for some reason this one appeals to me a great deal. Can I ask what your finish schedule was? Did you use a dye, gel stain, or something else?

    Thanks!

    - Keith
    "Listen, here's the thing. If you can't spot the sucker in the first half hour at the table, then you ARE the sucker. "

  9. #9
    Join Date
    Mar 2003
    Location
    SE PA - Central Bucks County
    Posts
    65,933
    That's a kewel project, Walt! And the material is wonderful.
    --

    The most expensive tool is the one you buy "cheaply" and often...

  10. #10
    Join Date
    Aug 2005
    Location
    Northern New Jersey
    Posts
    1,958
    The grain pattern is pretty intense. It adds a lot of special character to the piece. Nice.
    -Jeff

  11. #11
    Nice work Walt...
    You invented a new style...
    TrashCraft
    Glenn Clabo
    Michigan

  12. #12
    Walt, the oak looks terrific. Can't beat the look of QS. Very handy project, unless you're from the Central Valley of California. I think we've had 4" of rain in the last two years

  13. #13
    Join Date
    Aug 2007
    Location
    Greenville, SC
    Posts
    750
    Great looking umbrella stand, that turned out awesome. I think this would be a perfect accessory to my morris chair!

    What about using a lock miter joint in the corners instead of the biscuits?

    I will have to look back through my Stickley catalogs, I know I some waste baskets in there, is that what you modeled it after?

  14. #14
    Join Date
    May 2004
    Location
    Tyler, Texas
    Posts
    2,041
    That's a neat project, Walt and very well executed. For not trying to "pop" the grain on that QSWO, the ray flecks really show up well. I really like that finish. Thanks for sharing it with us.
    Cody


    Logmaster LM-1 sawmill, 30 hp Kioti tractor w/ FEL, Stihl 290 chainsaw, 300 bf cap. Solar Kiln

  15. #15
    Join Date
    Mar 2006
    Location
    SoCal
    Posts
    22,514
    Blog Entries
    1
    The Boogie Man scared me. I use some sort of decorative basket for my dry recyclables and have always felt it was kinda "girly" for a guy's house. I may hae to steal your idea. Great looking piece. Thanks, as usual, for sharing.
    "A hen is only an egg's way of making another egg".


    – Samuel Butler

Similar Threads

  1. Flip Top Tool Stand
    By Dominic Greco in forum General Woodworking and Power Tools
    Replies: 21
    Last Post: 12-12-2013, 11:14 PM
  2. Looking for cello stand plans.
    By Mike Monroe in forum Design Forum
    Replies: 2
    Last Post: 05-28-2008, 6:33 PM
  3. Ridgid R4330 / Stand Gloat !!!!!
    By Bill Huber in forum General Woodworking and Power Tools
    Replies: 18
    Last Post: 01-10-2008, 8:29 PM
  4. Oneida Pro 2000 Stand
    By Aaron Beaver in forum General Woodworking and Power Tools
    Replies: 1
    Last Post: 08-05-2006, 11:33 AM
  5. Grizzly Cyclone Review - The Stand
    By Bob Borzelleri in forum General Woodworking and Power Tools
    Replies: 6
    Last Post: 06-05-2005, 1:29 AM

Posting Permissions

  • You may not post new threads
  • You may not post replies
  • You may not post attachments
  • You may not edit your posts
  •