Page 2 of 2 FirstFirst 12
Results 16 to 29 of 29

Thread: Another handcut DT question

  1. #16
    Join Date
    Feb 2004
    Location
    Perth, Australia
    Posts
    9,497
    Assuming you wish to remove the waste exactly (i.e. go from saw cut to saw cut).....

    If you mark a pin from a tail with a pencil, then you must remove all the pencil line since it lies in the waste.

    This assume that there will be no compression in the wood, such as joining two hardwoods. If, for example, you join a hard- and a softwood, then you could leave a tad of pencil line.

    A knifed line is far more exact than a pencil line. If you knife the pins from the tails, then you aim to saw up against the resulting thin line.

    Knifing the lines ....


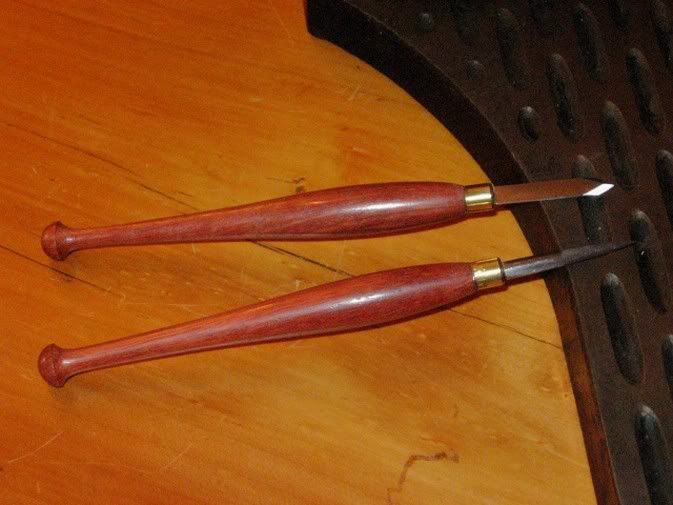
    My ideal dovetail marking knife has a thin double bevelled blade. I mark all the sides in one direction, then flip the knife and do the other side.

    The blade of this knife must be thin to fit into the narrow gap of skinny dovetails.

    The knives I make are very similar to those made by others, such as

    Dave Anderson (Chester Toolworks) http://www.chestertoolworks.com/index.htm

    and Dave Jeske (Blue Spruce) http://www.bluesprucetoolworks.com/tools/toolstore.htm

    Here are my favourites:


    Here are the completed dovetails from the above example ..


    Regards from Perth

    Derek

  2. #17
    Join Date
    Nov 2007
    Location
    Sioux City, IA
    Posts
    804
    Blog Entries
    3
    Your explanation indicates a tails first approach and I'm just the opposite. Therefore, I want to leave the line since its actually on the part I want to save. I cut to the waste side of the line. In fact, I still make a scribble on the waste areas when removing the template (pins) just to be sure. Nice looking joints btw -

  3. #18
    Join Date
    Jan 2005
    Location
    Waterford, MI
    Posts
    4,673
    The pencil marking (using a 0.5mm pencil) was just insurance in case I missed getting a knife line somewhere as I traced the pins. I didn't end up needing it as I managed to get a knife line all the way around them. But it turns out that I'm having to take the knife line anyway. I think due to the tight space, a handled knife that couldn't be laid flat against the pin sides, and the double bevel, that I ended up with the knife line in the crease instead of EXACTLY even with the edges of the pin. I'm still working on my practice one. Still needs more chisel work to get the socket walls squared up. I've got about 7/16" (of a 1-7/8" thickness) going on nice and snug with no gaps then it stops. The fun part is that my knife lines are on the non-show side. No layout lines for paring from the good side. So I'm taking it slow sneaking up on the fit. In the meantime, the LV chisels I got last fall are getting their first serious workout (not much call for them on a DC installation). They're so much nicer than my Marples ones, although I need to take care of glueing the handles on so they stay, and take a buffing wheel or something to smooth out the sharp edges on the back edges. Got loads of little paper-cut type slices from them plus the little purpleheart (porcupine wood) splinters. I'll post a pic once I get the practice one in place.
    Use the fence Luke

  4. #19
    Join Date
    Jan 2005
    Location
    Waterford, MI
    Posts
    4,673
    OK. Here's the first stab at this. No gaps anywhere but I'm going to have to do my best to lay out a knife line on the show side so's I can pare from that side too. Got some tearout that I'm sure I can do better on the next one.
    DTTry107b.jpgDTTry104b.jpg
    Use the fence Luke

  5. #20
    Doug,

    Looks good.

    You definitely want to be doing your paring from the show side. Why are you paring from the other side--are you concerned about having a scribe line showing on the finished work? If so, this can be handled in a coupla ways. The most direct is to gauge the scribe line only where you'll be paring--at the bottom of where the socket will be--and not across the tails themselves.

    Incidentally, the main cause of tearout of the kind you're showing is where the backing is getting chewed up, and the chisel is exiting the tails board into thin air. If you will keep moving your backing plywood underneath the tails board, so that the socket always has sound backing, then you should not be getting tearout. If you are, the chisel is not sharp.

    You're doing well.

    Wiley

  6. #21
    Join Date
    Jan 2005
    Location
    Waterford, MI
    Posts
    4,673
    It's just that the pins already exist. Didn't want to try and deal with cutting those by hand after they were glued onto the benchtop. So I cut those on the bandsaw and left the shoulders about 1/4" long then trimmed them up to the top after they were glued on. So now the only way to get the sockets sized to match is to clamp the piece across the pins and mark them which means marking on the hidden side. I'll have to take some careful measurements from that and get a line knifed on the good side to avoid the tearout issue.
    Use the fence Luke

  7. #22
    Doug,

    Sorry, I've been confused. Living in a 'tails first'-centric world.

    Hopefully someone who goes pins first can help here, but I'm under the impression that the typical way that the pin pattern is transferred to the tails is direct--you put the tails board down flat on the bench, then clamp the pins board down onto it at right angles, using long clamps, then trace the pin trapezoid directly onto the tails board. Maybe I dreamed that, but thought I saw it done in FWW a few years back.

    Wiley....having a head-slapping do-h-h-h moment

  8. #23
    Join Date
    Jan 2005
    Location
    Waterford, MI
    Posts
    4,673
    OK - yet another question. Made another practice piece that came out a skosh better, then dove in and did the real one. It's looking good from a gap standpoint, and I got one very minor tearout that will sand or plane out. But I got to thinking about the snugness of the fit and whether I should loosen this up a bit for glue. Right now I can seat the piece about halfway by smacking it with the heel of my hand. After that it's light/moderate tapping with a medium dead blow mallet, alternating from side to side. I'm using epoxy to glue this on which wont swell the wood like PVA but I'm wondering once the pieces have a coat of glue whether I'm going to have trouble getting these together. Think I should keep shaving here and there until I can smack the thing completely home by hand?
    Use the fence Luke

  9. #24
    Join Date
    Mar 2007
    Location
    Central Vermont
    Posts
    1,081
    They should fit pretty easily dry, you should only need light taps from a deadblow. You can always go in and undercut (slightly hollow) any tight spots that are not visible. If they fit properly you should be able to assemble them with yellow glue with no problems.

    I cut mine tails first, and then scribe the pins. With this method layout the tails, cut them, and pare them so they are 90 degrees across with a flat face. Then cut the pins and pare them so they are 90 degrees across from the refrence face (scribe line) and they should fit very nicely.

    I use a Lie Neilson dovetail saw, but for smaller dovetails I have been using a $10.00 model makers razor saw. The razor saws are about 25tpi with rip teeth, cut on the pull stroke and leave a really smooth cut and have a kerf thinner than that of a Japanese pull saw.

    If your dovetails are perfect you are probaly entitled to an honorary degree from the College of the Redwoods.

    If they are not don't be afraid to cover your tracks, as it is all part of the process. You can go in with a backsaw and cut a kerf nd fill it with veneer. fill larger gaps with wedges, and fill the slightest gaps with sawdust and yellow glue, or ca glue.

  10. #25
    Join Date
    Jan 2005
    Location
    Waterford, MI
    Posts
    4,673
    I think under normal circumstances I would have done the Tails-First approach. I had serious doubts on trying to do the pins by hand after the long edging was glued on though. No way to really hold this monstrously heavy top in a position I'd feel confident I could saw a straight line from. I'd have been in a kneeling position with my head angled over. Sounded too much like a recipe for a cut that was anything but straight. So I did them on the BS before attaching them to the top and left the shoulders long for trimming up after gluing. So I'm stuck with marking the sockets from the pins.
    Use the fence Luke

  11. #26
    Doug,

    It's good right now. Don't loosen the joint. Maybe it's too late, but I suggest you not use epoxy. Use PVA. Reason: cleaning up PVA squeeze-out is tough, but doable; trying to clean up epoxy squeeze-out would be impossible (for me at least!). Incidentally, this is why hide glue is so good for dovetails--easy cleanup and doesn't mess up the finish.

    Not to worry about the fibers expanding from PVA--it'll just have that growed-together look. And

    I think you have it set up perfect. The glue will not interfere with the joint going together. It has a slight lubricating effect when first applied; just don't give it three minutes to start setting up. Even then, a sharp mallet blow will break it loose.

    Wiley

  12. #27
    Join Date
    Jan 2005
    Location
    Waterford, MI
    Posts
    4,673
    Wiley
    Thanks but you're too late. At least for the 2 long sides that are already on. Actually the epoxy squeeze doesn't seem to be any worse than PVA squeeze out. It's more brittle but actually seems to come off easier without tearing wood fibers along with it. Nothing that cant be popped off with a sharp chisel anyway. I'll post pics after I get this end done and trimmed up. Then I need to lather/rinse/repeat for the other end which is also the back jaw for the twinscrew vise.
    Use the fence Luke

  13. #28
    Join Date
    Feb 2003
    Location
    Austin, TX
    Posts
    1,572
    I wouldn't recommend epoxy, but of course it will work. As to positioning the work piece so you stand a chance of sawing in some controlled manner, you can alway put the piece with the edge to be dovetailed hanging over the top of your main bench. Then to saw the dovetails, kneel down so your head's more or less level with the piece. In this position you can saw with no problems if you're using a pull saw. One more reason to love Japanese saws.

    Pam

  14. #29
    Join Date
    Jan 2005
    Location
    Waterford, MI
    Posts
    4,673
    Well they aint perfect but they'll do. There was another thread about not dry-fitting DT's as the fit was never as good as the first time. Here's proof. Unfortunately I discovered about a 6" gap on the end of the bench when I first clamped this on. I could hold a flashlight underneath and see about 2 paper thicknesses of gap near the center. So in the process of planing, chiseling, rasping, and sanding on the end of the bench and DT shoulders and dry fitting about a dozen times to check that gap, I ended up with a few minor gaps on the shoulders and face. I'll have to see if I can tuck some veneer into them or if not, some epoxy and purpleheart dust. Still have a bit more scraping and sanding to do but I'm moving on to the other end for now.
    Although I like the longer epoxy open time, I didn't really need it for this. But the other plus is that you can add enough thickener so that it doesn't try to drip off a vertical surface while you're getting the piece tapped on and clamped. I know there's the thicker PVA for moldings but I already had the epoxy, so just used that.

    Back Left corner - gaps on shoulders
    BackLeftDT02.jpgBackLeftDT04.jpg

    Front Left corner - gaps on face
    FrontLeftDT02.jpgFrontLeftDT04.jpg
    Use the fence Luke

Similar Threads

  1. Lurker peering thru the door with a rail and stile question? (Long)
    By Chris Wilson in forum General Woodworking and Power Tools
    Replies: 10
    Last Post: 03-13-2007, 5:20 PM
  2. Newbie question about my band saw
    By Tim Solley in forum General Woodworking and Power Tools
    Replies: 4
    Last Post: 04-20-2006, 2:45 PM
  3. Shop moving question?
    By Alan Tolchinsky in forum General Woodworking and Power Tools
    Replies: 20
    Last Post: 02-13-2006, 9:31 AM
  4. HI - New to this forum - got a question 'bout lathes
    By Matthew Dworman in forum General Woodworking and Power Tools
    Replies: 14
    Last Post: 06-01-2004, 10:38 PM
  5. A Different Question re: Old vs. New Planes
    By Lewis Lamb in forum Neanderthal Haven
    Replies: 3
    Last Post: 01-28-2004, 6:41 AM

Tags for this Thread

Posting Permissions

  • You may not post new threads
  • You may not post replies
  • You may not post attachments
  • You may not edit your posts
  •