Page 3 of 4 FirstFirst 1234 LastLast
Results 31 to 45 of 50

Thread: PROJECT: Tabletop Shuffleboard Game

  1. #31
    Join Date
    Jul 2003
    Location
    Wixom, MI
    Posts
    1,163
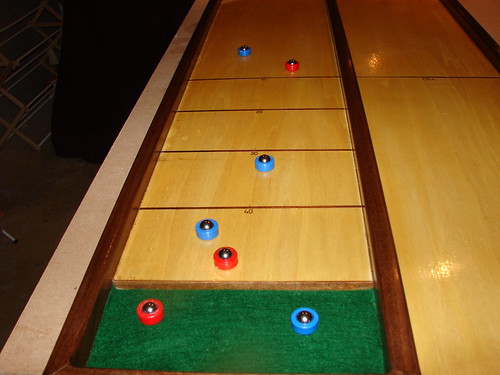
    Yeah, the pucks may be another issue. I'm reeeeeeeally hoping that after I get the surface buffed out and then waxed, they slide a little easier. Right now, they are sorta bouncing after they hit the rubber bands. I think it also had something to do with the width and tension on the rubber bands themselves. I'll get all of that worked out this weekend.

    - Keith
    "Listen, here's the thing. If you can't spot the sucker in the first half hour at the table, then you ARE the sucker. "

  2. #32
    Join Date
    Dec 2004
    Location
    St. Louis
    Posts
    3,349
    Cool, Keith. I saw that in a catalog somewhere and have been thinking about it. Still have to finish this year's Christmas presents tho.
    Where did I put that tape measure...

  3. #33

    Keep Us Posted

    Quote Originally Posted by Keith Starosta View Post
    Straight-up 90 degrees. I put together a scaled-down mock-up using this angle, and the pucks bounced clean and true. Sure wish I woulda done that in the first place. Oh well, live and learn.....

    - Keith
    I've been following this thread with interest, and have added it as a 2008 project.....please post pictures of your 2nd round, as well as critique the game play / "slideabillity" of the pucks.

    Merry Christmas-

    Michael

  4. #34
    Join Date
    Oct 2007
    Location
    St Marys, West Virginia
    Posts
    597
    Quote Originally Posted by michael gallagher View Post
    I've been following this thread with interest, and have added it as a 2008 project.....please post pictures of your 2nd round, as well as critique the game play / "slideabillity" of the pucks.

    Merry Christmas-

    Michael
    I am watching it too. I think its great Keith is doing all the legwork for us.

    Go Keith!!!!!
    One good turn deserves another

  5. #35
    Join Date
    Dec 2006
    Location
    Tucson
    Posts
    5,001
    Blog Entries
    1
    That's great! Not only can you play it with your son but you can pass it on to him some day and him to his kids. The butterfly effect Nice going.
    What you listen to is your business....what you hear is ours.

  6. #36
    Join Date
    Jul 2003
    Location
    Wixom, MI
    Posts
    1,163
    Thanks guys, for all the kind words!!!

    I'm having to force myself to stay away from the board, and just let it harden and rest after applying the Rock Hard. I've got all of my high-grit paper just sitting on the bench ready to go.

    There are two things that I'm hoping to accomplish after the finishing process. The first is to put together a detailed SketchUp drawing for all to use. The second is to make a short video of the "playability" and post it to YouTube for all to see. Hopefully it works......

    -Keith
    "Listen, here's the thing. If you can't spot the sucker in the first half hour at the table, then you ARE the sucker. "

  7. #37
    Join Date
    Sep 2004
    Location
    Atlanta, GA
    Posts
    129
    Keith-
    Awesome. In fact I had already started (barely) a SU drawing of it, but I'll save a lot of guesswork and wait for yours!

  8. #38
    Join Date
    Dec 2005
    Location
    Pennsylvania
    Posts
    896
    Just wanted to pop in to say that this is an awesome project. I NEED to make one of these. Can't wait to see the finished product.

    "If you lend someone $20 and never see that person again, it was probably a wise investment."

  9. #39
    Join Date
    Jul 2003
    Location
    Wixom, MI
    Posts
    1,163

    SketchUp Info

    UPDATE: December 21, 2007

    ---------------------------------------

    Howdy, Folks!! I took some time last night to put together a rough SketchUp drawing of the Tabletop Shuffleboard. Here are some snaps from that drawing...


    Here are the overall dimensions of the board. I forgot to place the dimension of the center rail. It is 36 3/4"L x 1"H x 3/4"W. It is centered in the board, placed in a groove that was routed 3/8" deep. It is butted up to the trim at the foot of the board.


    Spacing out the placing of the inlays took a little trial and error. I finally got it set the way I liked it...based on nothing more than what I thought looked appropriate.


    The gutter was hogged out using a 1/2" straight bit in my hand-held router. I will ulimately use 3M spray adhesive to apply a piece of green felt.


    The notches cut into the walnut trim were nibbled away one pass at a time, using my shaky miter guage on the table saw. The dowels are centered in the notch.


    If anybody has has any questions about anything, please don't hesitate to ask. I'm really looking forward to starting the rubbing-out process this weekend. Wish me luck...

    - Keith
    "Listen, here's the thing. If you can't spot the sucker in the first half hour at the table, then you ARE the sucker. "

  10. #40
    Join Date
    Sep 2004
    Location
    Atlanta, GA
    Posts
    129
    Excellent! A couple questions- can you share the SU file and what size rubber bands are you using?

  11. #41
    Join Date
    Jul 2003
    Location
    Wixom, MI
    Posts
    1,163
    Charlie,
    I have not yet picked up the rubber bands that I am going to use. From the initial rough testing I've done, I've determined that they are going to have to be wiiiide and short. The more tension, the better.

    As far as the .skp file, I've uploaded it, but keep in mind, I cobbled this together pretty quickly just to get dimensions down on paper. Some of the construction techniques I actually used are not entirely shown in SketchUp. It should be easy enough to "fix", if you need to.

    Enjoy!

    - Keith
    Attached Files Attached Files
    "Listen, here's the thing. If you can't spot the sucker in the first half hour at the table, then you ARE the sucker. "

  12. #42
    Join Date
    Jul 2003
    Location
    Wixom, MI
    Posts
    1,163

    Finished!!!

    ************************
    Update: December 23, 2007
    ************************

    Well, I've got this thing about as done as I can get it.....without screwing it up, anyway.

    Here are some pictures of the final product. My photography skills are...well, they're not good. Suffice it to say that the board looks a bit better in person.

    After letting it sit for about 10 days after applying the Rock Hard, I rubbed it out using successive grits of 400, 600, 800, and 1200. Having never used paper with grits that high, I wasn't exactly sure what to expect. Halfway through 800, I was getting pretty concerned that I had done something wrong, because I wasn't seeing any discernable difference in the surface. But after I finished with the 1200, and then rubbed it out with a gray Scotch Brite pad, I was happy to see and feel that I had a very smooth, satiny surface. I applied three coats of Johnson's Paste Wax, which brought it too a satin finish...which is what I was hoping for. I have to admit, there is a bit of orange peel throughout the board, which sorta sucks. But my wife gave me the slap to the back of the head, and said that it looked awesome...which was good enough for me!!

    Anyway, Here are some pictures...


    ....


    ...


    ...


    ...


    And, as promised, I made a short YouTube video of the "playability" of the game itself. I think it came out pretty well...

    http://www.youtube.com/watch?v=KxY2z_xDsO8


    Please let me know what you think. I've got a couple more of these to make now, so If I can make improvements, all the better!

    Merry Christmas to everyone!!

    - Keith
    "Listen, here's the thing. If you can't spot the sucker in the first half hour at the table, then you ARE the sucker. "

  13. #43
    Join Date
    Mar 2003
    Location
    SE PA - Central Bucks County
    Posts
    65,885
    OUTSTANDING job, Keith!!!!
    --

    The most expensive tool is the one you buy "cheaply" and often...

  14. #44
    Keith
    great job, your son is going to have a blast playing with the game.

  15. #45
    Join Date
    Jul 2003
    Location
    Wixom, MI
    Posts
    1,163
    Thanks, guys!! My wife and I have already broken it in with a few games. I'm better than her.

    - Keith
    "Listen, here's the thing. If you can't spot the sucker in the first half hour at the table, then you ARE the sucker. "

Similar Threads

  1. 1st real project complete! (Cherry Bed)
    By Bob Jones in forum Neanderthal Haven
    Replies: 18
    Last Post: 09-26-2007, 12:51 PM
  2. 3/4" project...S2S to 25/32....I'm confused!
    By Barry Londrigan in forum General Woodworking and Power Tools
    Replies: 10
    Last Post: 04-24-2005, 10:36 PM
  3. Mantle “Capper” Project Complete & Installed
    By Jim Becker in forum Woodworking Projects
    Replies: 32
    Last Post: 03-24-2005, 7:24 PM
  4. Weekend project almost done!
    By david shyong in forum General Woodworking and Power Tools
    Replies: 1
    Last Post: 10-28-2003, 7:40 PM

Posting Permissions

  • You may not post new threads
  • You may not post replies
  • You may not post attachments
  • You may not edit your posts
  •