Page 1 of 2 12 LastLast
Results 1 to 15 of 20

Thread: The Making of a 12" x 4' staved column

  1. #1
    Join Date
    Nov 2005
    Location
    NY
    Posts
    1,238

    Post The Making of a 12" x 4' staved column

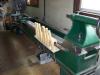
    Started a small column column today it is a 13" x 49" staved column. The wood is soft maple . I began with a layout for the stave's , there are 18 ~ 2-1/4" x 49" stave's all cut at 10 degrees and formed the usual perfectly round barrel. I devised a set up platform between the centers to glue all the stave's together- work's beautifully! I first had to plane both sides -( I only buy rough cut lumber) then cut the lengths on dbl compound miter saw with a jig for the lengths. the next step was running it through the PMTS at 10 degree bevel. then I laid out the stave's in the order I wanted them for appearance and numbered them. Next step was to set them in the column jig that I made to accept any staved column from 4" all the way up to 14" and can run an 8' length. Started with #1 and worked all the way to the last #18 stave. gluing each face , with plenty of glue- you want it to oohs out when banded. Once I had everything together I put my 3 straps around the column and tightened that puppy write up- worked like a charm. Sometimes I have to use more, but the cuts on the stave's come out so good and true that every face bonds flush to the next. It's sitting in my shop - all alone drying. I'll be turning that Friday and have some updates for all you folks that take an interest in architectural columns.
    More updates soon. these are not in order- sorry.
    Brian
    Attached Images Attached Images
    Last edited by Brian Weick; 09-27-2007 at 1:16 AM.

  2. #2
    Join Date
    Nov 2005
    Location
    NY
    Posts
    1,238

    Post More Pictures

    Some more Pictures: they are not in order of operation.
    Attached Images Attached Images
    Last edited by Brian Weick; 09-27-2007 at 1:15 AM.

  3. #3
    Join Date
    Nov 2006
    Location
    Tallahassee FL USA
    Posts
    291
    Nice operation, Brian. Nifty "outfeed table" for the TS. And that's one heck of an index wheel.

    Question, though: For different sizes of the assembly jig, do you use separate disks and bands for size increments? I don't see how something like that could be continuously adjustable. I guess the disks have to be sacrificial for end mounting. Please clarify.

    Joe

  4. #4
    Join Date
    Nov 2005
    Location
    NY
    Posts
    1,238

    Post Lathe Column Jig Question Reply

    Hi Joe,
    Regarding your jig question: After I cut the stave's , arrange them in the order I want ,I put them together standing up on the floor (dry) to check the stave's joints (that's the picture of the column standing on my bench) . I then tighten the column with my ratchet straps. Now , in this instance I have a 13" diameter column I then take a piece of cardboard to use as my template for the end cap. I form a fold in the cardboard in half, put the cardboard on the top , tacking 1/2 the cardboard on the end , I mark the #stave corresponding to the cardboard template so I know exactly how it is to be assembled . The flap is so I create an access flap for tracing the inside. I trace that part that is tacked down then put the fold flap down on the other half to cover the end cap, tack that down ,finish numbering that half , remove the other tacks from the half I just traced, then flip it up and finish tracing the other half. Now I have an exact end cap plug for fastening to my 14" headstock plate. I do the same for the other end (the tail stock end). After I get the shapes for both ends form the cardboard templates I cut the cardboard using a mat knife and label them on the cardboard and the column ends , headstock end/tail stock end. I will then cut the ends from the templates using 3/4" stock, label them (which end and stave numbers) check the fit on both ends for a snug fit.
    I then dismantle the column stave's and move over to the jig's on the lathe, set that up for the length. The metal band on the turning plate is removable ( it is not a waisted plate- there are mounting ports in the plate ) and the jig on the the tail stock has banding permanently fastened with an opening at the top of 6" to drop the stave's through as I put them together. I put the # 18 stave in first on the bottom resting on the metal ring ban , then fasten a temporary 3/8" screw through the metal ban and into each end of #18, then flip so it's resting on the bottom again. Next step is to glue # 17 and #16 (just one edge at a time)- . Now is when I fasten the templates I cut out in their respective ends with 2 screws on each end plate (temporary hold). the inside face of the stave's where it fastens to the end plates are glued as well. that whole lathe column jig assembly rotates so I just keep putting stave's in 1 at a time , the stave's will start to move away from the metal ban because it is a 14 1/2" diameter - so I use 1 ratchet strap (in the unlocked position) ( 6-8" from the headstock end to keep the stave's close to the end plate and snug,otherwise they may fall off. I slide each of the remaining stave's ( in order) one at a time until it's closed with the last one. then I put the other remaining ratcheting straps on , and draw the straps extremely tight. I then remove the temporary end cap plate screws and the #18 stave 1/4' temporary hold screws and remove the column, then I clean up any glue that I may have missed and leave to dry for turning 24 hrs later. When its ready to turn I create cross hair lines on each end plate (using the stave corners) to locate the center and drill my pilot wholes on each end ( 1/8" bit). when it comes time to mount it to the headstock plate I put the live spur from the tail stock in the headstock spindle (that protrudes out 1") with the face plate still attached, and the column jig in the tail stock end .I mount the column on to each center point- snug using the quill on the tail stock. Now I back of the 14-1/2" plate until it meets the column end cap - fasten my mounting screws to the headstock end cap , back off the quill on the tail stock and remove the column with the plate. I then remove the live spur and reinstall the column between the centers with the headstock hub attached,I move the quill in snug, lock it down and I am ready to turn. I didn't take pictures of that at the time- I get to wrapped up in what I am doing and forget sometimes to take some pictures - the next column I do I will make sure to snap those shots and put them up. there is a lot of work in creating these columns but I do believe i have saved time and it is a much better assembly.
    I have cut my time down significantly by gluing my columns this way on my jig and it is so clean and less of a glue mess all over the place. I used to do them standing up - what a mess and a PITA ! I will have more updates as I state in my earlier thread.
    I hope this answered your question Joe,
    Brian
    Last edited by Brian Weick; 09-27-2007 at 11:25 PM. Reason: typo

  5. #5
    Join Date
    Nov 2006
    Location
    Western Michigan
    Posts
    195

    Wow!

    That's quite an operation you've got going there -- can't wait to see the end result!

  6. #6
    Join Date
    Nov 2005
    Location
    NY
    Posts
    1,238

    Post Finished the column today!

    UPDATE: Here are the pictures: It is a stop fluted column ~ split- I am using this as a door front for 2 side by side cabinets going along a massive walk in shower. there will be hand carved cherubs- being used as a plinth then a capital top ~ I'll explain that when I get into it. I did not glue the end cap on this one , that is actually part of the cabinet design as well that I have for this- again- that will be explained later in this project. the flutes where shaped in the middle of each stave~ I only used 4/4 for this so the joints are 9/16" thick , so you can't go 1/4" into this seam ~ it will weaken this area as it is going to be a hinged column faced door , as I stated before
    Brian
    Attached Images Attached Images
    Last edited by Brian Weick; 09-27-2007 at 11:19 PM. Reason: missing information

  7. #7
    Join Date
    Nov 2005
    Location
    NY
    Posts
    1,238

    Post More Pictures

    Splitting the column:
    Attached Images Attached Images

  8. #8
    Join Date
    Feb 2003
    Location
    Hayes, Virginia
    Posts
    14,774
    Brian,

    Keep the pictures and commentary coming. This is the kind of tuning project that I am interested in and I have been thinking about building a large lathe in the future to turn columns.

    Thanks

  9. #9
    Join Date
    Nov 2006
    Location
    Western Michigan
    Posts
    195

    Wow Again

    Fantastic -- you've really got the setup, skill, and knowledge to do some incredible stuff. I'm green with envy!

  10. #10
    Join Date
    Nov 2006
    Location
    Tallahassee FL USA
    Posts
    291
    Thanks for the explanation, Brian. I think I got most of it.

    I guess I missed it the first time, and didn't realize you're using a metal lathe. Sure makes the routed coves easier. Nobody ever said (I think) that you can't turn wood on a metal lathe. For that matter, I've even turned metal (brass mostly) on a wood lathe; increases the pucker factor of course.

    Very nice results. Good for you.

    Joe

  11. #11
    Join Date
    Nov 2005
    Location
    NY
    Posts
    1,238

    Exclamation Metal lathe- that it's not.

    Quote Originally Posted by joe greiner View Post
    Thanks for the explanation, Brian. I think I got most of it.

    I guess I missed it the first time, and didn't realize you're using a metal lathe. Sure makes the routed coves easier. Nobody ever said (I think) that you can't turn wood on a metal lathe. For that matter, I've even turned metal (brass mostly) on a wood lathe; increases the pucker factor of course.

    Very nice results. Good for you.

    Joe
    Hi Joe,
    No that's not a metal lathe Joe, It is a Oliver 20C pattern lathe. They were, and still are , used in foundry's to create patterns made out of wood for what ever project they needed a negative made,after the shaped object was made on the pattern lathe, it was taken off and put into a cast box filled with a special sand mix that hardens temporarily. they would put the sand in the form, 1/2 way , then drop the project in , pack the sand with packing stampers, wait for it to harden,put a release agent on the surface, then fill the remaining half to the top, inserting a flow pipe down in through the sand until it meets the shaped object pattern. after it hardens they separate the 2 molds , take out the shaped object, remove the the flow pipe, put the molds together and seal the 2 halves of the molds and then pour whatever metal they were using through the flow port- and there is a replica of what was turned on the pattern lathe. They are still used today- the position title is a "Pattern Maker" in the foundry and anywhere else this trade is practiced.
    Brian

  12. #12
    Join Date
    Nov 2005
    Location
    NY
    Posts
    1,238

    Post

    Quote Originally Posted by Keith Outten View Post
    Brian,

    Keep the pictures and commentary coming. This is the kind of tuning project that I am interested in and I have been thinking about building a large lathe in the future to turn columns.

    Thanks

    Will Do Keith,
    I'll have some pictures of the hand carved cherubs used in this project up on this thread later today probably.
    Brian
    Last edited by Brian Weick; 09-28-2007 at 11:20 AM. Reason: gramatically incorrect-LOL

  13. #13
    Join Date
    Mar 2003
    Location
    SE PA - Central Bucks County
    Posts
    65,850
    I'm with Keith, too...keep 'em coming! This is a really interesting project.
    --

    The most expensive tool is the one you buy "cheaply" and often...

  14. #14
    Join Date
    Nov 2005
    Location
    NY
    Posts
    1,238
    Quote Originally Posted by Jim Becker View Post
    I'm with Keith, too...keep 'em coming! This is a really interesting project.

    Will do Mr. Becker!
    Brian

  15. #15
    Join Date
    Nov 2005
    Location
    NY
    Posts
    1,238

    Post update: Cherubs with 1/2 stop fluted column faced door fronts

    These are the 2 carved cherubs that will be implemented into the cabinets on either side. They are being used in this case as a (plinth corbel) I will be working on the cabinets today and the capital design.
    I will have more updates as the projects move forward.
    Brian
    Attached Images Attached Images

Similar Threads

  1. 36" Column on a Lathe
    By Samuel Brooks in forum Turner's Forum
    Replies: 9
    Last Post: 10-03-2006, 10:01 AM
  2. Front Porch Column Completed
    By Kevin Swindle in forum General Woodworking and Power Tools
    Replies: 7
    Last Post: 10-11-2004, 10:15 AM
  3. The next step in cabinet making
    By Jim Hill 2 in forum Design Forum
    Replies: 4
    Last Post: 01-27-2004, 9:13 AM
  4. 2nd step of making doors
    By Jim Hill 2 in forum General Woodworking and Power Tools
    Replies: 3
    Last Post: 01-14-2004, 5:27 PM
  5. Euro hinge question
    By Jay Goddard in forum General Woodworking and Power Tools
    Replies: 2
    Last Post: 12-09-2003, 12:02 PM

Posting Permissions

  • You may not post new threads
  • You may not post replies
  • You may not post attachments
  • You may not edit your posts
  •