Jim,
Excellent...nice photos...great progress ...excellent looking table...I really like the shape...very classic!


 In Memoriam
Jim,
Excellent...nice photos...great progress ...excellent looking table...I really like the shape...very classic!
"All great work starts with love .... then it is no longer work"
Member
Thanks for the step by step Jim! Besides being fun and educational, it's also a good reminder for me to take pictures as I move through the stages of my projects.
The table looks great. I look forward to seeing the finished result.
 Member
Jim, thanks for sharing. Your table is turning out very nicely.
Member
Wow, ... That's some great work!
Member
Nice progress on the table. Thanks for the intermediate steps. Can't wait to see the finished product.
Member
Hey Jim nice pictorial so far on this project. I look forward to seeing the finished product!
Dave
 [OP]
Moderator
[OP]
Moderator
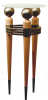
It's been awhile since I posted about this hall table project...weather, work and whatever kept me away from "final finishing" until today. I am generally pleased with the project and it was a nice introduction to what I'll call "informal bent lamination". The cost was also quite attractive...nearly nothing outside of the cost of finishing materials since the oak for the top was given to me by my cabinetmaker/artist neighbor and the base is built from poplar off our property that was harvested back in 2000. I did buy a quart of BM acrylic to finish the base...
Speaking of which, I love the color. I'm not overwhelmed by the product, however...major thick and no matter what I did, I couldn't eliminate brush marks. I even sanded it back once. The last coats are much better as I used a "virgin brush" and worked it carefully.
At any rate, this project is completed. I'll post a picture now taken outdoors and will post another one sometime in the next year when it moves into the addition...which is still in permitting.
hall-table-done.jpg
--
The most expensive tool is the one you buy "cheaply" and often...
 Member
Great design Jim. When you said you were painting the base I wondered why. Now that I see how nicely the painted base sets off the wood top, I see why you made that choice. It's beautiful.
 Member
 Member

Nicely done, Jim.
Martin, Granbury, TX
Student of the Shaker style
 Member
Jim, Thanks for sharing this project with us. I like the contrast between the oak top and the base. Nice job!
Alan T. Thank God for every pain free day you live.
 Member
Lookin' good! Well done!
-Jeff
Contributor
Beautiful table and thanks for the tutorial. Nice intro into bent lamination also. I have used Titebond III for one bent lam project and the results were better than expected.
One question regarding the MM slider. What is the length of your shop?? Since you have the 8' slider, I am wondering how much infeed/outfeed space is needed to keep from bumping into things. I am in the planning/dreaming stages for an upgrade from my 1964 Rockwell/Delta Unisaw and was wondering about this. Thanks.
[OP]
Moderator
The total infeed/outfeed/footprint necessary for the 8.5' slider is about 19'. I placed the machine with that in mind and just need to wheel the drum sander elsewhere when I'm ripping sheet stock. Outside of that, I have more space in the shop now. (when the big outrigger is off the wagon which is most of the time) My shop dimensions are about 21' x 30' minus the stairwell up, lumber storage rack and the DC/compressor closet.Originally Posted by Mike Wilkins

--
The most expensive tool is the one you buy "cheaply" and often...
 Posting Permissions

 Reply With Quote