Page 2 of 3 FirstFirst 123 LastLast
Results 16 to 30 of 39

Thread: Request advice on workbench design details

  1. Quote Originally Posted by Eric Sink
    Greetings all,

    It is time for me to build myself a proper bench...a "tray in the middle" design. ...tool tray in the middle is a removable piece of 3/4 inch plywood.

    Thanks in advance!
    Instead of a tool tray, consider building a separate tool bin/caddy on locking casters, sized to roll under some other table surface when not in use. That way, the tools you are using are at your side within reach when working; and you can later roll the bin/caddy back to your tool cabinet when you want to put the tools away. That simplifies the construction of the bench and provides one continuous flat bench surface if needed when assembling something.

  2. #17
    Join Date
    May 2005
    Location
    Moore, SC
    Posts
    112

    follow up

    Quote Originally Posted by Robert Trotter
    Andy,

    Looking at your bench picture am I right in that you have no top stretchers in either direction. Just four legs with botom stretchers and the legs morticed into the top? So the stability is from the mortice into the top?

    It's a bit hard to see clearly but am I right in that your legs and the front of your bench are in line?

    If so, how do you find this?

    And... is your bench made from pine? Has it got enough weight for hand planing?

    I am in the process of thinking about my bench design and construction also. I am wondering if I need the top stretchers with a thick top. If there are no stretcher at the top will the table be stable against racking?


    Robert
    Robert,
    I do have stretchers across the top. This was mainly done since I built my top as 2 large slabs plus 2 "ramps", and then assembled it all in to one main piece. If my top was all one slab before mounting it on the legs the top stretchers would probably be useless.

    The front legs are flush with the front edge of the bench. I like this. It allows the use of the legs and bottom stretcher for clamping if the need ever arises. Also, the deadman is in the same plane, so it can also be used for clamping, supporting, etc.

    And yes, my bench is made from almost 100% southern yellow pine. I did this for a few reasons. 1. Cheap. I think all the wood in my bench ran me about $120 from lowes. Now, I didnt waste much at all, and I had all my parts and cut list laid out for maximum utilization.
    2. Easy to find. - Go to nearest Lowes, Home Depot, etc. I do live in the south east, and I understand this is harder to find up north?
    3. I dont feel bad using the bench for what it was made for.....work! If i nick or accidentaly cut in to my benchtop its not a big deal. Now, I dont do this on purpose, but its for working and not admiring. I didnt spend a lot of time getting the top super smoth, or making it look really nice. If that is what you want then go for it, but it wasnt important to me.

    As for the weight of the bench. It became very apparent that it was going to be heavy early on in the construction. One day I took my bathroom scale out and measured the components (stretchers, legs, top slabs, etc) right before I started glue up. The 4 legs, 2 long stretchers, and 4 short stretchers weighed in at 140lbs. The two top slabs weighed in at 80lbs each. That is 300 lbs before adding the two ramps, both vises, vise jaws, and deadman. I know the anant alone is 38 lbs.
    I figure I am being very conservative when I say that bench weighs in at 350 lbs. That combined with the very stable base and it isnt going anywhere unless its on wheels.

    Here are some finished dimensions if you care.
    The legs are 5" square.
    The stretchers are 4.25" square.
    Top is 3.25" thick and 86.25" long. There are two main slabs that are each 10.75" wide. There are two filler blocks that fill about 20" in from each end, but they are only 2.5" thick. The tool tray is 5" wide, and 46" long.
    Bench top is 34.25" high.
    Tool tray is removeable by sliding the plywood out the left end of the bench. The end of the plywood is not seen, as it goes about 12" under the bench due to the 20" long filler block above it.

    I have attached 2 pics that hopefully shed some light on how the stretchers are.

    Hope this helps someone out....took a long time to type and compose. Let me know if I can be of more help. If anyone ever passes thru you are welcome to look at it.

    Andy
    Attached Images Attached Images

  3. #18
    Join Date
    May 2005
    Location
    Moore, SC
    Posts
    112

    More.

    Quote Originally Posted by Eric Sink
    Hmmm. Let's make sure I understand what you're saying:

    "Don't bother with the tenon/groove joint on the endcap. Just attach the
    endcap with the bolts and barrel nuts as explained in the vise instructions."

    Is that right? Will that approach be safe in terms of expansion/contraction of the top?
    Exactly. The Veritas instructions have some details on how the end of your bench should be so seasonal movement does not change the allignment of your vise jaws. The main point they make is that the sides of the rear jaw can not be covered with any aprons. Your twin screw drawing looks correct in this regard.

    Also, as Robert suggested make the front edge of the bench the rear jaw. It is easy to do, and gives much more utility in my opinion. If you have a long board or a wide panel you can clamp one end in the vise, and use a clamp on the other end to hold it firm againt your bench. I dont see much of a reason for the rear jaw that protrudes from the front of the bench on a front vise. If you need a pic of this let me know.

    Andy

  4. #19
    Join Date
    Jan 2007
    Location
    NW Arkansas
    Posts
    110
    Quote Originally Posted by Andy Howard
    If you need a pic of this let me know.
    I'd like one!

    L

  5. #20
    Join Date
    May 2005
    Location
    Moore, SC
    Posts
    112
    Quote Originally Posted by Luke McFadden
    I'd like one!

    L
    Ok, but just remember you asked for it.

    You can see in the first picture I am using the front edge of the bench for the rear jaw of the vise. I did have to build up some thickness underneath the bench in this area to get the needed depth for mounting this particular vise. I also just recently routed a rabbet in the top edge and glued in a piece of cherry. The pine was getting a bit compressed and I chipped out a piece on accident while doing something in the vise. (cant remember what it was )

    The other pictures show how a clamp can be used at the other end to really secure a board, panel, etc that you are working on. It really is amazing how much of a difference it makes vs. having only one end in the vise. The clamp could go all the way across the bench top, or the middle tool tray can be used as you see here. If it were a very large pannel or for some reason needed to be at an angle I can also clamp to the front legs as they are in the same vertical plane as the bench front.

    Andy
    Attached Images Attached Images

  6. #21
    Join Date
    May 2005
    Location
    Moore, SC
    Posts
    112

    One last pic.

    One last pic of the front vise closed.

    The rear metal jaw of the vise is in a slot cut on the underside of the bench.

    Sorry to monopolize or hijack your thread Eric. Hopefully I have added something usefull to the discussion.

    Andy
    Attached Images Attached Images

  7. #22
    Quote Originally Posted by Andy Howard
    Sorry to monopolize or hijack your thread Eric.
    Not at all. Threads should be monopolized by "people of clue".


  8. #23
    Thanks Andy, Very helpful to have other people ideas and explanation for organising your own thoughts. Thanks for the effort in typing it all out.

    Robert

  9. #24
    Andy,

    Help me out with one question. What's that small black tool sitting next to that nice Knight coffin smoother?

  10. #25
    Join Date
    Sep 2004
    Location
    York Co, PA
    Posts
    398
    Quote Originally Posted by Eric Sink
    I'd like to cap it, both for strength and to hide the plywood edge. But I really want the tray to be removable.
    I also think you should consider capping it. As for making the tool tray removable, just set it on ledges and it can easily be lifted out. I also like the idea of making it in at least two sections so that one half could be lifted out.

    My benchtop (still under construction) is ~19" wide before the front dog hole apron/strip, but the more I look at benches with tool trays, the more I am drawn to them & may consider adding one.

    As for the sort strtechers, I agree with others - it's not needed.

    I can't comment on the twin screw, but like the look of it.

    Anyway, thanks for the ideas & "pics".

    -Mike

  11. #26
    Join Date
    May 2005
    Location
    Moore, SC
    Posts
    112

    Stereo Remote!

    Quote Originally Posted by Ruston Hughes
    Andy,

    Help me out with one question. What's that small black tool sitting next to that nice Knight coffin smoother?
    That would be my stereo remote! Gotta have my tunes in the shop. Also have the worktunes earmuffs with radio. Makes it much more enjoyable for me.

    Andy

  12. #27
    Join Date
    Jun 2006
    Location
    Pickering Ontario Canada
    Posts
    211
    That bench looks very familiar....
    Built mine 2 years ago. Rather simple design, east to build and very functional. Not as pretty as most benches, but for a first bench I am happy.
    Top is 3 1/2" thick Jatoba, base in ash. Weight is in the 350lbs range.
    and yes, I am left handed.

    Chris
    Attached Images Attached Images

  13. #28
    Join Date
    Jun 2006
    Location
    Pickering Ontario Canada
    Posts
    211
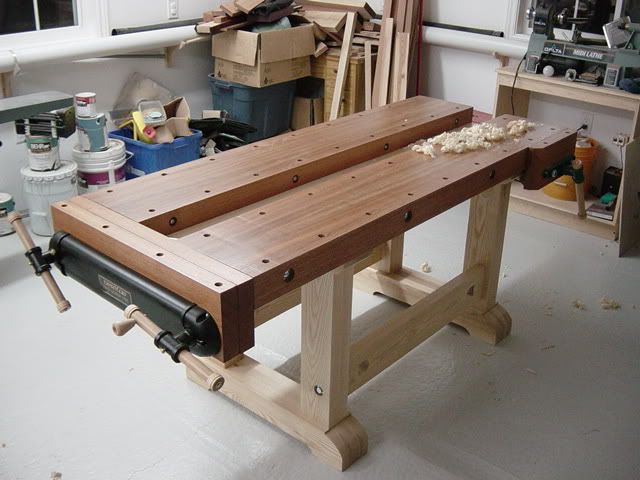
    pic of the Veritas twin screw vice

  14. OVerall I think it's strong enough. I agree with the drilling holes all the way - two comments:


    install the vice by burying the rear jaw in the body of the bench. then extend the front apron all the way so that when you clamp something it's always against front edge of the entire bench - not offset by a rear jaw like you have drawn.

    with the entire front of the bench working as a rear jaw you can trivally clamp long boards with just a c clamp to the apron and the main vise

    2: I find tool trays a total waste of space and just a garbage collector.

  15. #30
    Quote Originally Posted by chris del
    Not as pretty as most benches
    Actually, to my eye, your bench is about the prettiest one I've seen here. I suppose many folks might find Tony Sade's bench to be more attractive (and it's gorgeous), but your bench really caught my eye, in both form and function. I suppose that's why my design is so similar to yours.

Similar Threads

  1. Tablesaw Advice Request: Laguna vs. Minimax vs. Hammer
    By Ben Notan in forum General Woodworking and Power Tools
    Replies: 44
    Last Post: 10-25-2011, 1:54 PM
  2. Finishing advice request
    By John Keane in forum Project Finishing
    Replies: 2
    Last Post: 12-18-2006, 3:04 AM
  3. need advice - workbench design
    By Mark Pruitt in forum General Woodworking and Power Tools
    Replies: 8
    Last Post: 07-01-2006, 4:23 PM
  4. Office Trash Can Design Help Request
    By Ken Salisbury in forum Design Forum
    Replies: 16
    Last Post: 06-11-2005, 4:32 PM
  5. wood movement in workbench?
    By Roger Barga in forum General Woodworking and Power Tools
    Replies: 3
    Last Post: 03-08-2005, 8:25 PM

Posting Permissions

  • You may not post new threads
  • You may not post replies
  • You may not post attachments
  • You may not edit your posts
  •