Page 1 of 2 12 LastLast
Results 1 to 15 of 25

Thread: Restoration and Extension of My 31 Year Old Deck

  1. #1
    Join Date
    Mar 2004
    Location
    Toronto, Ontario, Canada
    Posts
    3,789

    Restoration and Extension of My 31 Year Old Deck

    (part 1 of 5)

    I am back in Toronto for a two week period and decided to make a start at restoring our deck. I expect that I will not get the project completed before winter sets in, but just maybe, with the incentive provided by having to report on progress here plus the very active “encouragement” of Margaret (my wife), it might get done before the snow flies.
    When I built my shop a couple of years ago (see the thread: http://sawmillcreek.org/showthread.php?t=7769), I had to tear down some of the old deck to make room for the shop. Here are some photos taken in March 2004 just before I started work on shop:

    • The deck –photo taken from the east

    The original deck -photo taken from the east.JPG

    • The deck –photo taken from the north

    The original deck -photo taken from the north.JPG

    • The outline of the about to be built shop mapped upon the ground and the deck:

    The new shop mapped onto the deck.JPG

    I built the deck in 1975 and the surface is western red cedar 2x6s nailed onto the joints with three 3 inch galvanized spiral nails at each intersection. Thus, the boards are not easy to remove without damaging them in some way. At the time the shop was built, the deck was in serious need of maintenance. It had last been stained in 1995 and suffered from neglect and even misuse while we lived in Seattle from 1997 to 2003. But in 2004, the shop construction project took priority, so the deck has now been neglected and misused for 11 years. However I am happy to report that, in spite of that, the majority of the 31 year old decking boards are sound. And, the underlying support joists and beams are all in good shape.

    The project consists first of sanding, and where necessary filling, then staining the remaining original decking. Then I am going to extend the deck with a semi-circular perimeter to the north and east. New wood will be used for the extension.

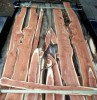
    Here are some pictures taken just as work is getting underway earlier this week:

    Deck building 01 -Taken from the east -Work is just underway -small.JPG

    Deck building 02 -Taken from the north -Work is just underway -small.JPG

    The first picture is taken from the east and the second from the north. By the way, last weekend I built the steps that are shown to the right of both pictures; the wood on the steps themselves and on the risers is restored cedar.
    Last edited by Frank Pellow; 09-23-2006 at 9:58 PM.

  2. #2
    Join Date
    Mar 2004
    Location
    Toronto, Ontario, Canada
    Posts
    3,789
    (part 2 of 5)

    The perimeter of the extension is roughly shown by the yellow line in repeated picture below:

    Deck building 03 -marked up to show perimeter of deck extension.JPG

    Here is the rough plan for the extension:

    deck extension plan -small.jpg

    The first phase of reconstruction was to install new joists in sections where I had to remove the old deck in order to build the shop. This was two years ago. Those sections are to be covered with 2x6 that I took up at that time and have stored ever since. The boards were sanded on all sides with 36 grit paper using my Festool 150 Rotex sander in aggressive mode:

    Deck building 04 -Sanding a board 36 grit paper -small.JPG

    As you can imagine in this mode and with this grit material gets removed very quickly.

    Next the holes were cleaned out then filled with Bondo auto body filler: Here is the filler being mixed:

    Deck building 05 -Preparing to mix auto boady filler -small.JPG Deck building 06 -Mixed auto boady filler -small.JPG

    After mixing the filler has to be applied within about 4 minutes. I applied it using both a popsicle stick and a putty knife.

  3. #3
    Join Date
    Mar 2004
    Location
    Toronto, Ontario, Canada
    Posts
    3,789
    (part 3 of 5)

    After the filler was applied, I waited for about an hour then sanded the top surface of the boards first with 80 grit paper and then with 120 grit paper. A coat of Sikens Cetol SRD (078 Natural) was then applied to all sides. Here are some pictures of a segment the same board going through the above steps:
    • Before sanding

    Deck building 07 -Surface of a typical board that is to be restored -small.JPG

    • After sanding with 36 grit and hole filling:

    Deck building 08 -After sanding with 36 grit and hole filling -small.JPG

    • Sanding with 80 grit paper:

    Deck building 09 -Sanding with 80 grit paper -small.JPG

    • After sanding and application of one coat of stain:

    Deck building 10 -After sanding and application of one coat of stain -small.JPG

  4. #4
    Join Date
    Mar 2004
    Location
    Toronto, Ontario, Canada
    Posts
    3,789
    (part 4 of 5)

    The first thing to do was to replace the “bridge” to my main shop door with restored boards:

    Deck building 11-Taken from the back door -Work is just underway -small.JPG Deck building 12 -A small section in front of the door to the shop has finished -small.JPG

    In the second picture, it has just rained and water is beading on the boards. Notice, the patch on the second board out from the wall.

    Here are a couple of photos showing the restored boards being installed on some new joists:

    Deck building 13 -Laying the restored boards -picture taken from the west -small .JPG Deck building 14 -Laying the restored boards -picture taken from the east -small.JPG

    The boards were quite straight and I only needed to use my BoWrench clamp once:

    Deck building 15 -Laying the restored boards -using BoWrench -small.JPG

  5. #5
    Join Date
    Mar 2004
    Location
    Toronto, Ontario, Canada
    Posts
    3,789
    (part 5 of 5)

    Now, to work on the already-nailed-down boards. I will need to remove a few of these as well as some sections of others but, for the most part, it will be possible to sand these in place, countersink their nails even further and fill the holes with body filler. Some of these boards are being sanded with 36 grit paper as shown in the photo below:

    Deck building 16 -Sanding some boards in place -small.JPG

    As well as the deck, two chairs and three planter boxes need to be restored. Here is “before” photo of one of the chairs:

    Deck building 17 -There are also two chairs like this one to restore -small.JPG

  6. #6
    Cool that you could reuse your deck boards...not many 31 year old decks in use today in this area....

    Can't wait to see the final pics!

  7. #7
    Looking good Frank! I too am suprised that your 31 year old deck is still in such good shape.

    corey

  8. #8
    Join Date
    Feb 2004
    Location
    Odessa, Texas
    Posts
    1,567
    Looking good, Frank. I am curious though about your design, wondering why you didn't lengthen the curved part of the new deck to include the shop door on the East side of the shop and move the steps to the edge of the deck, giving you a flat landing coming out of the shop and then down the stepsto the yard, OR..a right turn on the Deck straight to the house. It just looks more practical to me and seems like it would be more aesthetically pleasing than having the steps against the door, but sideways to the end of the deck.
    Last edited by Norman Hitt; 09-24-2006 at 2:19 AM.
    "Some Mistakes provide Too many Learning Opportunities to Make only Once".

  9. #9
    Join Date
    Mar 2004
    Location
    Toronto, Ontario, Canada
    Posts
    3,789
    Quote Originally Posted by Norman Hitt
    Looking good, Frank. I am curious though about your design, wondering why you didn't lengthen the curved part of the new deck to include the shop door on the East side of the shop and move the steps to the edge of the deck, giving you a flat landing coming out of the shop and then down the stepsto the yard, OR..a right turn on the Deck straight to the house. It just looks more practical to me and seems like it would be more aesthetically pleasing than having the steps against the door, but sideways to the end of the deck.
    Norman, that’s a good suggestion but, the reason that I did not do things as you suggest is lack of space.

    We have squeezed a lot into our suburban back yard and making the deck bigger than my current plans would encroach on our already diminished lawn and vegetable garden. I have a single door to the shop which does open onto the deck and that door gets the vast majority of use. You might be right that the steps at right angles to the deck will look funny but, if they do, I might be able to come up with something that makes that arrangement look natural –I am pretty good at solving problems like that.

  10. #10
    Join Date
    Apr 2006
    Location
    Phoenix AZ Area
    Posts
    2,505
    Frank, can you elaborate on how long it took to sand each board? Which Festool paper did you use? I was surprised to see that you started with 80 grit. thanks...joe

  11. #11
    Join Date
    Feb 2004
    Location
    Odessa, Texas
    Posts
    1,567
    I kinda "Figgered" there must be some reason for it, and I DO savvy the lack of yard space. I kinda have a different problem in my back yard, as I have PLENTY of space left, Buuuuut....the City Powers that be, say I can only cover 124 more sq ft of the yard with ANYTHING.

    (It must be "who you know" down here at our City Hall, because I have seen several places within the past year that have built houses, bldgs, pools, decks, etc and have almost their whole legal lot covered with something,....Definitely more than the percentage of coverage on a lot that they told me).
    "Some Mistakes provide Too many Learning Opportunities to Make only Once".

  12. #12
    Join Date
    Mar 2004
    Location
    Toronto, Ontario, Canada
    Posts
    3,789
    Quote Originally Posted by Joe Jensen
    Frank, can you elaborate on how long it took to sand each board? Which Festool paper did you use? I was surprised to see that you started with 80 grit. thanks...joe
    Joe, I started with 36 grit, not 80. You missed a step.

    I used Festool Saphir paper, 36 on all 4 sides, then 80 on the top side, then 120 on the top side.

    The boards shown in the pictures are 7 feet long. As best I can recall becuase I was not really timing myself, on average it took about 10 minutes to sand with 36 grit, 4 minutes with 80 grit (at this point, I was also sanding the auto-body filler), and about 2 minutes with 120 grit.

  13. #13
    Join Date
    Mar 2004
    Location
    Toronto, Ontario, Canada
    Posts
    3,789
    Quote Originally Posted by Frank Pellow
    ...
    I used Festool Saphir paper, 36 on all 4 sides, then 80 on the top side, then 120 on the top side.
    ...
    Correction: Only the 36 and 80 grit paper are Saphir. The 120 grit paper is Rubin.

  14. #14
    Join Date
    Mar 2004
    Location
    Toronto, Ontario, Canada
    Posts
    3,789

    September 25th Update

    It rained on and off during the weekend and this is a problem because the boards that are being refinished in place on the deck have to be perfectly dry before they can be sanded. I left Toronto this morning and will not get back to the project for about a week and a half, so I hope for dry weather upon my return. Here is a photo of the deck as I left it this morning:

    Deck building 19 -Deck as I left it on the morning of September 25th -small.JPG

    There was certainly some work that could be done in spite of the rain and that is the restoration of the chairs and planter boxes. Not only are they badly weathered, but a few parts are cracked and/or broken. My Festool My Festool Deltex sander is perfect for sanding the narrow boards on the back of a chair:

    Deck building 18 -Deltex sander is perfect for sanding the narrow boards on the chairs -small.JPG

  15. #15
    Join Date
    Mar 2004
    Location
    Toronto, Ontario, Canada
    Posts
    3,789

    October 8th Update (1 of 2)

    I returned from Pellow’s Camp to Toronto in the middle of the week to find dry weather, cold but dry. Of course, dry is what is needed to be able to sand, fill, and stain the rest of the old deck. This I managed to do, as well as to install the posts needed for the extension.
    Unfortunately, I could not save all the old cedar decking. Here are some photos showing sections being removed:

    Deck building 20 -Removing bad sections from the deck -1 -small.JPG Deck building 21 -Removing bad sections from the deck -2 -small.JPG

    Note in the second photo how the five stained boards immediately in front of the door are brighter than the stained boards to the left of them and in front of them in the photo. This is because they have had two coats of stain whereas the other boards have only had one. There was discussion recently as to whether one or two coats of Sikkens Cetol SRD should be applied. I am in the two coats camp and this photo illustrates why I am in that camp.
    All the kneeling that I was doing on this project finally got to me so, after many years of abusing my knees, I finally invested in some kneepads. Here I am modeling them:

    Deck building 22 -Frank models his new kneepads -small.JPG

    Stylish aren’t I!

    And here I am making use of them:

    Deck building 23 -Frank using kneepads when sanding the deck -small.JPG

    This picture shows some of the new boards being installed. Like the original decking the new boards are 2x6 Western Red Cedar.

    Deck building 24 -Patching a few places with new wood -small.JPG

Posting Permissions

  • You may not post new threads
  • You may not post replies
  • You may not post attachments
  • You may not edit your posts
  •