Results 1 to 14 of 14

Thread: SAW TABLE (Bench) Tutoral Part 2

  1. #1
    Join Date
    Aug 2003
    Location
    extreme southeast Nebraska
    Posts
    3,113

    SAW TABLE (Bench) Tutoral Part 2

    PART 2

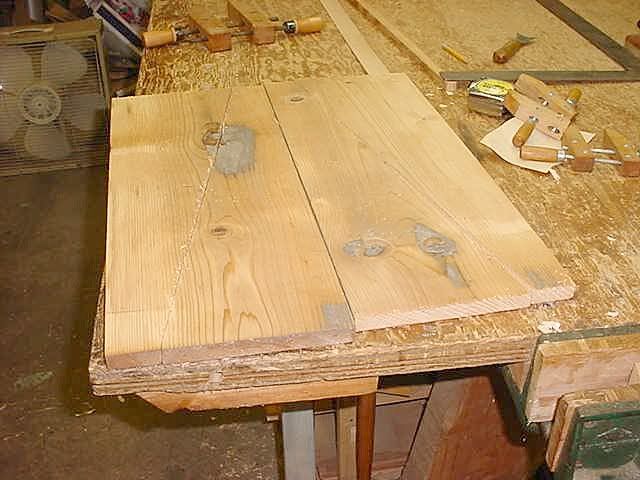
    We know that the legs will have a 10° splay to them. We already know that 10° is 1 inch in 5 1/2 inches. I am making my bench 20 1/4 inches to the top, so this means that the footprint of the legs will be approxiametly 8 inches wider than the top. The top and bottom of the legs are going to have to be sawn at 10° also so I need about 20 3/4 inches finished length. I am going to start with 24 inch long legs. I found a nice salvaged piece of 1 by 10 with a few knots in it that is just a tad longer than I need, so I am going to use that. Delta volunteered again and this time it was more down his alley and he cleaned the faces up pretty well.

    Here you see the 1 by 10 marked at 24 and 48 and then lines scribed with the framing square. I then came in 2 inches from each end on the same side and 2 inches in from the edge in the center and connected the lines. The two scrap pieces are laying on the lines for clarity.


    Here I am cutting off the excess, the 8 point rip was too coarse for this old pine and was splintering bad on the bottom side, so I switched to a 12 point panel for this part. I had a clamp holding the hidden end to the bench to make the job easier.


    Here I am cutting on the middle line. You can see a little trick I use to hold the off piece from falling off at the end of the cut and splitting off the underside of the left hand piece. Just a piece of scrap and 2 small clamps, its quick and easy.


    Here I am using my makeshift face vise to hold one piece while I rip it.


    Most of you probably don't do this, but when ripping and almost done, I just flip the piece over and finish the cut by sawing up. You don't have to try and get things lined up this way with a second cut.


    This picture shows the two pieces ripped into 4 legs. Notice the one on the left is splintery and the saw cut is crooked, I used the rip saw on this one and forgot to check the back side, and it splintered out on me, so I switched to the 8 point crosscut for the second one and got a much smoother cut and it cut well at an angle in this brittle wood.


    Plane your legs up and chamfer the edges just a touch and we will commence with part 3 next friday.
    Last edited by harry strasil; 07-26-2006 at 12:47 AM.
    Jr.
    Hand tools are very modern- they are all cordless
    NORMAL is just a setting on the washing machine.
    Be who you are and say what you feel... because those that matter... don't mind...and those that mind...don't matter!
    By Hammer and Hand All Arts Do Stand

  2. #2
    Join Date
    Feb 2004
    Location
    Modesto, CA
    Posts
    2,364
    Oh...I'm so excited....part 2.


    Harry, if I may.....the bigger bench in the original thread, part 1, looks to have 2x legs. Is this right? But your legs here are 1x. Can we use either?

    Thanks very much.


    Oh yeah, I also wanted to mention that this pace of the parts of your tutorial, today with number 2, seems to be just right.

    Thanks very much again.
    Mark Rios

    Anything worth taking seriously is worth making fun of.

    "All roads lead to a terrestrial planet finder telescope"

    We arrive at this moment...by the unswerving punctuality...of chance.

  3. #3
    Join Date
    Aug 2003
    Location
    extreme southeast Nebraska
    Posts
    3,113
    Yes Mark you can use whatever you want, remember its your saw table, what I am doing is just a guideline.

    Good Luck

    I almost forgot about the tutoral tonight, sorry I am late.
    Last edited by harry strasil; 07-21-2006 at 10:59 PM.
    Jr.
    Hand tools are very modern- they are all cordless
    NORMAL is just a setting on the washing machine.
    Be who you are and say what you feel... because those that matter... don't mind...and those that mind...don't matter!
    By Hammer and Hand All Arts Do Stand

  4. #4
    Join Date
    Aug 2003
    Location
    extreme southeast Nebraska
    Posts
    3,113
    I have also decided to keep the legs like the original without the front to back splay as it might be a little to complicated for those just starting out.

    But the legs on the little one I am making will be splayed both ways.
    Jr.
    Hand tools are very modern- they are all cordless
    NORMAL is just a setting on the washing machine.
    Be who you are and say what you feel... because those that matter... don't mind...and those that mind...don't matter!
    By Hammer and Hand All Arts Do Stand

  5. #5
    Join Date
    Dec 2003
    Location
    Aiken, SC
    Posts
    77
    Will we have a straight edge and a sloped edge on each leg or will we be tapering the legs in a later lesson?

  6. #6
    Join Date
    Aug 2003
    Location
    extreme southeast Nebraska
    Posts
    3,113
    just as the appear in the final picture only with planed edges.
    Jr.
    Hand tools are very modern- they are all cordless
    NORMAL is just a setting on the washing machine.
    Be who you are and say what you feel... because those that matter... don't mind...and those that mind...don't matter!
    By Hammer and Hand All Arts Do Stand

  7. #7
    Join Date
    Jul 2006
    Location
    Hubbards, Nova Scotia, Canada
    Posts
    147
    Hi

    I'm a new member - been lurking for a couple of weeks now. I just wanted to show my support for Harry and the valuable service he's providing. Keep at it Harry - most interesting thread in the forum IMHNO (in my humble neanderthal opinion). Keep on showing the folks that you don't need a $10K panel saw and a brass infill plane to get things done!

    IG

  8. #8
    Join Date
    Aug 2003
    Location
    extreme southeast Nebraska
    Posts
    3,113
    It's funny to me Ian, seems that fancy high dollar tools are supposed to make a better woodworker out of a person. Yet most woodworkers try to make stuff as good as the the old stuff that was made with a minimum of basic tools. It's skill with what tools you have that makes you a good woodworker.

    An old Blacksmith saying is; "Its the Blacksmith who makes the Tools, not the Tools who make the Blacksmith!"

    I don't make mistakes, I only have learning experiences. Some days I feel like I'm working on my masters degree.
    Last edited by harry strasil; 07-23-2006 at 11:51 AM.
    Jr.
    Hand tools are very modern- they are all cordless
    NORMAL is just a setting on the washing machine.
    Be who you are and say what you feel... because those that matter... don't mind...and those that mind...don't matter!
    By Hammer and Hand All Arts Do Stand

  9. #9
    Join Date
    Apr 2006
    Location
    Menlo Park, CA
    Posts
    281
    Harry,

    I believe that, given infinite time, better tools and worse tools can produce the same result. However....

    I only have limited woodworking time. Right now, I'd get heat stroke if I went into the shop, so I'll have to wait until later today to do any woodworking. I have fibromyalgia, so I go in only when my pain levels are low enough that I can do physical work without needing bedrest for three days. Sometimes, that means I can only work for 15 minutes. Sometimes, several hours.

    What LN tools get me is less fiddling. I lost a lot of time on a "good day" last week adjusting my Record #4 smoother. When I got out the LN, there were no questions from the wood or the tool, the work Just Got Done.

    So, given my particular constraints, yes, "high dollar tools" DO make me a better woodworker, if only because I'm actually able to get more done.

    There's also the side factor -- I'm not doing this for a living, I'm doing this for fun (and exercise). Fun for me means "with minimal frustration."

  10. Quote Originally Posted by harry strasil
    It's funny to me Ian, seems that fancy high dollar tools are supposed to make a better woodworker out of a person. Yet most woodworkers try to make stuff as good as the the old stuff that was made with a minimum of basic tools...
    Hmm. Not sure I agree with the first premise. "Fancy high dollar tools" have for the last few hundred years been with us as a choice. Always will be.

    And while I assume some people in the past bought a high-dollar tool hoping for a magic wand to cure their inexperience or whatever just as today, I think that then as now people who can afford it purchase these tools because of a view towards their tools which extend beyond utility. Think Duncan Phyfe et al.

    They didn't all have a minimum set of tools. They didn't all suffer along with "lesser" quality tools.

    As to the premise "It's skill with what tools you have that makes you a good woodworker," absolutely.

    Take care, Mike

  11. #11
    Join Date
    Jul 2006
    Location
    DuBois,Pa
    Posts
    1,557

    I bought a fancy high dollar saw

    I bought a fancy high dollar saw, Thanks Mike I like it alot. It really cut my dovetail time down! Did I need a high end saw probally not. But being my first good western joinery saw I bought I now know what one should feel and cut like with alot less trail and error.

    Bob

  12. #12
    Join Date
    Aug 2003
    Location
    extreme southeast Nebraska
    Posts
    3,113
    nice purchase Bob, you will enjoy it.
    Jr.
    Hand tools are very modern- they are all cordless
    NORMAL is just a setting on the washing machine.
    Be who you are and say what you feel... because those that matter... don't mind...and those that mind...don't matter!
    By Hammer and Hand All Arts Do Stand

  13. #13
    Join Date
    Apr 2006
    Location
    Menlo Park, CA
    Posts
    281
    Just responding to the last message out of convenience.

    For those who like diagramses, the new issue of Woodworking magazine has a sawbench very much like Harry's, and they have uploaded rotatable diagrams to the magazine's blog. This may be an excellent additional resource.

    link

  14. #14
    Join Date
    Jan 2005
    Location
    St Thomas, Ont.
    Posts
    553
    Firstly I did the planing of the top of the saw thingy, freehand and found when done that I had deviated somewhat from the designated angle. So I cut the legs at the same angle, just to be consistant.

    The really neat thing was though, I did the rip cuts with a panel saw, I had in my possession, a 26 inch Shurly & Dietrich, which was made in Galt Ontario probably in the latter part of the 19th century. Man I had never used it prior to this for some reason, but it went through that dry pine like the proverbial hot knife through butter, what a joy to use.

Similar Threads

  1. Replies: 43
    Last Post: 01-13-2010, 7:20 PM
  2. Bench drawers to match my router table
    By James Biddle in forum General Woodworking and Power Tools
    Replies: 16
    Last Post: 04-09-2006, 9:34 PM
  3. Shop Table modifications
    By Bob Nazro in forum General Woodworking and Power Tools
    Replies: 6
    Last Post: 02-13-2006, 9:24 AM
  4. The Learning Bench (Pics)-(LONG)
    By John Miliunas in forum General Woodworking and Power Tools
    Replies: 63
    Last Post: 02-06-2005, 9:42 AM
  5. Hacker Bench in Progress
    By Tom LaRussa in forum Neanderthal Haven
    Replies: 14
    Last Post: 10-26-2004, 9:49 AM

Posting Permissions

  • You may not post new threads
  • You may not post replies
  • You may not post attachments
  • You may not edit your posts
  •