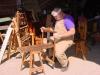
2 of my wood clamps, any comments?


 [OP]
In Memoriam
[OP]
In Memoriam

2 of my wood clamps, any comments?
Jr.
Hand tools are very modern- they are all cordless
NORMAL is just a setting on the washing machine.
Be who you are and say what you feel... because those that matter... don't mind...and those that mind...don't matter!
By Hammer and Hand All Arts Do Stand
 Member
Hey neat. I like your clamps. As a matter of fact, I like your clamps, your sawhorses, your tool box, and I even like the foot of what looks like a nice bench.Originally Posted by jr. strasil
You have a woodworking environment to be proud of.
 Moderator
Hi JR, or is it Junior abbreviated?
I particularly like the wooden "K bodies". Much less harmful to the workpiece than those with the metal bars and plastic heads. The wider double bar clamp is neat too though I'm not sure I need to steal this idea like I will with the single bar clamp.
Dave Anderson
Chester, NH
Member
Fantastic!! Any chance you would share the details abou them say with drawings or closer photos?
I', sure many other than just myself would love to 'steal' the design and build some for ourselves. They look very useful, well made and well designed.
SHERWUD in the beautiful sierra foothills East of Fresno, CA
[OP]
In Memoriam
Ok. here goes the explanation for the attached sketch, hope this will be clear enough to understand.
First I always make my clamps in pairs, no two pair are the same dimensions or length. they are made of salvaged oak from a 60 year old corn crib.
Fig. 1- shows the 2 bars clamped together and 3/8 holes drilled with a bradpoint bit at equal distances down the length of the bars to get a half hole for the locking pin. (A) is the end that the screw is on so holes clear to the end are not necessary. On the (B) end are drilled one size under 1/4 inch holes for a peg to keep the sliding jaw from falling off accidentally. The bars are usually 3/4 by 2-1/2 or 3 inches.
Fig. 2 -shows the method of attaching the nut for the screw. It is pegged and glued to make it secure.
Fig. 3 - is the jaw that the screw pushes against. It is usually 1-1/2 inches wide. it has a shallow depression for the screw end to fit into and a dab of beeswax applied for antifriction. It has a full thru mortise that is just loose enough to let it slide freely. It must have enough meat on top so as not to split out the top.
Fig. 4 - Is the sliding jaw and is made the same as the other jaw , with the exception that it has a 3/8 hole drilled thru it on the centerline of top of the mortise.
Fig. 5 - shows the relation of the hole to the mortise. The other small hole is 3/16 inch and is used to lock the string retainer for the pin in place. I just stick the string end in the hole and drive in a short 3/16 peg.
Fig. 6 - shows the locking peg usually made of walnut, (5/8 square turned to 3/8 diameter)the string is run thru the hole and a knot tied to keep it from slipping thru. (Caution - the string must be long enough to insert the peg from either side).
Fig. 7 - shows the stop peg in the end of the bar.
It will be necessary to move the sliding jaw to each hole and trial fit the peg for ease of insertion, and a round file used to adjust the depressions in the bar. give the locking peg a coat of beeswax to make it slide and release easily. DO NOT USE ANY OTHER FINISH ON THIS PEG OR YOU WILL END UP DRIVING THE PEG OUT AFTER USE. I generally use danish oil as a finish on the rest of the clamp as it is very forgiving and will give a slick finish if polished to make movement of the jaws easier.
A quick note about the 2 bar clamp, I use this when edge joining boards for table tops ,etc. slide over the ends and lay on a table so that one bar is against the top and the other against the bottom, adjust the bottom jaw to the right place , insert the pegs and tighten. this way the boards do not have a tendency to warp one way or the other at the joint and the pressure is applied exactly in the center of each side.
Last edited by harry strasil; 09-11-2003 at 8:52 PM.
Hand tools are very modern- they are all cordless
NORMAL is just a setting on the washing machine.
Be who you are and say what you feel... because those that matter... don't mind...and those that mind...don't matter!
By Hammer and Hand All Arts Do Stand
 Member


Very nice!!
I would like to nominate this to be made into an article. This is great info!! Thank you for sharing it.
I had one question...you don't talk about the screw at all. How long is it? What diameter? How do you thread it?
Noah
To laugh often and much; to win the respect of intelligent people and the affection of children; to earn the appreciation of honest critics and endure the betrayal of false friends; to appreciate beauty, to find the best in others; to leave the world a little better; wheter by a healthy child, a garden patch or a redeemed social condition; to know even one life has breathed easeir because you have lived. This is the meaning of success.
Ralph Waldo Emerson
[OP]
In Memoriam
The thread is 3/4 inch diameter about 6 inches long and was cut with a screwbox and tap I got from AMT, Noah.
Hand tools are very modern- they are all cordless
NORMAL is just a setting on the washing machine.
Be who you are and say what you feel... because those that matter... don't mind...and those that mind...don't matter!
By Hammer and Hand All Arts Do Stand
Member
Wow!!, thanks. I think an article permanently published would be great.
Thanks to what you wrote and your figures, I can figure it out more than enough to make some. Sure do like them.
Thanks again for sharing!!
SHERWUD in the beautiful sierra foothills East of Fresno, CA
[OP]
In Memoriam
I hope these pics help those who were interested in making some clamps.
Hand tools are very modern- they are all cordless
NORMAL is just a setting on the washing machine.
Be who you are and say what you feel... because those that matter... don't mind...and those that mind...don't matter!
By Hammer and Hand All Arts Do Stand
 Administrator
Noah,
I've used the Beale Wood Threader for years. The male threads are cut on a router fixture, the female threads are cut with a tap.
Member
Jr. and Keith
That is very cool! Thanks for sharing that.
Noah
To laugh often and much; to win the respect of intelligent people and the affection of children; to earn the appreciation of honest critics and endure the betrayal of false friends; to appreciate beauty, to find the best in others; to leave the world a little better; wheter by a healthy child, a garden patch or a redeemed social condition; to know even one life has breathed easeir because you have lived. This is the meaning of success.
Ralph Waldo Emerson
 Member
since we are on the topic of home made wood clamps I thought i'd toss this pic in for comparison. It's a clamp created by a correspondent of mine living in japan - he works under some difficult conditions. It's made from a few scrap 2 X 4's and a salvaged auto jack. He claims it works great and you can view his woodworking accomplishiments on his web site at
http://member.nifty.ne.jp/manasan/english/
 Posting Permissions


 Reply With Quote