Page 1 of 2 12 LastLast
Results 1 to 15 of 23

Thread: Kaizen Foam Drawer Organization

  1. #1
    Join Date
    Nov 2022
    Location
    Northern Colorado
    Posts
    1,138

    Kaizen Foam Drawer Organization

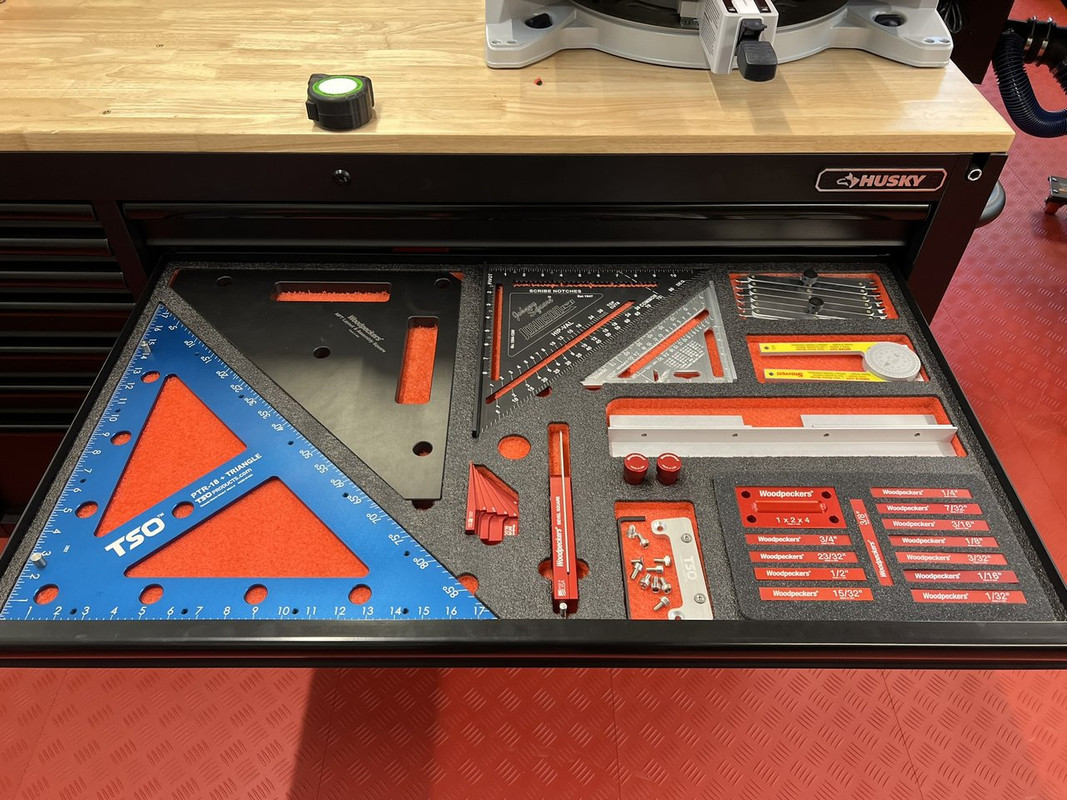
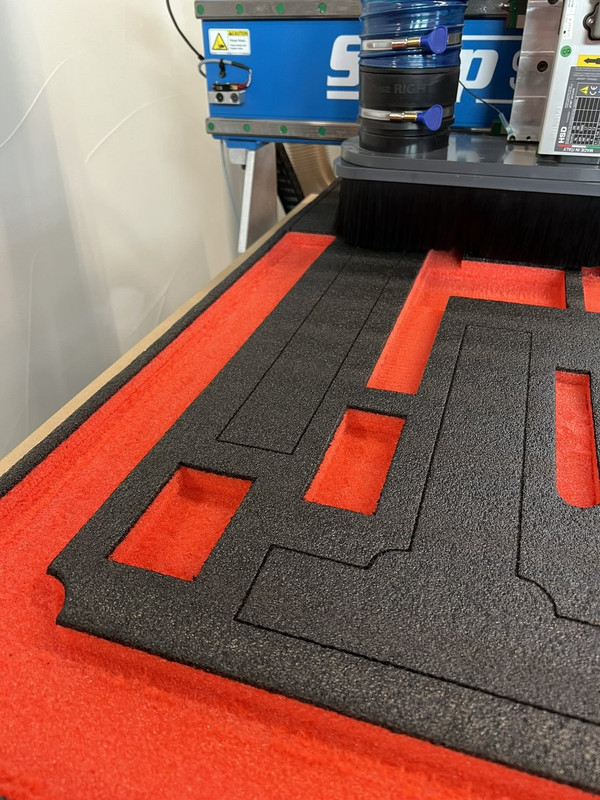
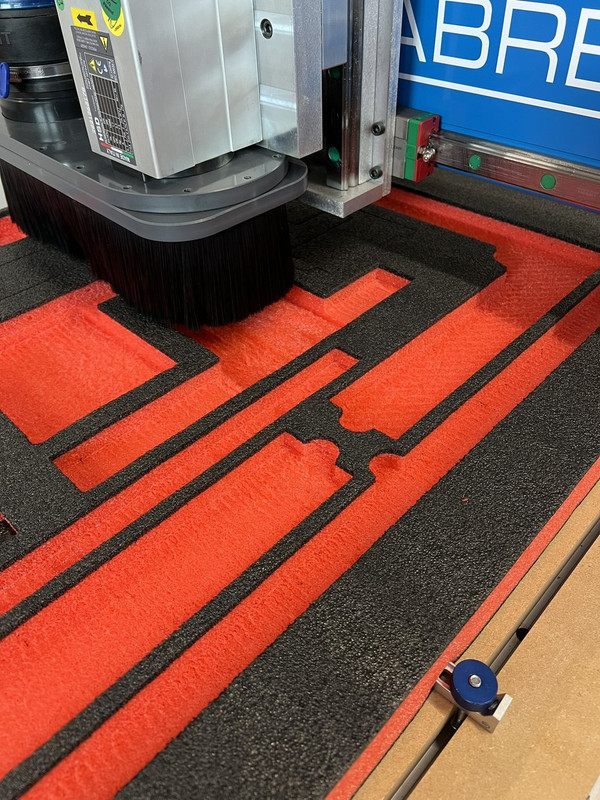
    While I'm between projects, I'm having a lot of fun tuning shop infrastructure. I'm pretty happy with my workflow in general but I've been wanting to organize some of my most used drawers (I'm a drawer guy) that I frequently access during a build. Over the weekend I decided to work on my most used drawer that contains all of my primary layout tools. The process was a ton of fun, stress free and overall really easy to do.

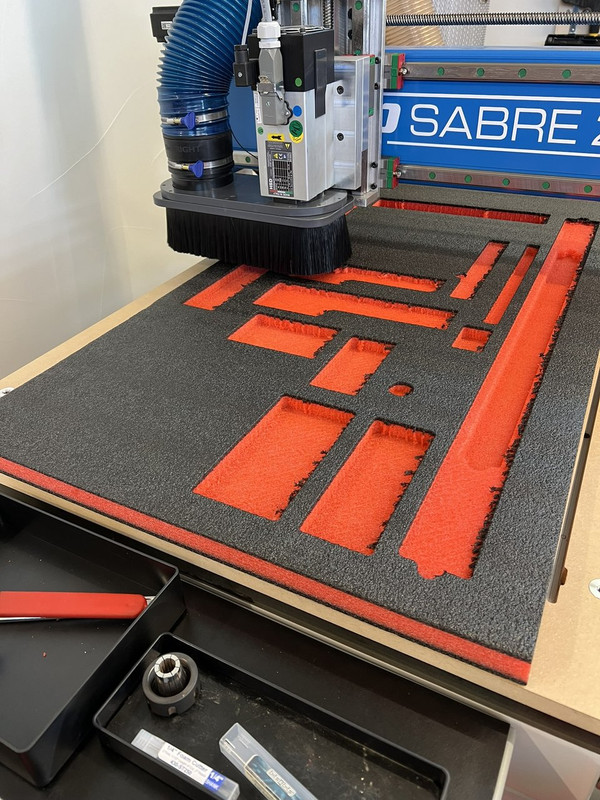
    The two bits I used for this entire process are as follows:
    1- Clearing bit - https://bitsbits.com/product/330-dnc375-down/
    2- Profile foam cutter - https://bitsbits.com/product/430-st250-foam/

    Some pointers:

    • Use two toolpaths for each cutout; one for the profile, which I cut first, and two for the pocket - I'm not sure if this is 100% necessary, but the edges were super crisp
    • For the pocket, use a raster along either 45-degrees or along the shortest length to avoid long stringy pieces
    • For the pocket I used a 30% stepover
    • Chipload doesn't seem to matter much in my testing. I tried 120-250 IPM and 15000-17000 RPM and they all looked simlar. At the higher RPM and slowest IPM I noticed a little melting in corners, etc, so I settled on 16000 and 170 IPM. (may increase to 200 next drawer I do this weekend just to see)
    • I just held things down with X-Fasten tape - about 3 strips of 25" or so


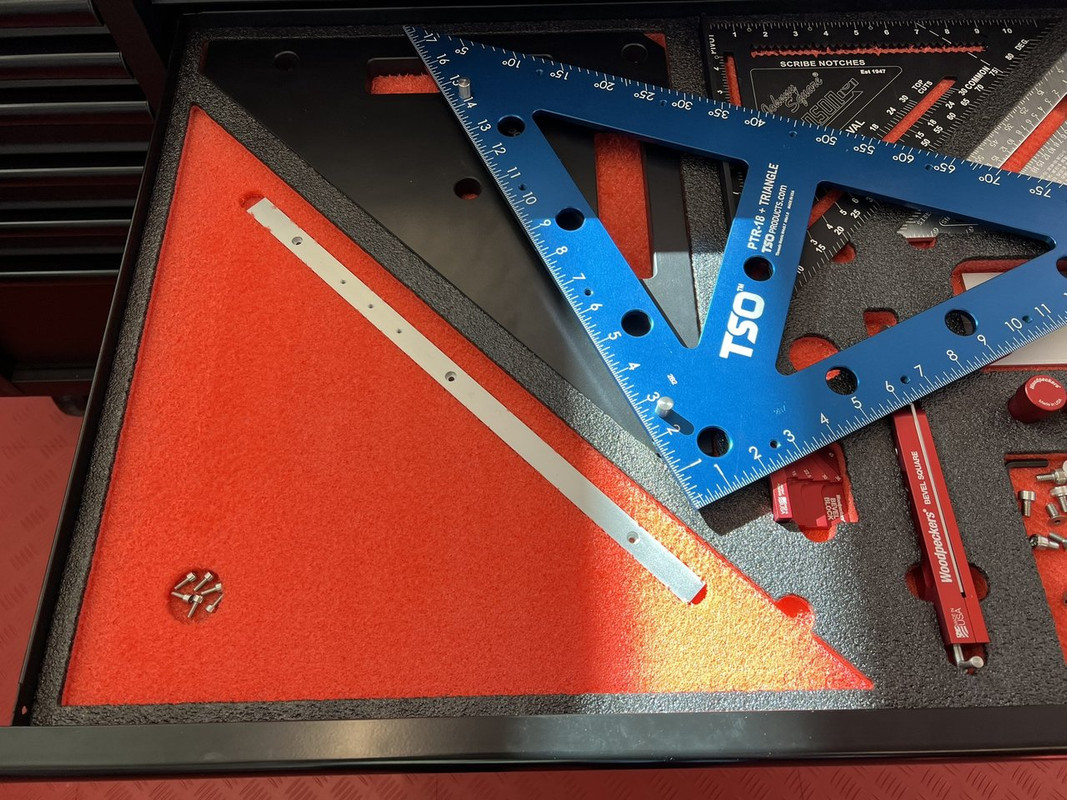
    Overall the design process and cutting was super fun and oh-so satisfying when tools just plopped right in. Took about 15-20 minutes to collect the dimensions, another 30-40 minutes to lay it out in Vcarve and generate sets of toolpaths (since I wanted to test different F&S). Overall milling time was about 40 minutes in total (16 pockets/profiles), but I was experimenting with feeds/speeds for each pocket, collecting data, so it will go faster next time. Simpler drawers will go a lot faster.


    Last edited by Michael Burnside; 03-05-2024 at 1:19 AM.

  2. #2
    Join Date
    Nov 2007
    Location
    Goleta / Santa Barbara
    Posts
    969
    VERY nice, sir.

  3. #3
    Join Date
    Feb 2007
    Location
    Piedmont Triad, NC
    Posts
    793
    Looks very cool. Thanks for the info.
    "Only those who have the patience to do simple things perfectly will acquire the skill to do difficult things easily.”
    Friedrich von Schiller (1759-1805)

    "Quality means doing it right when no one is looking."
    Henry Ford

  4. #4
    Join Date
    Mar 2003
    Location
    SE PA - Central Bucks County
    Posts
    65,896
    That two colored foam is da bomb!!!!
    --

    The most expensive tool is the one you buy "cheaply" and often...

  5. #5
    Join Date
    Nov 2022
    Location
    Northern Colorado
    Posts
    1,138
    Finished my other two layout/marking drawers.

    I've pretty much ironed out the process.

    I switched to this bit for the main clearing tool (https://bitsbits.com/product/530-dnc500-down-cut/) and created a custom material tool in Vcarve for Kaizen. For the aforementioned bit I'm using 200 IPM and 15K RPM. I did a few tests in some scraps and this seemed like a decent tradeoff in overall job time and quality of cut. One important factor is use 25% step-over for this bit. Using this larger bit really helps with job runtime, but with all bits, I noticed if you take too much bite (say 35-50%) typical for hardwood, you would get strings that could possibly wrap around the bit when cutting. I saw a few YouTubes and discussions on this. If you use this big bit at 25% you'll see short chips only. You might see a bit of tearing when the clearing bit climbs instead of conventional cuts, but it won't matter as the profile tool will clean it up. Runtime of these drawers are around 25 minutes total, each.

    For the profiles the same bit I mentioned above was used, and after a few tests, I ended up on 130 IPM and 16K RPM. This results in a nice finish. It is very important that this cut be setup as conventional. I set the max depth of cut in the tool setup to 1" and so pretty much every profile was one pass LOL.


    Here you can see some "fuzzies" for the climb cuts in the clearing process, but they clean up nicely and the bottom finish is great with the 1/2" bit.


  6. #6
    Join Date
    Mar 2003
    Location
    SE PA - Central Bucks County
    Posts
    65,896
    Truly well done and actually "beautiful" at the same time. That certainly matches your shop very well!

    Where did you source the Kaizen from?
    --

    The most expensive tool is the one you buy "cheaply" and often...

  7. #7
    Join Date
    Dec 2010
    Location
    WNY
    Posts
    9,750
    Very well done and truly eye candy.

    I will never be that organized. I will never own such nice tools.

    John

  8. #8
    Join Date
    May 2008
    Location
    MA
    Posts
    2,260
    Beautiful drawer inserts.

    I saw a video where they laid the tools out on a white background - then took a picture of that and imported to VCarve and did a bitmap outline to generate profiles. I havent tried it - all my organizers I built the file in VCarve itself grounds up.

    Looks like you did something similar - any tricks to building the CAD file?

  9. #9
    Join Date
    Nov 2022
    Location
    Northern Colorado
    Posts
    1,138
    Quote Originally Posted by Jim Becker View Post
    Truly well done and actually "beautiful" at the same time. That certainly matches your shop very well!

    Where did you source the Kaizen from?
    Thanks Jim! Yea, I love my workshop almost as much as I love woodworking so I figured, why not make it look good too LOL. I sourced it directly from Fastcap.com. I bought an 8 pack 1-1/8” and a 5 pack of 2-1/2”. Overall the 1-1/8” seems adequate for most things, so to finish up I’ll probably need one more 8 pack for a couple of other drawers in other boxes.

  10. #10
    Join Date
    Nov 2022
    Location
    Northern Colorado
    Posts
    1,138
    Quote Originally Posted by John TenEyck View Post
    Very well done and truly eye candy.

    I will never be that organized. I will never own such nice tools.

    John
    Hah, thanks John. I have a hard time being creative if things aren’t somewhat organized. I am lucky to have nice tools, but they’ve been procured slowly over years of birthdays, holidays, etc.

  11. #11
    Join Date
    Nov 2022
    Location
    Northern Colorado
    Posts
    1,138
    Quote Originally Posted by Carl Beckett View Post
    Beautiful drawer inserts.

    I saw a video where they laid the tools out on a white background - then took a picture of that and imported to VCarve and did a bitmap outline to generate profiles. I havent tried it - all my organizers I built the file in VCarve itself grounds up.

    Looks like you did something similar - any tricks to building the CAD file?
    Thank you Carl! I know some folks get a little crazy and have the foam perfectly follow the contour of the tool. Personally, for something that isn’t going to be transported, it’s excessive and more importantly time consuming. A few folks use Shaper Origin’s Plate. I have one and while super cool, tracing the object, converting to SVG and importing to V-Carve Pro for cleanup and vector creation takes more time than I want to spend. If you don’t spend time cleaning/smoothing the vector the edges will be a little choppy. It’s not hard to do, but it isn’t 0 time and cutting a rough 4 inch x 5 inch tiered pocket is waaaaay faster and honestly looks just as good IMHO.

    I just measure the drawer, starting from one of the edges and jot down some rough measurements in my notebook. Then I just go into V-Carve and build the drawer and adjust as needed. I create shapes and move them to generic layers (.e.g pocket 0p75DOCPocket which means 3/4” depth of cut pocket) and then generate tool-paths based on those layers. It’s a super fast and efficient way to do things. Typically the toolpaths are a clearing raster path 0/45/90 degree and a finish pass of different depths. This makes for quick design. Basically draw a shape, move to a layer, generate toopaths for that layer, group clearing and finish paths for entire job for 2 job files, done. All told, depending on drawer complexity it takes me 25-35 minutes from measuring to having g-code for cutting.

    One trick is to leave the foam on the CNC and try to fit any of the more tricky tools. If it isn’t quite right, you can easily generate an offset copy and an inside toolpath or adjust as needed, save a custom “cleanup” g-code file and run it. I had to do that on the Starrett straight edge because I wanted the pocket to be super tight.
    Last edited by Michael Burnside; 03-10-2024 at 12:24 PM.

  12. #12
    Join Date
    Mar 2003
    Location
    SE PA - Central Bucks County
    Posts
    65,896
    Quote Originally Posted by Michael Burnside View Post
    I sourced it directly from Fastcap.com. I bought an 8 pack 1-1/8” and a 5 pack of 2-1/2”. Overall the 1-1/8” seems adequate for most things, so to finish up I’ll probably need one more 8 pack for a couple of other drawers in other boxes.
    That's a pretty reasonable price when you buy the packs!
    --

    The most expensive tool is the one you buy "cheaply" and often...

  13. #13
    Join Date
    Nov 2022
    Location
    Northern Colorado
    Posts
    1,138
    Jim, I agree, especially considering you get free shipping. Overall it's a pretty inexpensive way to get full custom options.

    Another fun part of the design process is trying to get even more utilization out of a drawer by double stacking common items or accessors, as shown in the following pics of the drawers I already posted about.


  14. #14
    Beautiful work, Michael!
    David
    CurlyWoodShop on Etsy, David Falkner on YouTube, difalkner on Instagram

  15. #15
    Join Date
    Mar 2016
    Location
    Millstone, NJ
    Posts
    1,643
    Michael the drawers look great. Ive used a bunch of kaizen in the past but never the 2 color stuff. Now I may have to redo it.

    What flooring do you have?

Posting Permissions

  • You may not post new threads
  • You may not post replies
  • You may not post attachments
  • You may not edit your posts
  •