Page 3 of 6 FirstFirst 123456 LastLast
Results 31 to 45 of 80

Thread: table saw outfeed table

  1. #31
    Join Date
    Mar 2003
    Location
    odessa, missouri
    Posts
    1,931
    Blog Entries
    2
    I’m a heavy user on table saw. I have to have a 4’x64” on my saw. It doesn’t matter to me if it’s PB, laminate, MDO or MDF. Use a door or cover with Masonite, doesn’t matter as long as you keep it waxed..like Trewax, good, I like Johnson’s. Just wax it. Make a outfeed table to what you want.

  2. #32
    I just eat spinach.

  3. #33
    Here is a pic of mine (Wife is making year end awards for the wrestling team on it currently).

    It does 4x duty as an outfield table for the table saw, outfield for the drum sander, storage, and is my main assembly and drafting table. I also used it as a mobile scaffold when I put the lights and wiring on the ceiling.

    I used laminate on the top for ease of cleaning glue and finish slops. It does have a torsion top made of two sheets of particle board on a grid of Doug Fir. Having done a fair amount of formica work, laminate seems to work best with particle board of all things. Not sure why, I think there is something about the surface that the adhesive seems to like. And as long as you keep actual water away it doesn't seem to have issues in service with expansion and contraction. I put 3 coats of orange shellac, wax and all, on the underside to seal from vapor and balance out the impermeable laminate.


    IMG_3240.jpg

  4. #34
    Join Date
    Sep 2019
    Location
    Lafayette, CA
    Posts
    844
    I suppose my method is an outlier. I have four 1x10 pine boards, about 36” long. To each, I attached a 1” pine strip along one end, as a hook. To the other I hinged two little spindly 34” 1x3s. The hook fits between the fence rail and the extension table rail. On the rear table rail I clamped 10” long pine L brackets; the hook fits in there, too. I hang the assemblies on my French cleat wall, two steps from the saw.

    When I want to rip a long piece, I get 2, or 3, or 4 supports from the wall, hook them onto the saw, and drop the legs. I can rip a full 4x8 sheet of 3/4” plywood. The supports get the job done in my hobby shop, and take up nearly no space when not in use.

    Many years ago I lightly sanded and waxed the boards, maybe one or twice.

    Simple, cheap, sturdy enough, clever.

    Fine Woodworking Table Saw Methods of Work, ca. 1995.

  5. #35
    Quote Originally Posted by Andrew Seemann View Post
    Here is a pic of mine (Wife is making year end awards for the wrestling team on it currently).

    It does 4x duty as an outfield table for the table saw, outfield for the drum sander, storage, and is my main assembly and drafting table. I also used it as a mobile scaffold when I put the lights and wiring on the ceiling.

    I used laminate on the top for ease of cleaning glue and finish slops. It does have a torsion top made of two sheets of particle board on a grid of Doug Fir. Having done a fair amount of formica work, laminate seems to work best with particle board of all things. Not sure why, I think there is something about the surface that the adhesive seems to like. And as long as you keep actual water away it doesn't seem to have issues in service with expansion and contraction. I put 3 coats of orange shellac, wax and all, on the underside to seal from vapor and balance out the impermeable laminate.


    IMG_3240.jpg


    That's a nice set up- multi-function.

  6. #36
    two generals, this one the ripping, the other general cross cut now the excalibur sliders are off it. The SCM slider has just simple cut down stand from the last owner. This two sheets of ply left over from a job glued and screwed sitting on saw horses. I welded adjustable legs 20 years go, still sitting. Its no more than support for the material and its all I need. Works 1000 times better than net people who play catch.


    P1370800AB.jpg

  7. #37
    Join Date
    Feb 2004
    Location
    Perth, Australia
    Posts
    9,497
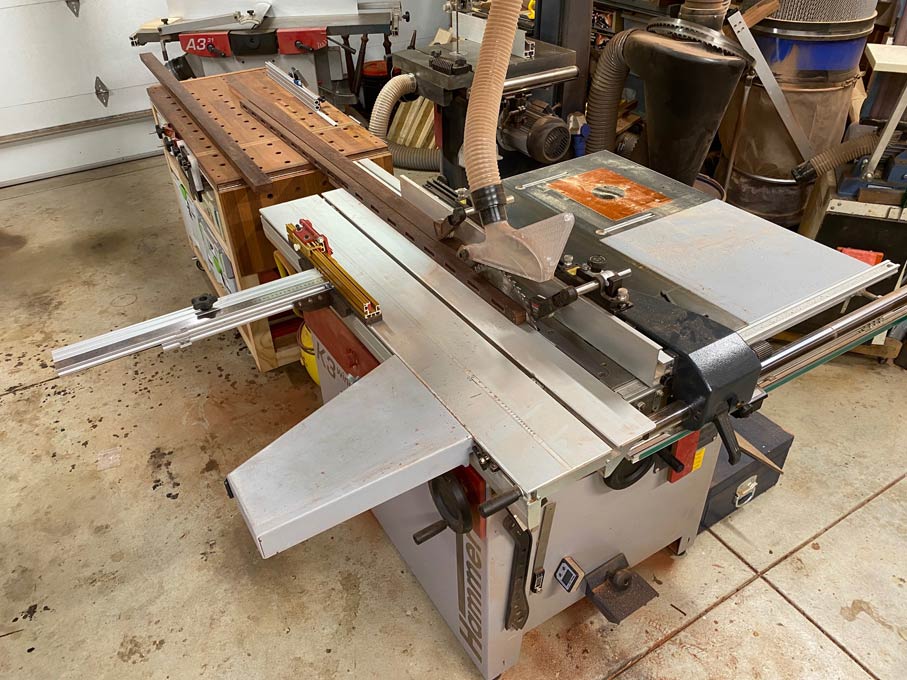
    I have taken a different approach. When my Hammer K3 slider is used in tablesaw mode - using the rip fence - my MFT doubles as an outfeed table ...


    Regards from Perth

    Derek

  8. #38
    this was on the side bar so gave it a look. He glues and screws two sheets which is fine. He should be standing on the material as he does it and not screw from the outsides in. He uses laminate and contact but id change out the 2 x 2 for dowels, more chance some material comes off edges and even one tiny splinter his way, if so will leave a bump later.

    he shows ripping material and it falling off with no outfeed, more like he flings it flings it off.

    an outfeed table is a safety device. Just can see those type of push things. Irrelevant but simple ones we have keep you further away.


    https://www.youtube.com/watch?v=5gMUP2hP7O8

  9. #39
    Join Date
    Dec 2013
    Location
    Central New Jersey
    Posts
    1,009
    Thanks for all the responses. I ordered a sheet of black Formica. My choice was set when I decided to match the black of the extension table of my saw and finding black melamine around here is not easy. Plus the durability of the Formica. I know how easy melamine chips off based based on prior use. It seems some folks had good luck using plywood, and I have some sanded ply in my shop already so I will use it. It's a lighter than MDF so that is a bonus. I will put a hardwood frame around it and some ribs under to help keep it flat.
    Distraction could lead to dismemberment!

  10. #40
    Join Date
    Mar 2003
    Location
    SE PA - Central Bucks County
    Posts
    65,893
    If you apply the solid wood edging first, you'll be able to lay down the laminate and then trim it to the edge, keeping a contiguous surface that will never "catch" something. A slight bevel on the laminate with an appropriate piece of router tooling when you trim it will remove the sharp edge and reduce the risk of damage to that edge. An applied wood border that surrounds the laminate can move a hair up and down seasonally, so by covering it with the laminate, you still get a "pretty" table border but eliminate the chance of it "catching" something in the future.
    --

    The most expensive tool is the one you buy "cheaply" and often...

  11. #41
    Perhaps 10 years ago, I applied plastic laminate to a used solid core door, put some legs on it and attached it to the table saw as both outfeed table and assembly table. It is now nicked, scratched, and stained, but after about 10 years of use, It is still going strong. If I were doing it today, I would do it exactly the same. The solid core door is flat, rigid, and strong. It is great for clamping projects to for glue up.

  12. #42
    Join Date
    Jan 2004
    Location
    Lewiston, Idaho
    Posts
    28,549
    As Jim suggested, build your top and edge it first. Then adhere your laminate. Then route the laminate and edging. I used a 45* chamfer bit, chamfering both back slightly. When you lay your laminate, if you don't have a J-roller, get one and use it.
    Ken

    So much to learn, so little time.....

  13. #43
    Join Date
    Dec 2013
    Location
    Central New Jersey
    Posts
    1,009
    Quote Originally Posted by Jim Becker View Post
    If you apply the solid wood edging first, you'll be able to lay down the laminate and then trim it to the edge, keeping a contiguous surface that will never "catch" something. A slight bevel on the laminate with an appropriate piece of router tooling when you trim it will remove the sharp edge and reduce the risk of damage to that edge. An applied wood border that surrounds the laminate can move a hair up and down seasonally, so by covering it with the laminate, you still get a "pretty" table border but eliminate the chance of it "catching" something in the future.
    That was my plan. Laminate all the way to the edge, including the solid wood boarder. I have 3 big planks of ASH that have dried. I will pull them out tomorrow and see if any are quartersawn to help reduce movement.
    Distraction could lead to dismemberment!

  14. #44
    Join Date
    Dec 2013
    Location
    Central New Jersey
    Posts
    1,009
    Quote Originally Posted by Ken Fitzgerald View Post
    As Jim suggested, build your top and edge it first. Then adhere your laminate. Then route the laminate and edging. I used a 45* chamfer bit, chamfering both back slightly. When you lay your laminate, if you don't have a J-roller, get one and use it.
    Thanks for the extra tips. I ordered a J-roller and contact cement with the laminate. I hate not having the proper tools for the job.
    Distraction could lead to dismemberment!

  15. #45
    Apologies if you have done laminate work before, if not, warning: Unsolicited advice below

    A glue spreader for the contact cement makes it go on much more evenly. Basically a piece of metal or plastic with v notches like used for laying tile. A place like Home Depot probably has one sized for vinyl flooring that would work. If you have a big blob of contact cement in one place it can cause the laminate to be a little high in that spot. Not a huge deal on an outfeed table, but ideally something you don't want. If the glue surface is super uneven it can interfere with the bond though.

    Let the glue dry to tacky, where it won't come of the laminate if you touch your finger to it. Don't let it sit overnight if possible. If you have enough extra, practicing on scrap isn't a bad idea. FYI, laminate likes to slide under table saw fences. It also sends sharp little chips all over the place when you cut it. I've had a few imbed a little bit in my fingers. More of an annoyance than anything.

    A bunch of 3/4" sticks laid across the substate (your plywood) will keep the laminate from touching prematurely. Too many sticks is better than not enough. You basically only have one shot; it is nearly impossible to remove after you get a good bond started. Make sure you have enough overlap on all edges.

    Remove enough sticks in the center to touch the laminate to the substrate (make sure you don't twist it or knock it off center in the process) and either work from the center out, or start from the center and go to one side then the other. Remove enough sticks to go 6-9 inches maybe 12 at a time. Use your hand to flatten and smooth out the laminate taking care not to get any air bubbles. Work from the center out. After you get the initial bond with your hands, use the J roller starting in the middle and work your way out. Always start with the roller working away from the center; the idea is that you will be pushing any air bubbles out rather than in. After you get a good bond it is OK to just go back and forth.

    After you get it all affixed, you'll want to trim the excess. The router bit will probably get full of adhesive a couple times and need to be cleaned off. If you need to touch up the edges you can use a medium to medium fine file.

    This was long winded I admit, and in practice it is pretty easy to do, though some of the steps and reasons aren't always obvious. There are videos out there of varying quality. I'd recommend watching at least a few of them. Good Luck!
    Last edited by Andrew Seemann; 03-06-2024 at 11:41 PM.

Posting Permissions

  • You may not post new threads
  • You may not post replies
  • You may not post attachments
  • You may not edit your posts
  •