Results 1 to 11 of 11

Thread: Sideboard using roasted oak and black limba

  1. #1
    Join Date
    Nov 2022
    Location
    Northern Colorado
    Posts
    1,139

    Sideboard using roasted oak and black limba

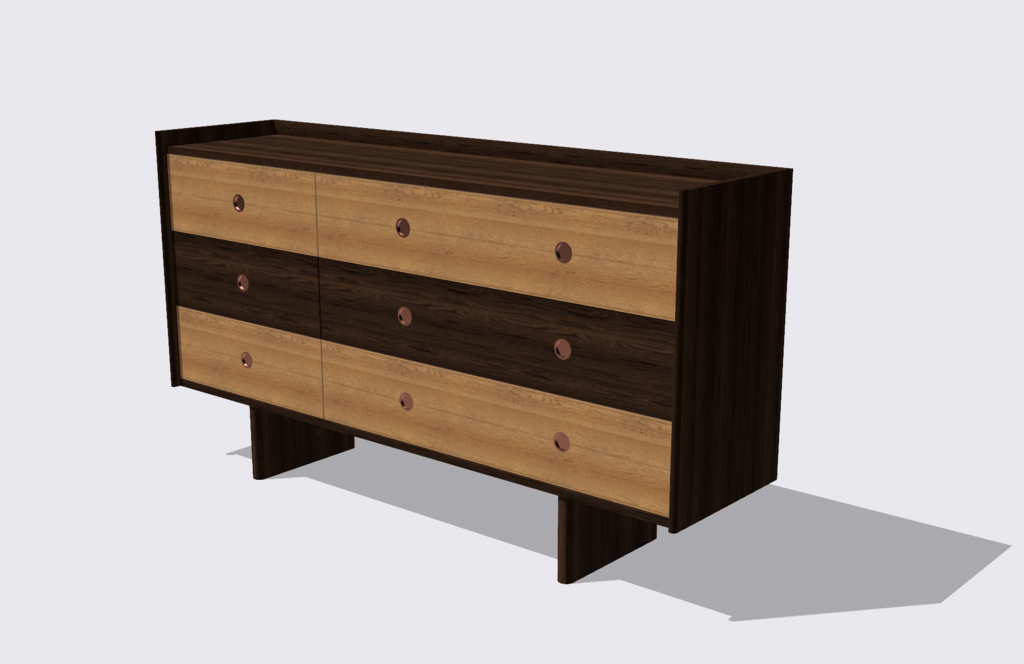
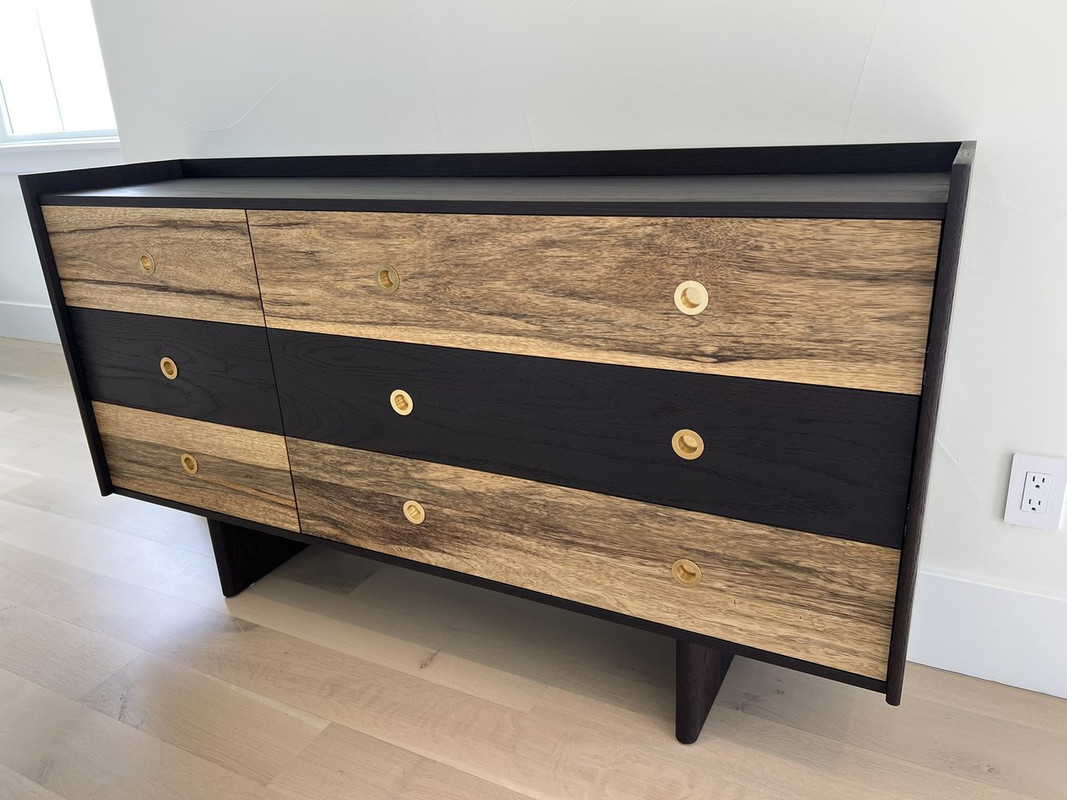
    This project ended up being a lot of fun and a great way to experiment with a few things that have been on my list to try. At the top was the merging of these two woods in a furniture piece. The figured wood is Black Limba while the darker wood is Oak that has been slow roasted and yields a beautiful rich "black" look when stained, particularly with oil-based products. I've made a couple of charcuterie boards using the wood and where this piece was destined we wanted it to match the black/dark tones of our upstairs bar/lounge area.

    The project started out with a 3D model using Shar3D, which allows me to print out 2D cad drawings which I use during the build


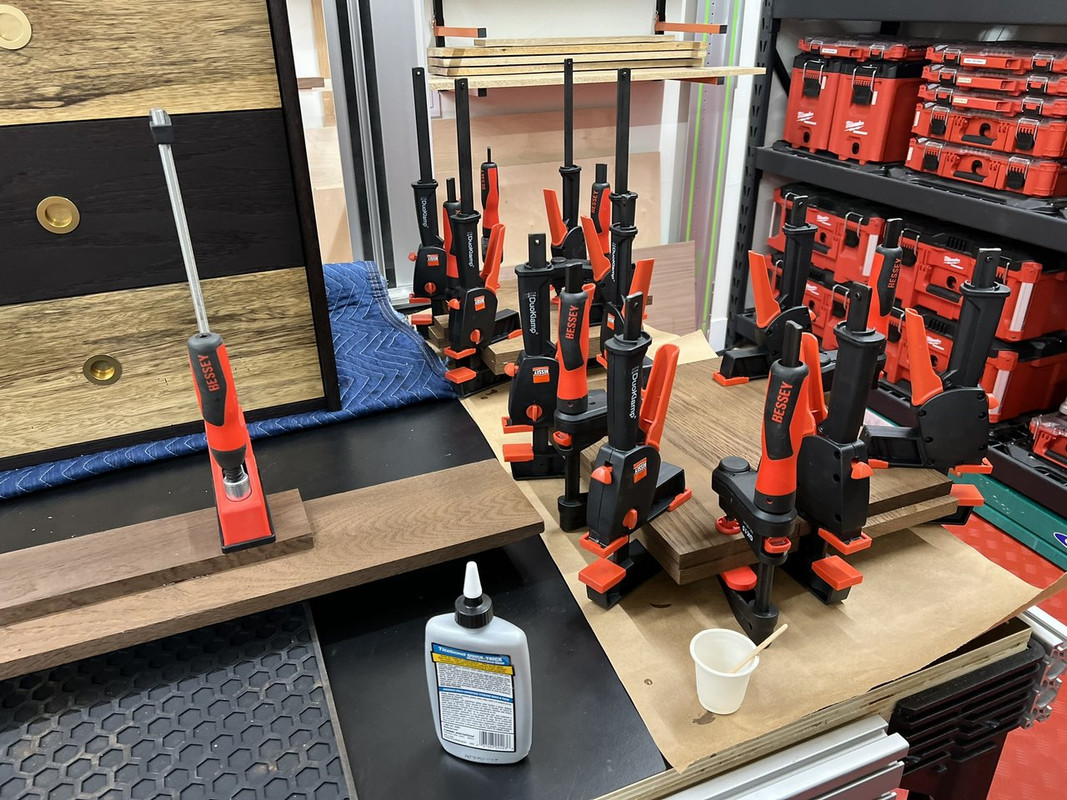
    One thing about roasted oak is that it is best to use epoxy. Using TB II/III will not work very well due to the fact that the carbonizing of the wood when roasted will not allow the glue to build a strong bond. I tried a test piece and with "some effort" I was able to break the joint. Using TotalBoat epoxy with a mix of medium and slow hardeners, makes for a super strong bond with very long open time. Personally, if not for the expense, I will often use epoxy over wood glue as I find a thin bead is super strong and I get little to no squeeze out and no swelling of the wood. A little acetone make it easy to clean up and squeeze out.


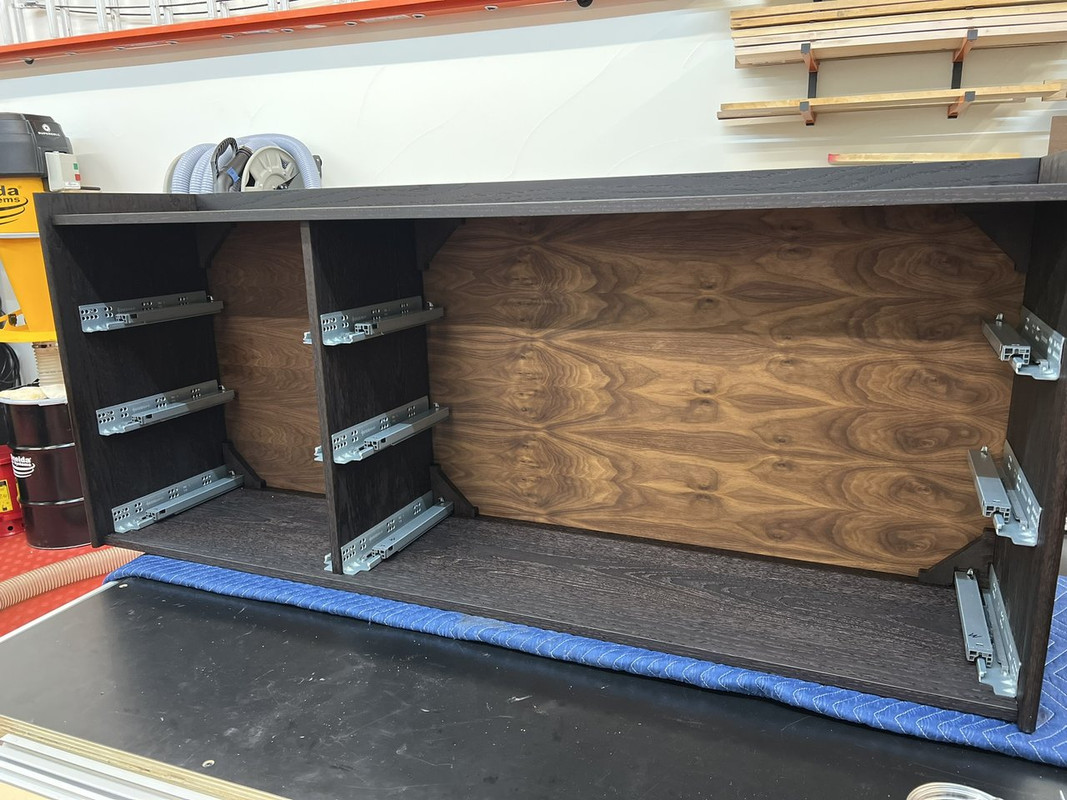
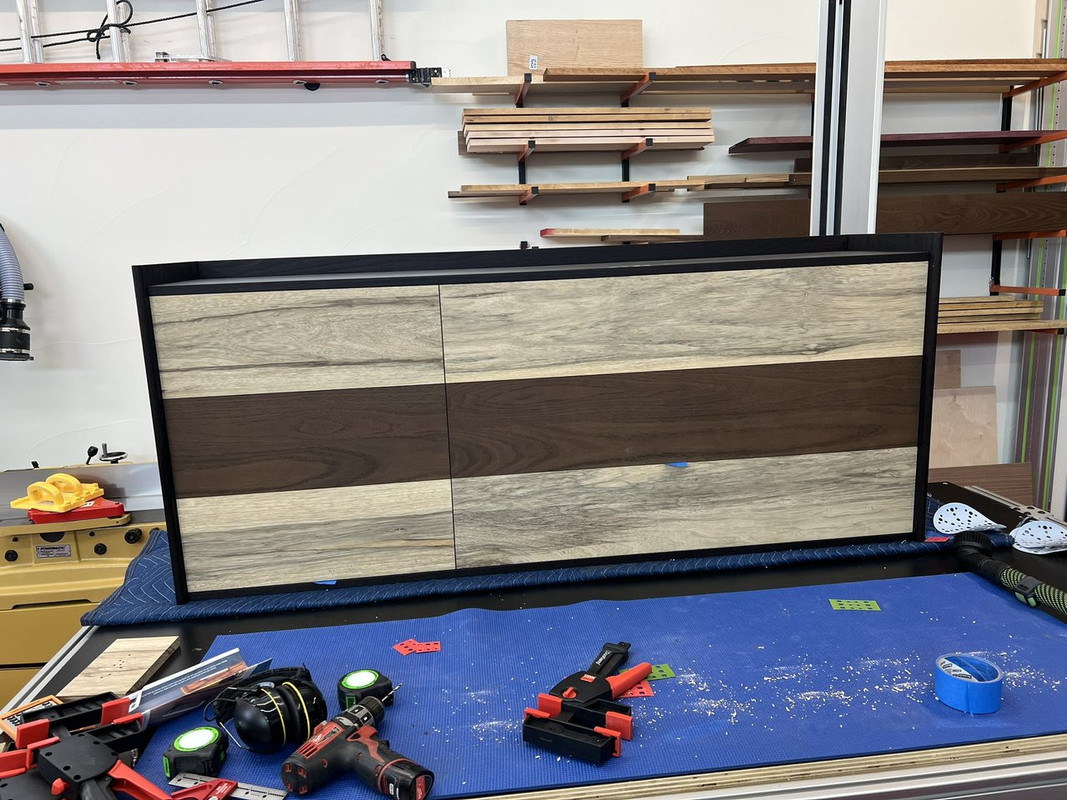
    I glued up the carcass with some help of a few Bessey clamps. I opted to inlay 1/4" MDF walnut ply, so it was necessary to install the panel during this process. While it is a bit more work and adds one extra step during a glue-up, I find an inset panel ups the aesthetic level of a piece, at least for me. I used TotalBoat epoxy with a slow hardener for this step.


    Jumping ahead a little, I stained the carcass with Rubio Monocoat (Pure), which came out looking stunning. I also installed Rockler Centerline undermount drawer slides. These came in around $12 cheaper than Blum and I figured I'd try them out. Overall they are built quite well with a similar assortment of adjustment and "slide action" compared to Blum. In operation, I cannot really tell the difference. That's good. The one complaint I have is the left/right components that attach to the actual drawer front. First, they mount, via a tab, to the narrow part of the frame and two require shimming for drawers thinner than 5/8". In my case, I milled to 5/8" so that wasn't a problem, but I feel this top-tab was a "we want to be different" decision that seems unnecessary. I will say, they're very easy to install. I'd lean towards Blum in the future unless out of stock, but on the next project I'll be giving Salice a test.


    Drawer boxes built (5/8" hard maple) and installed. Again, Rockler slides were easy to use and function very well.


    Next step was attaching the drawer fronts and doing some final tweaking. This won't see a lot of heavy use, so I opted for a tighter fit.


    Milled out the pockets for Basso brass pulls using my Shaper Origin. I was a little nervous about this step, but it was pretty easy overall


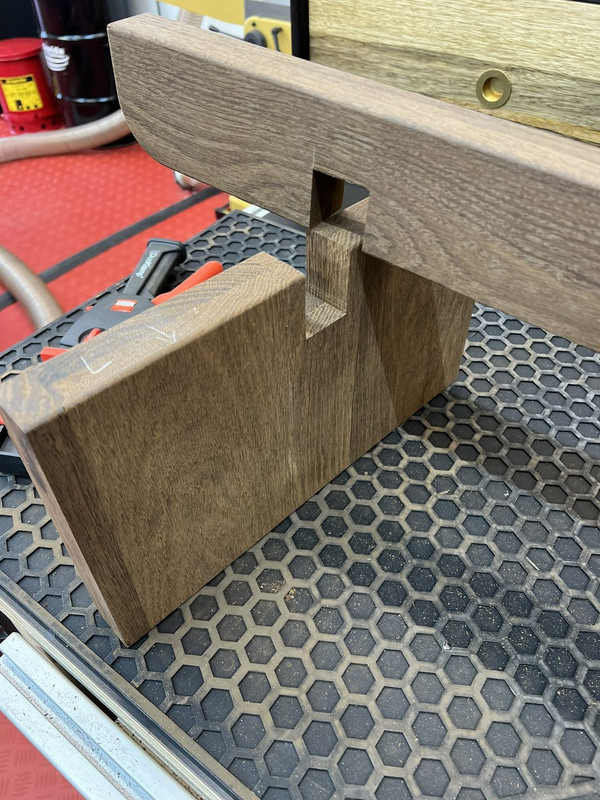
    Next, I milled up the base components with a combination of TB quick-and-thick and Totalboat Epoxy with medium hardener.


    Overall very pleased with the final product. My wife, who is my most important customer, absolutely loves it, so really that's all that matters to me. I really do love how you can still see the oak texturing, but it allows the Black Limba figuring steal the show.


    One last shot of the underside with base attached. Used my Shaper Origin to make elongated holes and attached from inside into stainless steel, threaded 1/4-20 inserts/bolts.


  2. #2
    Join Date
    Mar 2003
    Location
    SE PA - Central Bucks County
    Posts
    65,901
    Really outstanding and those species are very complimentary!
    --

    The most expensive tool is the one you buy "cheaply" and often...

  3. #3
    Join Date
    Nov 2022
    Location
    Northern Colorado
    Posts
    1,139
    Thanks Jim. Yea they really do complement well. This build was a lot of fun and a great learning experience.

  4. #4
    Join Date
    Dec 2010
    Location
    WNY
    Posts
    9,751
    I love it. Bold yet refined.

    Did you make or buy the toasted oak? Please tell us more.

    John

  5. #5
    Join Date
    Nov 2021
    Location
    Mid West and North East USA
    Posts
    2,943
    Blog Entries
    2
    Quote Originally Posted by Michael Burnside View Post
    Thanks Jim. Yea they really do complement well. This build was a lot of fun and a great learning experience.
    That looks excellent! Do you do your own roasting? My learning with roasting and torrefication is going very slowly.
    Best Regards, Maurice

  6. #6
    Join Date
    Nov 2022
    Location
    Northern Colorado
    Posts
    1,139
    Quote Originally Posted by John TenEyck View Post
    I love it. Bold yet refined.

    Did you make or buy the toasted oak? Please tell us more.

    John
    Quote Originally Posted by Maurice Mcmurry View Post
    That looks excellent! Do you do your own roasting? My learning with roasting and torrefication is going very slowly.
    Thank you, I really appreciate it! I do feel it was a bit out there but after finishing the carcass, I knew I was going to love it.

    I picked this up at Woodwokerssource. Bought a bunch of it when they had a sale going on. At first I thought charcuterie boards or maybe something small but after using it, my wife and I decided I should try to make a full piece out of it.

    For something as large as a furniture piece like this you need a pretty big oven, vacuum (to prevent a fire LOL) and a means of slowly raising the temperature. As you say Maurice, I believe the term is "torrefaction" which has been used on ships and even whiskey barrels. It's an interesting process, but what drew me to it was the unique look unattainable with a typical stain. The pictures just don't do it justice, it really is a beautiful look with a jaw dropping transformation when you apply an oil finish.

    As I mentioned, the only real downside is when gluing up edges, you really need to utilize epoxy (my preference) or polyurethane (Gorilla) glue as traditional glues just don't perform due to the carbonization and moisture resistance the wood has after roasting. TB II dark seemed ok, but TB II extend and III even after 24 hours could be broken at the joint by prying with hand/arm strength. I thought about TB II dark, but was paranoid something would go wrong, so I stuck with epoxy. Other than that one consideration, everything else in terms of "working" the wood is similar.
    Last edited by Michael Burnside; 02-18-2024 at 11:07 PM.

  7. #7
    Join Date
    Apr 2017
    Location
    Clarks Summit PA
    Posts
    1,747
    Michael, a unique handsome piece. I could see why your wife loves it. Thanks for your insight into working with epoxy.

  8. #8
    That’s a very nice piece of work! Congratulations!
    "All that is necessary for the triumph of evil is that good men do nothing."

    “If you want to know what a man's like, take a good look at how he treats his inferiors, not his equals.”

  9. #9
    Join Date
    May 2005
    Location
    SE South Dakota
    Posts
    1,538
    M O M!!

    Sorry that's upside down.

    Bruce
    Epilog TT 35W, 2 LMI SE225CV's
    CorelDraw 4 through 11
    CarveWright
    paper and pencils

  10. #10
    Join Date
    Nov 2022
    Location
    Northern Colorado
    Posts
    1,139
    Quote Originally Posted by Bruce Volden View Post
    M O M!!

    Sorry that's upside down.

    Bruce
    LOL thanks Bruce!

  11. #11
    Join Date
    Mar 2008
    Location
    SW Michigan
    Posts
    672
    I like it. The the contrast in drawer front textures and colors is interesting.

Posting Permissions

  • You may not post new threads
  • You may not post replies
  • You may not post attachments
  • You may not edit your posts
  •