Page 1 of 2 12 LastLast
Results 1 to 15 of 16

Thread: Fabricating 22 Identical Tapered Spindles: Any Tricks?

  1. #1

    Fabricating 22 Identical Tapered Spindles: Any Tricks?

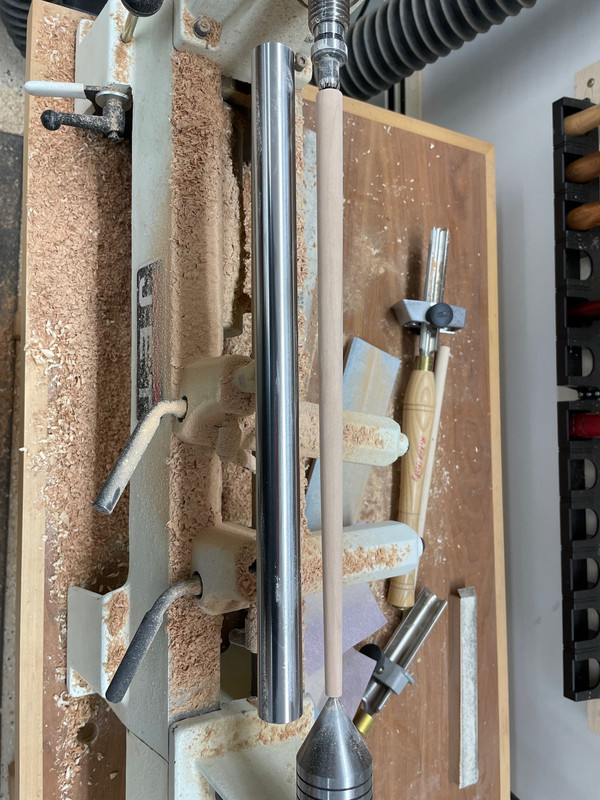
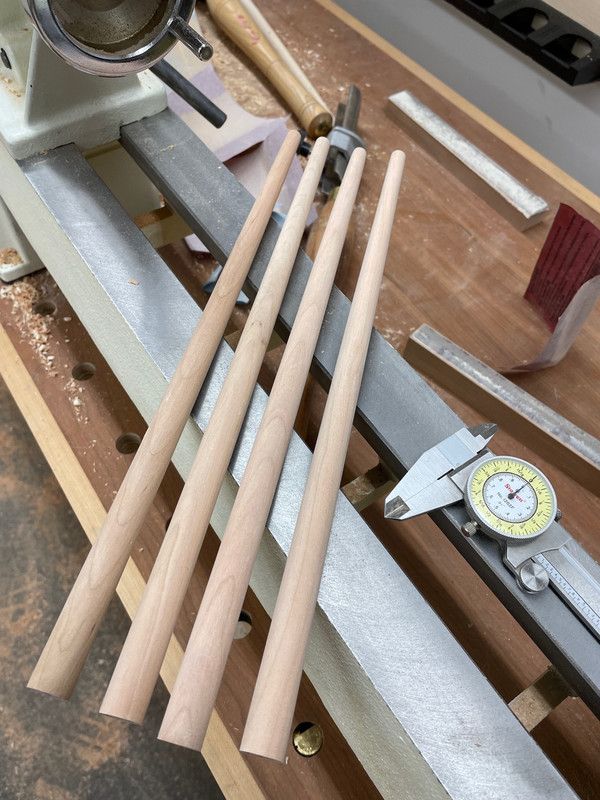
    I am planning on building a Shaker Setee a la Christian Becksvoort. The piece requires 22 tapered spindles: tapering from 5/8" dia. to 3/8" dia. over a length of 13-3/4". I am relatively new to turning, having made mostly chisel handles and a few turned legs. I am wondering if there are any tricks to producing multiple copies of this part so they all come out nearly identical? Here is a picture of a prototype I made today: I started with a round blank and used first a roughing gouge, then a spindle gouge, then a length of wood with 60 grit sandpaper adhered to it, then hand sanded lengthwise up to 180 grit. I can build one: what the trick to making 22 of them?

    [IMG][/IMG]

  2. #2
    Join Date
    Mar 2003
    Location
    Ontario, Canada
    Posts
    646
    At least you put in the word "nearly" with "identical". As they say, making one thing on a lathe is easy, making an identical one is hard!

    I had a similar project to yours years ago when I was a fairly new turner - make about 24 spokes for decorative wooden wagon wheels. I made one I liked then I measured the diameter at the big end, 1/4 of the way down, 1/2 way down, 3/4 of the way down, and finally, the small end diameter.
    I then mounted the blank roughed it and then with a parting tool put grooves the required depth at big end, 1/4 down .... to the small end to match the measurements. Handy if you have multiple calipers so you don't have to keep setting them.
    I then turned the blank tapering from the bigger to the next groove diameter, and so forth, until I got to the end. Cleaned up any "bumps" and then sanded it smooth.
    After I did a few, I started just using the 2 ends and the middle for reference. I did a couple near the end with just the end diameters and while not perfect the difference wasn't obvious at all.
    Your project may be a little trickier given the small 3/8 diameter. but the length is fairly short. You might be better starting at that end and working back towards the headstock so you have more supporting material from the drive end as you cut it away.
    Another thought: Do you need to have a bit of non-tapered spindle at each end to fit into mounting holes; I think your picture shows tapered from one end to the other.
    HTH
    Last edited by Bill Howatt; 01-26-2024 at 3:54 PM.

  3. #3
    Just a thought, I have never tried this,but could you copy the angle on something and follow this on your project?
    And I agree, I have not turned two identical pieces, it's not easy.

  4. #4
    Join Date
    Mar 2003
    Location
    Ontario, Canada
    Posts
    646
    Maybe he's done that given the gizmo clamped to the gouge in the background. Could just angle his long toolrest and then run the gouge down it after the initial roughing.

  5. #5
    Join Date
    Jan 2013
    Location
    sykesville, maryland
    Posts
    862
    I've never done this. I've only seen it on the web. Some have used a router attached to a base that follows a template of the desired profile. The template is cut from hardboard or other flat hard stock and mounted on the bed in line with the piece.

  6. #6
    Join Date
    Aug 2013
    Location
    Providence, RI
    Posts
    520
    For a simple taper like that, you should not need either a template nor multiple measurments. Draw your desired diameters on each end of a blank & mount between centers. Set your tool rest (which should probably be a bit lower) so that it is parallel to your desired taper. I usually do this with a pencil - hold the pencil at a fixed point along its length, touch the sharpened tip to the end circle you have drawn, adjust the toolrest so the outside is just touching your fingers where you are holding the pencil. Pinch your sharp roughing gouge between thumb and index finger (handle low for the cleanest cut), and use your index finger to set depth of projection. Move your body side to side to take nice smooth cuts. In a minute or less, you should have a tapered cylinder of the desired dimensions. You could follow up with a skew to get the best surface, using the same general procedure.
    -- Jim

    Use the right tool for the job.

  7. #7
    Last summer I had to do 18 croquet mallet handles. Not tapered like your pieces, but when I cut the handles, despite my best efforts, there was a few tool marks, or very slight depressions. No matter what method you choose to get the taper, sanding worked best for me by gluing sandpaper to a long piece of wood, and sanding the whole spindle at the same time. It works like a planer, the high spots come off, and the low areas are not touched until the high spots get down to their level. I hope that makes sense.
    Brian

    Sawdust Formation Engineer
    in charge of Blade Dulling

  8. #8
    Join Date
    Jan 2004
    Location
    Lewiston, Idaho
    Posts
    28,566
    When I first started turning, I volunteered to turn a set of spindles for a fellow Creeker, Dave Richards (Sketchup guru), for the wheel of his sailboat. Dave sent me 8 glued up blanks with an original spindle as an example. The key is "nearly identical". It's tough!

    I just finished turning a 3" section above a tapered foot on 4 walnut table legs for the table I am building. I had a catch on one in the final area and so it's very similar but not identical.

    If it was me, I'd use a skew for that simple taper but, Bernie Weishapl and I challenged each other to turning with nothing but a skew for one month, some years ago. We did and we feel comfortable use the skew which most turners hate.

    That said, get or make yourself a set of "go-no go" gauges for 3 different spots on the tapered spindle, say one for each end and one in the middle of the spindle. (Open ended box wrenches can be used , for example, or calipers.) Then using a parting tool, cut those three areas until the gauge fits and then connect the "dots" with a tool that you feel comfortable using.
    Last edited by Ken Fitzgerald; 01-27-2024 at 3:46 PM.
    Ken

    So much to learn, so little time.....

  9. #9
    Well, you guys have provided some great input and I am actually thinking this task is doable at this point. I will explore these various suggestions and report back. I found it interesting that Christian Becksvoort chose not to produce these spindles on his lathe: he described in his FWW article that he tapered some square blanks on the jointer and followed that by work at the bench with a block pane. I briefly tried that and was not happy with the results I was getting. I do wonder why Christian chose this approach. In the same article, he does turn the 6 legs for the bench on the lathe. Thanks again gents: with me luck!

  10. #10
    Join Date
    Sep 2023
    Location
    Upstate NY
    Posts
    36
    I saw something once that allowed quick duplication of a complex spindle. It was a rod that extended the length of the spindle, mounted behind the blank (parallel along the ways). At each required width there was a wire cut to that specific length. You turn the blank into a cylinder and then flip the wires to ride on top. As you turn the diameter to the exact required diameter the wire drops. Might be something easily set up since you'd only have to set a few wires to the taper. It would eliminate the need for repeated checking with calipers and speed the process quite a bit.

  11. #11

    Copy Lathe

    This is a perfect time to make your own copy lathe!

    Secure a nice piece of MDF to the ways of your bed (easier said than done!), and as wide as the opening from your headstock to the tailstock, about 12-14 inches wide. Prepare a fence about 3/4" x 2-1/2" x the length of the MDF deck.

    Next, make a fixture for your router that will hold it so the router centerline lines up horizontal from the deck, parallel to the floor, matching the centerlines. Select a nice 1-1/2" diameter flat router bit, sharp. The fixture that holds your router needs to to have a nice flat front edge to ride on the fence, and the fence needs to be anchored to match the taper. Adjust all so that the bit just touches the tapered part original. Make sure everything is secure so you can concentrate on the cut. Depending on a lot of variables, you may have to make several passes, with the router base cocked off the fence at an angle to reduce to the depth of cut.

    Run a part or two to get the fence in the right place, and then you can make two or two hundred.

    I have photos on the phone, not yet in this machine. I'll post a few pictures shortly. I am designing the production jigs for a stool design, and tapered legs, lots of 'em, are foundational to the project.
    I want to stay as close to the edge as I can without going over. Out on the edge you see all kinds of things you can't see from the center.
    - Kurt Vonnegut

  12. #12
    Join Date
    Jan 2004
    Location
    Lewiston, Idaho
    Posts
    28,566
    Quote Originally Posted by Phil Gaudio View Post
    Well, you guys have provided some great input and I am actually thinking this task is doable at this point. I will explore these various suggestions and report back. I found it interesting that Christian Becksvoort chose not to produce these spindles on his lathe: he described in his FWW article that he tapered some square blanks on the jointer and followed that by work at the bench with a block pane. I briefly tried that and was not happy with the results I was getting. I do wonder why Christian chose this approach. In the same article, he does turn the 6 legs for the bench on the lathe. Thanks again gents: with me luck!
    Here's wishing you luck. You might send Creeker John Keeton a private message asking about his approach and advice.. He's been creating a bunch of chairs recently and turning the spindles. He's a turner and just an all around great woodworker.

    Correct me if I'm wrong, but Christian Becksvoort is a known hand tool aficionado isn't he?
    Ken

    So much to learn, so little time.....

  13. #13
    20240130_122825_Original.jpg
    Finally! Trouble posting a photo….. But this is a photo of the copy lathe jig added to my lathe. There is a stool leg mounted between centers, similar to the taper you wish to copy. The hardest parts of this jig is making the router fixture and fixing the base board to the ways of the lathe.
    The accuracy of this set up is very high. In runs of twenty parts, I get less than .030” variation in diameter. It takes a few hogging passes, then one or two finale, full length passes. Dust collection is helpful.

  14. #14
    Join Date
    Aug 2013
    Location
    Providence, RI
    Posts
    520
    Quote Originally Posted by Jim Morgan View Post
    For a simple taper like that, you should not need either a template nor multiple measurments. Draw your desired diameters on each end of a blank & mount between centers. Set your tool rest (which should probably be a bit lower) so that it is parallel to your desired taper. I usually do this with a pencil - hold the pencil at a fixed point along its length, touch the sharpened tip to the end circle you have drawn, adjust the toolrest so the outside is just touching your fingers where you are holding the pencil. Pinch your sharp roughing gouge between thumb and index finger (handle low for the cleanest cut), and use your index finger to set depth of projection. Move your body side to side to take nice smooth cuts. In a minute or less, you should have a tapered cylinder of the desired dimensions. You could follow up with a skew to get the best surface, using the same general procedure.
    Perhaps I didn't make clear that once the toolrest is set, it does not need to be moved again. With that long toolrest in OP first post, I could whip these out in less than an hour, no special tools or jigs required.
    -- Jim

    Use the right tool for the job.

  15. #15
    Success! I made a prototype of the spindle, which tapered from 5/8" to 3/8" over the 13-3/4" length. I used this set the angle of the tool rest to give me the same taper. As luck would have it, I had a tool rest that was the perfect length for these spindles. Successive cuts starting out from the small diameter end eventually gave me the taper I needed. Once I was around 1/32" from finished dimensions, a piece of scrap with 60 sandpaper was used to dial in an even taper. Some time spent moving up the grits yielded some fine looking spindles. 4 down, 18 to go.

    Thanks to everyone for the great suggestions: much appreciated.

    [IMG][/IMG]

    [IMG][/IMG]

Posting Permissions

  • You may not post new threads
  • You may not post replies
  • You may not post attachments
  • You may not edit your posts
  •