Results 1 to 7 of 7

Thread: Clock with Grasshopper Escapement - My longest project ever

  1. #1
    Join Date
    Dec 2010
    Location
    WNY
    Posts
    9,750

    Clock with Grasshopper Escapement - My longest project ever

    Recently, I posted about a test clock I was working on utilizing a grasshopper escapement, first developed by John Harrison the famous English clockmaker from about 300 years ago. Harrison developed the grasshopper escapement to eliminate sliding friction, the enemy of accurate time keeping. A side benefit is that it is nearly silent. That was the appeal to me because my wife hates tick-tock, so in order to have a functioning clock that she will tolerate I needed to make one that is very quiet.

    I built a mockup of just the escapement mechanism with a pendulum to prove to myself I could fabricate one that worked. From that small success I built two test clocks, one just to prove I could design my own drive train from scratch, and a second to make the whole thing attractive. I didn't keep track of how many hours I spent designing and building the test clocks and the final one, but I'd guess it approached 300 hours. That, by far, is the longest I've ever spent on one project.

    Along the way I implemented a "remontoire", an endless rope, to automatically rewind the clock. There is a small motor in the back of the clock that is triggered by the falling drive weight when it trips a limit switch to start the motor and another to turn it off. I couldn't stop a rope system from slipping, so I used a toothed belt like used in ink jet printers. Some fancy machining was required to mill the tiny 1 mm teeth into the center wheel for the belt to mesh with.

    All of the wheels, pinions, and most of the clock parts were machined on my CNC. The frame was built in the conventional way, but I used the CNC to mill pockets into it for the limit switches and to house the relay and wiring in the base.

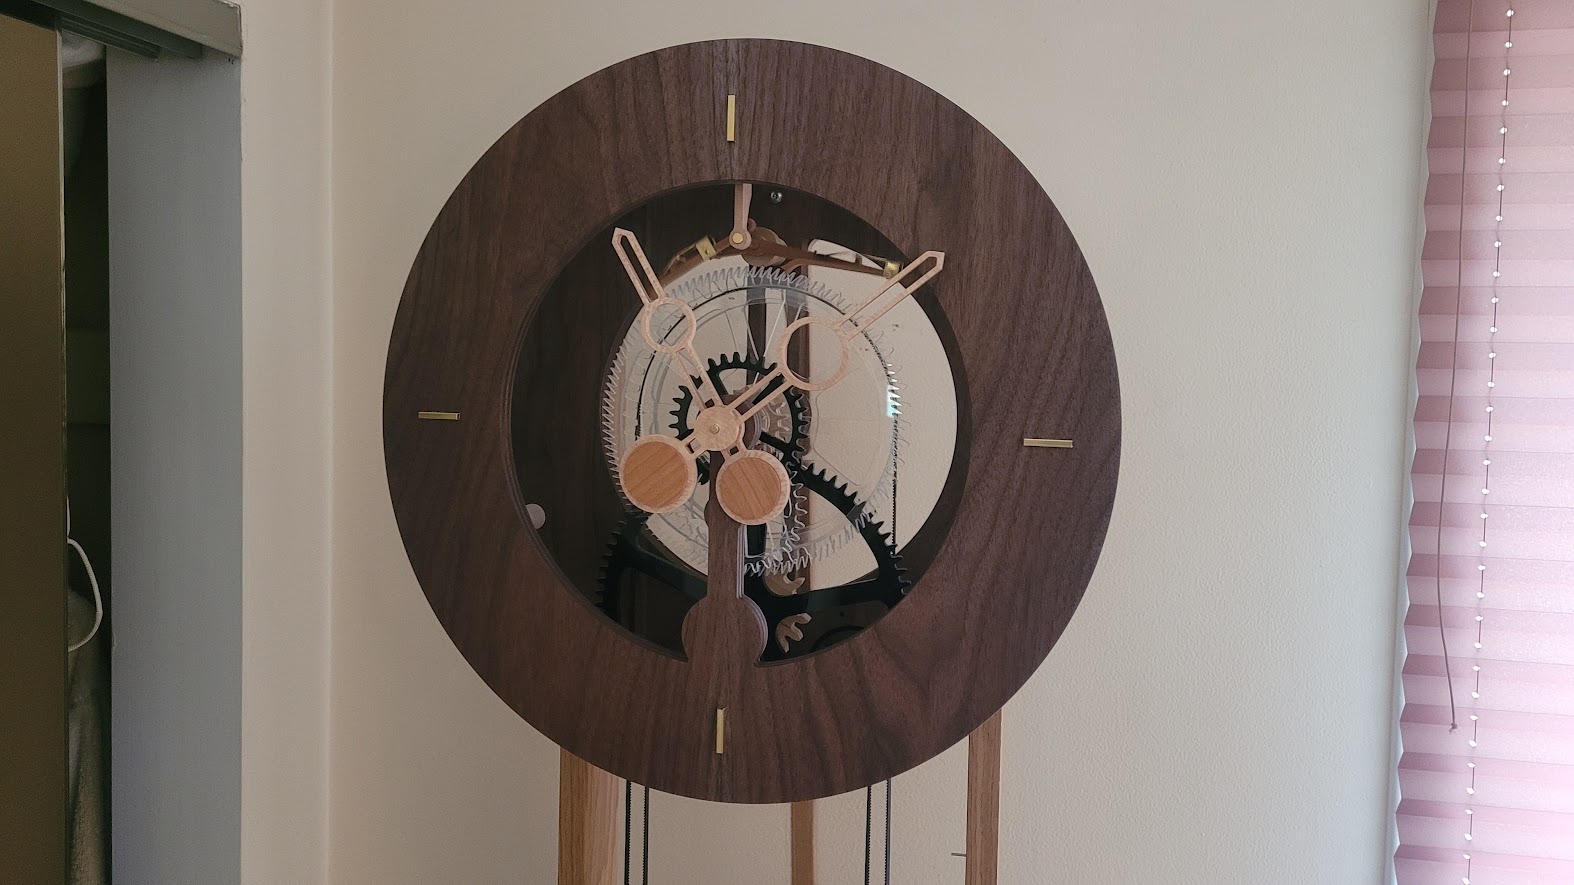
    The clock is made with walnut plywood that I made from shop sawn veneer. The base is white oak. The hands are sycamore and cherry, as is the grasshopper. The wheels are cast acrylic and the pinons are cherry plywood. The pendulum weighs 3 pounds, as Harrison deemed correct. The drive weight is about 2 lbs and the counter weight is about 300 grams. While much of clock making can be derived from formulae and geometry, the weight required to drive a clock can only be ascertained empirically, although I did find that once you know what works for one movement it can be extrapolated to others to get you into the ballpark.

    Here are a few photos.


    Here's a video of about 75 seconds showing the clock in motion:

    https://photos.app.goo.gl/hk4kGXYVx8mV8C6s9


    This was a very rewarding project, but I think it satisfied my clock making appetite for awhile.

    John
    Last edited by John TenEyck; 01-11-2024 at 12:54 PM.

  2. #2
    Join Date
    Jun 2016
    Location
    Houston
    Posts
    246
    Fascinating, and nice work! I think your efforts also satisfied my appetite for a while, and I am really happy you undertook this. It looks like a lot of math.

  3. #3
    Outstanding John. The video really adds to your post too.
    Dave Anderson

    Chester, NH

  4. John,

    congratulations! A beautiful clock with a unique design! The only thing that I would add are indices for minutes and seconds for a better readability, but that's not meant to criticize you.
    I appeciate that we both came to somehow similar results by completely different approaches: You made your clock almost entirely by CNC; in contrary, I made my own clock (see https://sawmillcreek.org/showthread....n-s-principles ) the old-fashioned way by deliberately avoiding any CNC machining. It's good to see that both ways lead to comparable results.

    Quote Originally Posted by John TenEyck View Post
    I didn't keep track of how many hours I spent designing and building the test clocks and the final one, but I'd guess it approached 300 hours. That, by far, is the longest I've ever spent on one project.
    Mine as well was my longest project: It took me four years to develop the concept, to let the design mature, and to do all the calculations needed in order to optimize the geometry. Manufacturing the clock took almost two years, but I didn't write down the hours neither.

    Quote Originally Posted by John TenEyck View Post
    I couldn't stop a rope system from slipping, so I used a toothed belt like used in ink jet printers.
    That's strange. I'm using a polyhemp rope, as used for rigging shipmodels, spliced to an endless loop, and I don't observe any slipping. The ratio of my drive weight and my tensioning weight is like 2,5:1, but I might go to 3:1 (like your clock) without problems.

    Quote Originally Posted by John TenEyck View Post
    While much of clock making can be derived from formulae and geometry, the weight required to drive a clock can only be ascertained empirically, although I did find that once you know what works for one movement it can be extrapolated to others to get you into the ballpark.
    I tried to calculate the power consumption beforehands and got to the correct range, but this was some serious math. So in general, you're right.
    But it even might be interesting to determine the power afterwards:
    You can make a decay test by letting the bare pendulum (without the clockwork) swing and measuring the decay of its amplitude. From that, you can obtain the Q-factor of the pendulum, which is a measure for its damping by air resistance. In my case, I have a Q of 3000, which is quite low compared to "conventional" precision clocks. But Harrison advocated the concept of high amplitude and low Q, in contrary to Graham escapement clocks with low amplitude and high Q.
    From Q, one can calculate the power consumption of the pendulum at its operational amplitude (60 microwatt in my case). From the weight and sinking speed of the driveweight, one can calculate the drive power (75 microwatt in my case). The ratio of output power to input power is the mechanical efficiency of the clock's movement and escapement. My own clock has an efficiency of 80%, which ist excellent compared to conventional clocks: A Graham escapement (with sliding pallets and drop) cannot have a better efficiency than 50% as a matter of principle.

    Regards, Norbert

  5. #5
    Join Date
    Dec 2010
    Location
    WNY
    Posts
    9,750
    Thanks Norbert. It was a great project with a lot of learning. My objective in making the clock was different from yours. I set out to make a clock that is very quiet and that is attractive. On those counts I think it's a success. I wasn't concerned very much about accuracy. Plus or minus a couple of minutes/day is more than acceptable, so minutes/seconds marks on the dial were of no importance to me. Plus, I really like the very simple dial ring, complimented by the bob and its brass pieces. I think your objective was to build a clock fully following Harrison's principles, of which you did in magnificent fashion, and I imagine it keeps exceptionally accurate time.

    I used a simple flat ring for the rope system remontoire, and even on a wooden ring it slipped. I think I would have to make one with a radiused groove in it about the same size as the rope to prevent slippage. Is that what you did? The printer belt I ended up using to prevent slippage is not as attractive, but it fits with the modern design of my clock. If I were to build one with a more traditional look, however, I would not use it, and would have to revisit the rope system. Since you were able to make it work, I know it's possible.

    I had little interest in knowing the Q-factor or what the efficiency is of my clock. All I was interested in was a clock that will run reliably and is quiet. It's definitely quiet thanks to the grasshopper escapement. Whether or not it's reliable is yet to be determined.


    John

  6. #6
    Join Date
    Jan 2024
    Location
    United States
    Posts
    33
    Wow, I love the minimal aesthetics of this clock!

    I wish I can craft something like this someday.

  7. #7
    Beautiful work! I can only imagine the amount of thought, effort, and skill you've poured into this project. I've never spent 300 hours on building anything, but I might think about making more complex pieces considering how this one turned out.

Posting Permissions

  • You may not post new threads
  • You may not post replies
  • You may not post attachments
  • You may not edit your posts
  •