Page 3 of 5 FirstFirst 12345 LastLast
Results 31 to 45 of 75

Thread: Designing a dining carver chair

  1. #31
    Join Date
    Feb 2004
    Location
    Perth, Australia
    Posts
    9,497
    Keegan, the grain for the seat does run side-to-side. The main reason is to enable tenons to be integral. I have considered loose tenons, but the issue there is that the removal of waste for the seat curve/hollowing may interfere with morticing the sides. Integral tenons will be stronger.

    The shaping of the seat is planned to create a 35mm high rim. This is the same as the seats for the bentwood chairs.

    Regards from Perth

    Derek

  2. #32
    Join Date
    Apr 2021
    Location
    Austin, TX
    Posts
    664
    That makes sense. Cut the tenons while the seat blank is still square then shape. Do you plan to hollow out the seat with hand tools?

  3. #33
    Join Date
    Oct 2005
    Location
    Helensburgh, Australia
    Posts
    2,711
    Setting the parameters for chairs is a bit of a challenge and stock sizes do not fit all. My wife is 4" 10" tall and she has never been able to find a chair that was comfortable so I set out to build one. Along the way I recalled a jig I had seen many years ago in FWW #096 that made the fitting of a chair to a specific person fairly easy so it got used and definitely works. I guess I can't post any details here but it is worth a look for anyone building chairs. The specific issues my wife has is being able to sit in a chair upright against the back rest without slumping and have her feet flat on the floor, this means the length, the height and the slope of the seat has to be very specific to her. Once that is decided the height of the arms has to be resolved and different uses mean different heights. The Morris chair I built had to have the arms lower than normal because she does a huge amount of hand sewing and having them higher interferes with her arm movement. If it was used as a lounge care and nothing else the arms would be a bit higher. I built the jig, fitted it to her and she sat in it for some months while we change things to suit the person and the use it was put to.
    Chris

    Everything I like is either illegal, immoral or fattening

  4. #34
    Join Date
    Dec 2019
    Location
    The old pueblo in el norte.
    Posts
    1,904
    Quote Originally Posted by Chris Parks View Post
    Setting the parameters for chairs is a bit of a challenge and stock sizes do not fit all. My wife is 4" 10" tall and she has never been able to find a chair that was comfortable so I set out to build one. Along the way I recalled a jig I had seen many years ago in FWW #096 that made the fitting of a chair to a specific person fairly easy so it got used and definitely works. I guess I can't post any details here but it is worth a look for anyone building chairs. The specific issues my wife has is being able to sit in a chair upright against the back rest without slumping and have her feet flat on the floor, this means the length, the height and the slope of the seat has to be very specific to her. Once that is decided the height of the arms has to be resolved and different uses mean different heights. The Morris chair I built had to have the arms lower than normal because she does a huge amount of hand sewing and having them higher interferes with her arm movement. If it was used as a lounge care and nothing else the arms would be a bit higher. I built the jig, fitted it to her and she sat in it for some months while we change things to suit the person and the use it was put to.

    Thank you. My wife is 4'11". I'll go find it. Living room seating is already on my honey-do list.
    ~mike

    happy in my mud hut

  5. #35
    Join Date
    Feb 2004
    Location
    Perth, Australia
    Posts
    9,497
    After some discussion, and a sudden increased awareness of dining room chairs, I decided to level the seat in profile ...


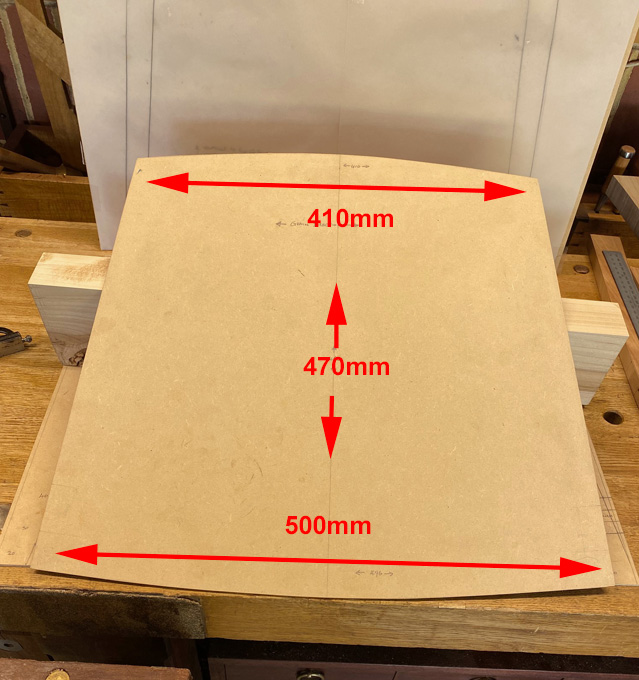
    The seat will not end up horizontal, however, but be curved across the width, and further carved for extra depth at the butt end.


    This is a basic template for the seat ...


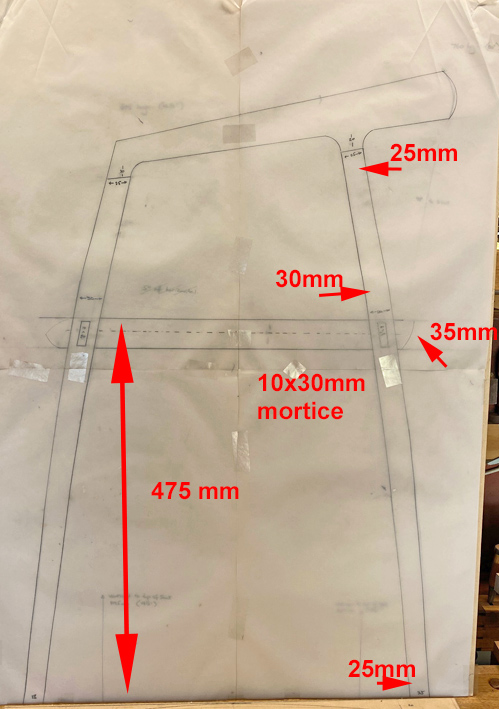
    The seat will be attached directly to the circular legs with through integral tenons for strength, and because the curved seat would make it difficult to use loose tenons. The tenon/mortice with be 10x30mm.


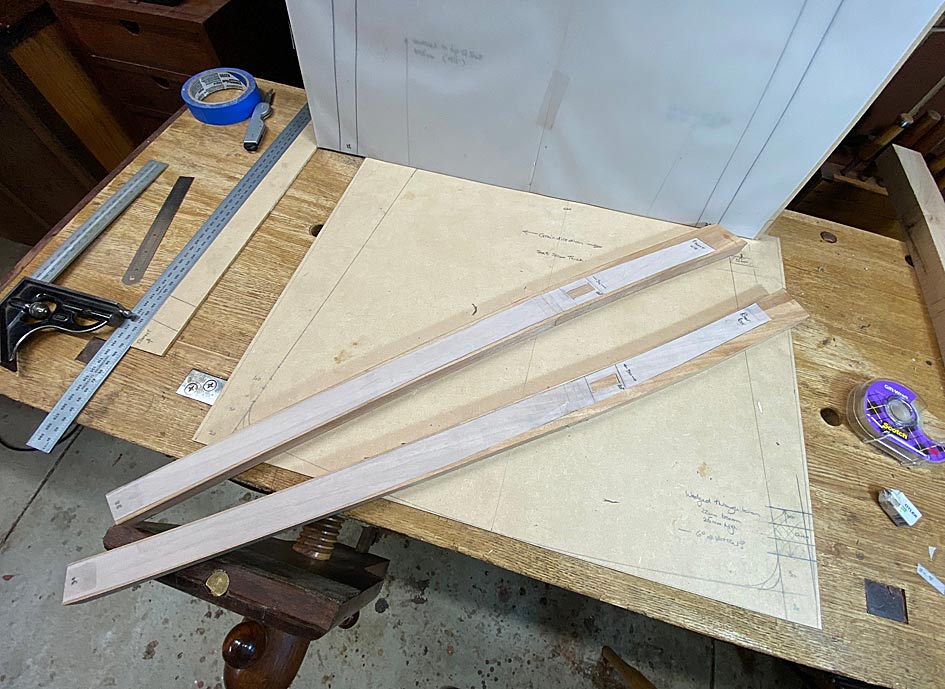
    A tracing of the legs was used to create templates ...


    In drawing the legs, each was mapped out separately, but with the same basic parameters: 25mm diameter at the top and bottom, and 30mm diameter through the centre. Similar curve plotted. The rear legs are roughly 30 mm longer than the front legs, and I anticipated that the proportions would differ as a result. However, when I placed the two templates on top of one another, they were exactly the same! And not only that, but the mortices were in exactly the same position as well!!


    As a result, one template was used for both front and rear legs.


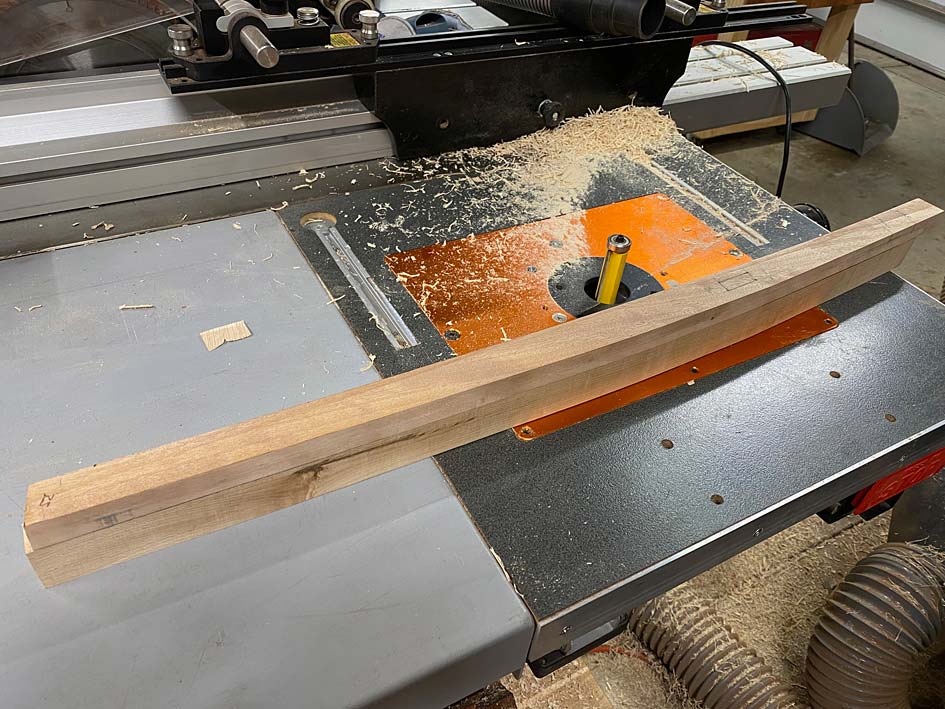
    The plan was to bandsaw out each leg ...


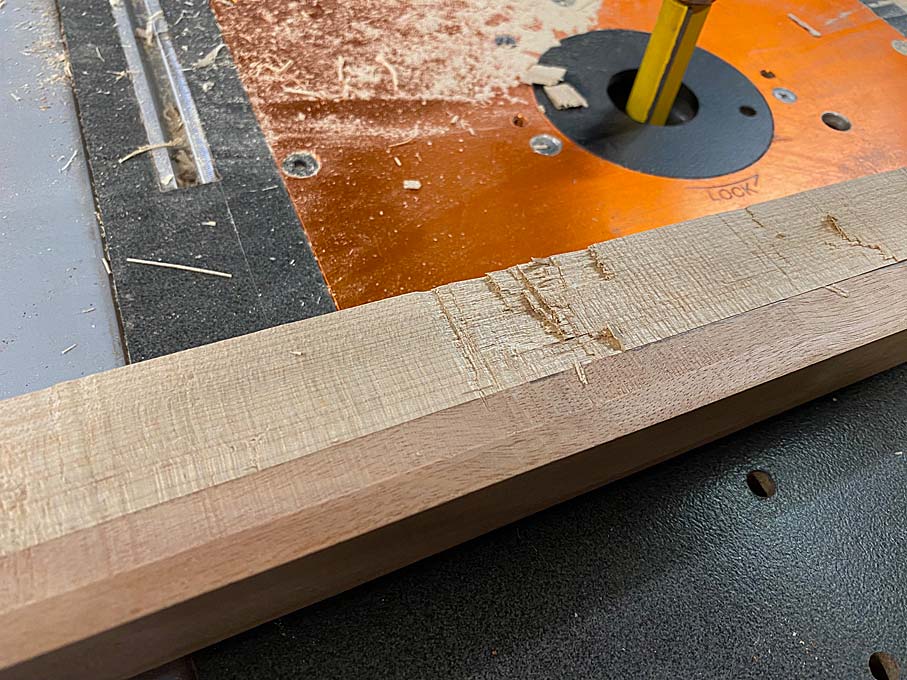
    ... and then use a pattern bit on the router table to trim the waste ...


    This did not go to plan. The first leg was uneventful, but the second decided to explode. This is what I feared from the Rock Maple. Even with care in regard to grain direction, and resorting to climb cuts where needed, the router bit I had available was not helpful (the router bit I ordered had not arrived, and would be some days away).


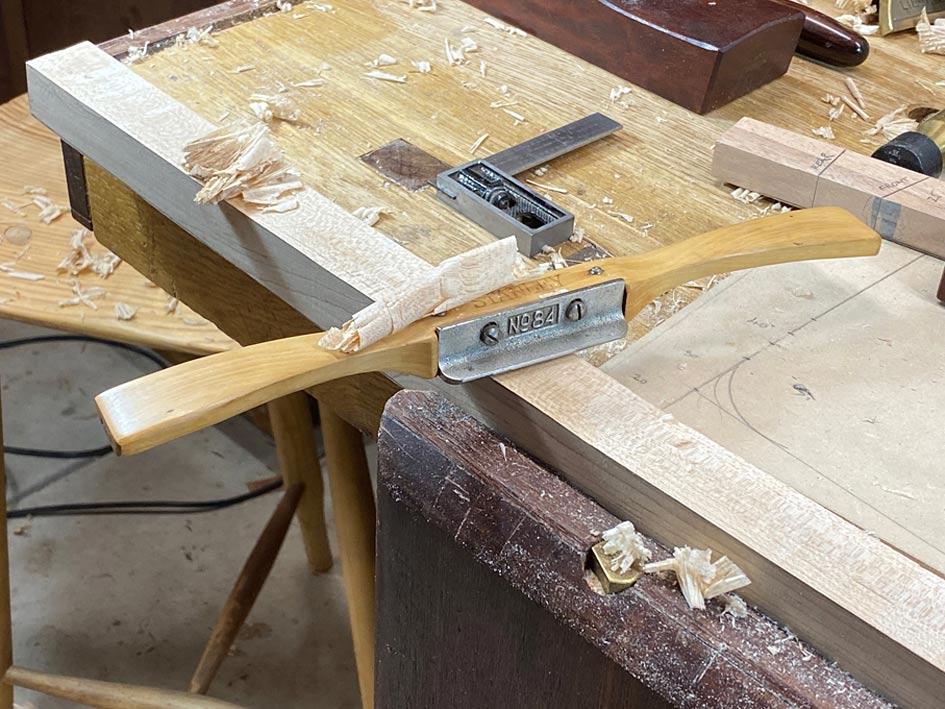
    I had four leg blanks for the first chair cut out, and decided to do it in a method with which I am more comfortable ... with hand tools. Since there was so little waste to remove, a spokeshave on the inside curve was simple enough ...


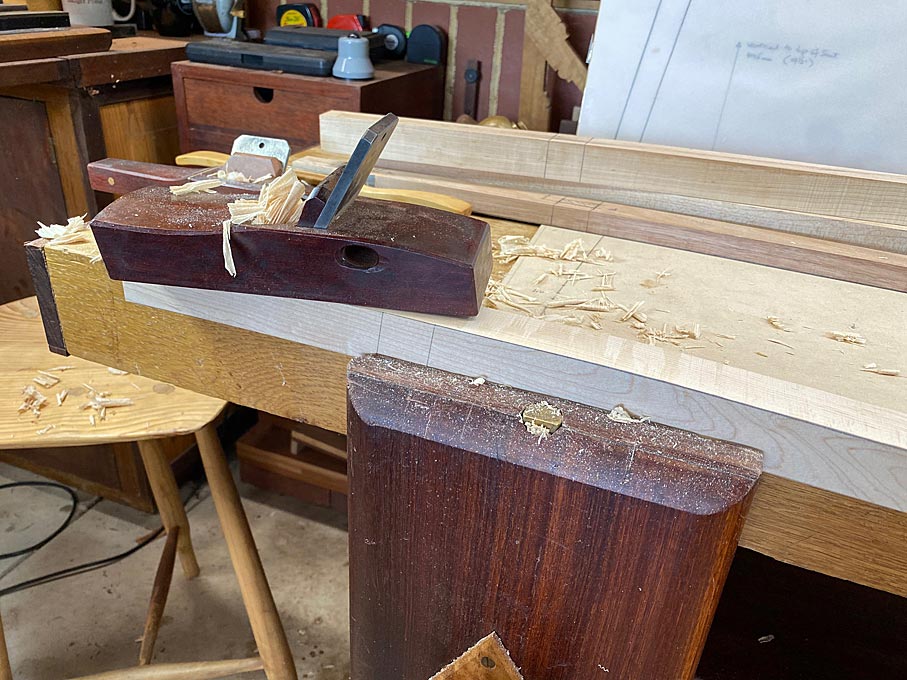
    ... and a hand plane on the outside curve was even easier ...


    It is vital to check frequently that everything is perfectly square. Morticing would not be possible otherwise.


    Rock maple may be hard and brittle, but it cuts cleanly with a plane blade.


    The leg blanks are 30mm thick. Once the outline is cut to match the template, the ends will need to be reduced to 25mm ...


    Lastly, for now, the position of the mortice was marked on both sides of each leg. The legs will be attached with through mortice-and-tenons, and each mortice is cut half-wway from each side ...


    I am putting aside these legs for now, and will return to the final shaping, along with the other four, after the seats are made. which is next up.


    Regards from Perth


    Derek

  6. #36
    I have a near 100% success rate at ruining something whenever I pull out my router to speed up something I know I can do better by hand. Glad I'm not the only one

  7. #37
    Join Date
    Feb 2004
    Location
    Perth, Australia
    Posts
    9,497
    The question I have is whether to keep the ends of the mortices round, or square them off? Square ends make for easier square (hand cut) tenons .. integral to the seat), but round ends will look better - in keeping with the round legs.


    Regards from Perth


    Derek

  8. #38
    Join Date
    May 2015
    Location
    NJ
    Posts
    1,414
    I vote for square. It will give the work a nice hand-done look and will compliment the curvature nicely imho. Too much round looks machine made (I feel).

    Also, I don't care for doing that sort of thing in a router table. If they're one off's then hand tools are the way to fly. If I absolutely must, I like using a hand held router, flipping the work as needed and climb cutting when necessary.

  9. #39
    Square for sure - agree with all John said. I don't mind round, but only use them when batching out on my mortising unit. Even then, I tend to square the ends.

  10. #40
    Join Date
    Sep 2007
    Location
    Longview WA
    Posts
    27,471
    Blog Entries
    1
    Quote Originally Posted by Derek Cohen View Post
    The question I have is whether to keep the ends of the mortices round, or square them off? Square ends make for easier square (hand cut) tenons .. integral to the seat), but round ends will look better - in keeping with the round legs.


    Regards from Perth


    Derek
    I've done rounded tenons (& lovetails) by sizing the work to match one of my gouges. Makes it easy to get a tight fit for tenons or lovetails.

    100_1100.jpg

    jtk
    "A pessimist sees the difficulty in every opportunity; an optimist sees the opportunity in every difficulty."
    - Sir Winston Churchill (1874-1965)

  11. #41
    Join Date
    Feb 2004
    Location
    Perth, Australia
    Posts
    9,497
    Thanks Dean and Jim. Dean, it sounds as though you prefer the look of squared ends, but Jim you do not say which you prefer. Will you say? And any other views, with explanations hopefully ...

    Regards from Perth

    Derek

  12. #42
    One way to look at it is, will one or the other detract from your overall aesthetic?
    Will the square stand out too much, or will the round look too "machine made" as has been mentioned.

  13. #43
    Join Date
    Feb 2004
    Location
    Perth, Australia
    Posts
    9,497
    Thanks Edward.

    Another way to ask the question is for me to restate the situation as 'I plan to round the mortice-and-tenon because I view the round ends as more sympathetic to the whole design'. Then I need to ask the question, 'do you agree/disagree, and what are your reasons?'.

    I am really trying to get some discussion going about design elements. I thought that this would be interesting and perhaps helpful for many.

    Regards from Perth

    Derek

  14. #44
    Join Date
    Jun 2016
    Location
    Houston
    Posts
    246
    In your drawing of the side view of the chair, the mortises are tall parallelograms, and the mortises ends are not square or perpendicular to the leg itself. To me, the top and bottom of the mortises look parallel to the seat and the floor, assuming I am viewing things correctly. I find that geometry pleasing.

    In your pattern for the leg itself, the mortise ends are square, like you would get from a mortise chisel. Because the legs are slanted in relation to the seat and the floor, I am not sure that squared mortise end would look great in relation to the entire chair once the legs and seat are fully assembled. If your choice is either to have a rectangular mortise or a rounded end, I think the rounded end would be better.

  15. #45
    Join Date
    Feb 2004
    Location
    Perth, Australia
    Posts
    9,497
    Thanks Todd. I agree, rounded ends blend in better.

    Regards from Perth

    Derek

Posting Permissions

  • You may not post new threads
  • You may not post replies
  • You may not post attachments
  • You may not edit your posts
  •