Page 1 of 2 12 LastLast
Results 1 to 15 of 16

Thread: Shaping elliptical, curved chair legs

  1. #1
    Join Date
    Feb 2004
    Location
    Perth, Australia
    Posts
    9,497

    Shaping elliptical, curved chair legs

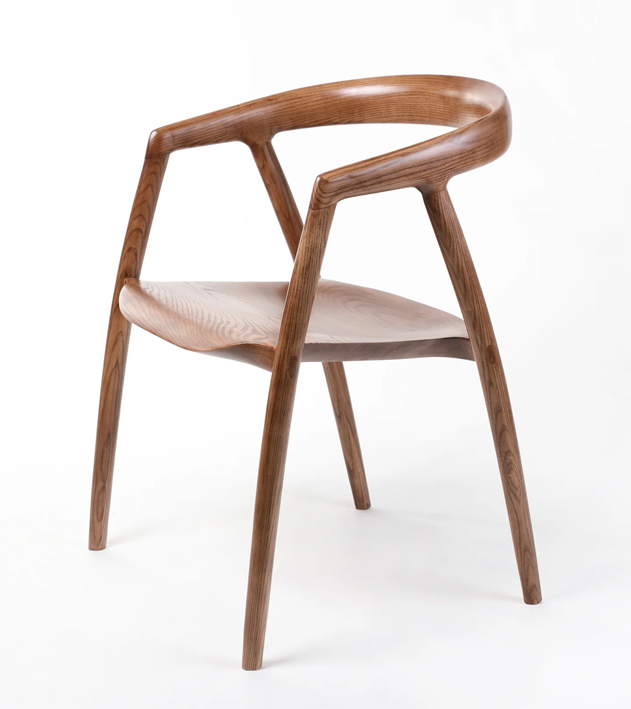
    I am building dining room chairs (and a dining room table), and the chairs will be similar to the one below. It has been fun designing and dimensioning


    The legs are both curved and have an elliptical profile. Because of this, they cannot be turned on a lathe. I have created a template, partly for marking out and partly a potential pattern for a router table.

    Here is the "however" ... the wood is Rock Maple (or Hard Maple) and I have never routed this with pattern bits. I have read that it is not a good choice of wood for this method (tending to blow out and blow up at the suggestion of cutting into the grain).

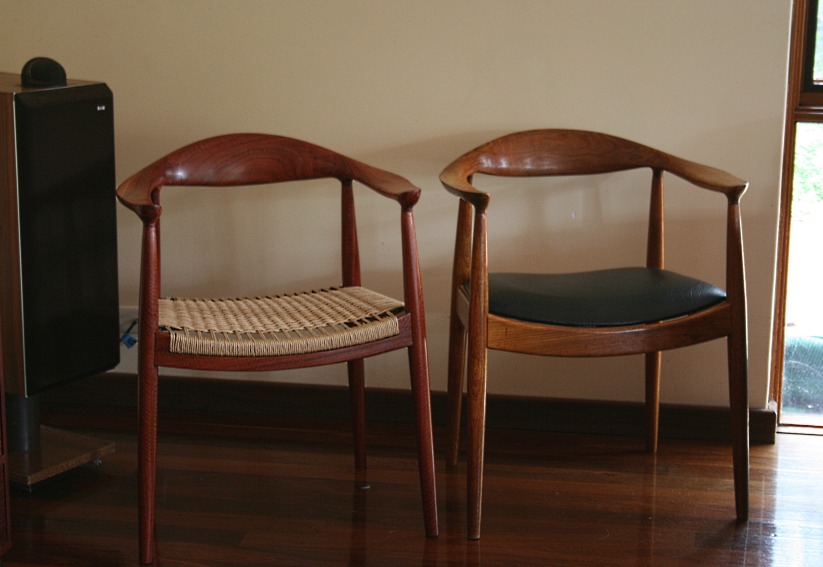
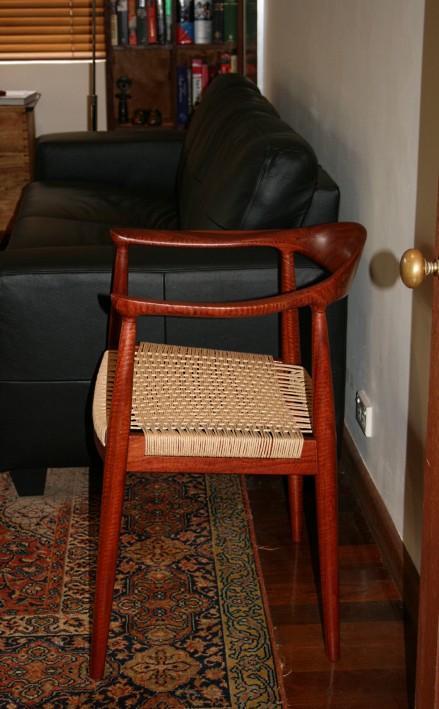
    When it comes to shaping, my preference is to use hand tools ... spokeshaves, etc. I have build a similar chair completely with hand tools in the past, an exact copy of Hans Wegner's "The Chair", even copying the mortice and tenon joinery with hand tools. This is a piece of furniture built in the factory with lathe copiers.

    Mine on the left, original on the right ...


    When it comes to the dining chair, you can see that I like the style

    So ... shape the legs with spokeshaves, or what router bit and method can be suggested?

    Regards from Perth

    Derek

  2. #2
    Join Date
    Mar 2003
    Location
    San Francisco, CA
    Posts
    10,324
    I'd be inclined to template-bandsaw the legs to get the overall shape, but with a rectangular cross-section. Then go to handplanes and spokeshaves to get the elliptical cross-sections.

    How in the heck are you going to approach the arms-plus-back part? Unlike the Wegner chair, it doesn't appear to have any seams, as though it is steam bent or perfectly bent-laminated.

  3. #3
    Join Date
    Feb 2004
    Location
    Perth, Australia
    Posts
    9,497
    Jamie, my thought for the arm-back connection is to take a leaf out of the Wegner book. Instead of a dovetail joint, as with The Chair, I plan to use a half lap to connect the arms and back at the start of the curve. This will shape well with less risk of a gap, and create a strong joint.

    Thoughts?

    Regards from Perth

    Derek

  4. #4
    Join Date
    Sep 2008
    Location
    N. Idaho
    Posts
    1,621
    Elegant and challenging design! My first thought is to go to the bandsaw and shape as Maloof did and then clean up with hand tools. The (old) fine woodworking dvd/doc has a good clip show him demonstrating and with him strongly recommending not using his method! That said, while I haven’t t done chairs, I have used the technique to freehand shape parts on the bandsaw and it is pretty straightforward as long as you bow to the physics involved. Also, I’ve found rock maple to be pretty reasonable to work with using hand tools though have heard some trees grow in conditions that take the wood to a whole new level. Will look first to seeing your progress.
    "You can observe a lot just by watching."
    --Yogi Berra

  5. #5
    i Thinl I would approach it as Christopher mentioned.
    IMO, the router really doesn't have much of a place here. If anything, you could use a round-over bit to remove some bulk waste but the burning alone would put me off.
    Good luck

  6. #6
    Aside from its hardness I don't find sugar maple particularly difficult to machine compared to oak or cherry for example. When routing against the grain I tend to climb cut with a limit on the depth of cut and clean up with a conventional cut direction. Obviously this can be prone to kickback and not recommended for beginners. Any template needs to be substantially made with handles well clear of the bit.

    I recently made some 2" full round handrail sections curved in one plane using a handheld router and a piloted quarter round bit. This involved some creative clamping, stepping the cut down in 3 or 4 increments and fastening runout blocks to the pre-cut ends to prevent spelching and support the router base. I had a little bit of burning when feeding too slow in spots but a sharp bit will minimize that and it can be cleaned up with a card scraper.
    DSC_1515.jpgDSC_1520.jpgDSC_1518.jpg
    Last edited by Kevin Jenness; 12-27-2023 at 8:55 AM.

  7. #7
    I have nothing to add except that is a beautiful designed chair ! If you have the time please post up a few build pictires down the road. I'm just getting into bent, curved projects and very impressed with your work !
    Thanks

  8. #8
    Join Date
    Mar 2003
    Location
    San Francisco, CA
    Posts
    10,324
    Quote Originally Posted by Derek Cohen View Post
    Jamie, my thought for the arm-back connection is to take a leaf out of the Wegner book. Instead of a dovetail joint, as with The Chair, I plan to use a half lap to connect the arms and back at the start of the curve. This will shape well with less risk of a gap, and create a strong joint.

    Thoughts?

    Regards from Perth

    Derek
    The Wegner arms+back is made from three pieces of wood, right? This chair's arms+back does not appear to have any seams. Maybe is it steam bent? Or maybe it is perfectly bent-laminated?

  9. #9
    Join Date
    Mar 2003
    Location
    SE PA - Central Bucks County
    Posts
    65,896
    Derek, I think you can safely do the pattern routing with the maple as long as you 1) pre cut to within a "proverbial hair" of the lines and 2) pay attention to grain direction...the latter will require you to flip the workpiece a few times and the use of a top and bottom (double) bearing piece of tooling or a tooling change between the flips. Making an extra set for insurance is likely a good idea. For one piece, going the hand tool route is reasonable, but for a set of chairs, it would really extend the build process and level of grunt effort to create the basic structural pieces. Either way, one has to "build in" for clamping/assembly prior to final assembly. I don't envy you with these beautiful but complex chairs! 'Not something I'm likely to take on any time soon! LOL
    --

    The most expensive tool is the one you buy "cheaply" and often...

  10. #10
    Join Date
    Feb 2004
    Location
    Perth, Australia
    Posts
    9,497
    Jamie, I did consider a bent lamination. Explored this carefully. In the end I decided that the result of shaping might create something that resembled plywood, and so moved on.

    There are a few ways to do this. Another is steam bending. But Hard Maple does not bend well. So the way I decided to go was to use solid wood, and join it in three pieces (ala The Chair), but the choice of joint is not yet decided. I may do splines. The joint needs to be able to be carved without leaving voids.

    Regards from Perth

    Derek

  11. #11
    Join Date
    May 2015
    Location
    NJ
    Posts
    1,416
    I have the same question as Jamie. The chair back and arms in the first pic are all continuous long grain with no seams or signs of bent lamination. I would imagine you'd need a lot more material to start before shaping so stream bending something that chunky would be challenging I think.

  12. #12
    Join Date
    Feb 2004
    Location
    Perth, Australia
    Posts
    9,497
    John, I would what wood was used in the example? It is certainly not Rock Maple! It looks like a very professional steam bend. For such thickness, it would require a serious press, which is out of my league.

    Regards from Perth

    Derek

  13. #13
    Join Date
    Feb 2004
    Location
    Perth, Australia
    Posts
    9,497
    Quote Originally Posted by Jim Becker View Post
    Derek, I think you can safely do the pattern routing with the maple as long as you 1) pre cut to within a "proverbial hair" of the lines and 2) pay attention to grain direction...the latter will require you to flip the workpiece a few times and the use of a top and bottom (double) bearing piece of tooling or a tooling change between the flips. Making an extra set for insurance is likely a good idea. For one piece, going the hand tool route is reasonable, but for a set of chairs, it would really extend the build process and level of grunt effort to create the basic structural pieces. Either way, one has to "build in" for clamping/assembly prior to final assembly. I don't envy you with these beautiful but complex chairs! 'Not something I'm likely to take on any time soon! LOL
    Jim, I feel more comfortable going the hand tool route, but was hoping for a way to semi-mass produce parts, since I am starting with two chairs, and later will need to make another 6. If only two, I would be fine just using hand tools, but with more on the horizon it would be helpful to lay out a few templates and short-cut the process.

    "Building-in clamping" is so true. Here are old photos of building and clamping the back of The Chair ...


    Regards from Perth

    Derek

  14. #14
    Join Date
    Jan 2017
    Location
    Santa Cruz, CA
    Posts
    158
    I would be tempted to use the template on a bandsaw with a follower set up. Then, chase the profile with concave spokeshaves back to the line cut with the bandsaw. That way, you can really pay attention to the grain. But then, I much prefer spokeshaves to the router table, as the router table does scare me some-especially with woods that grab.


    I do really like the Danish modern style, though it does pose some interesting challenges in building them by hand, since the original is usually predicated on mass production with purpose built machines-at least that is the way that I understand the genre. I built a set of these chairs that I tried to copy from a Nana Ditzel design. Certainly, less challenging than the design that you have chosen, but a challenge for me nonetheless. I did bent laminations for the backs.

    IMG_4085.jpg
    Last edited by scott lipscomb; 12-27-2023 at 7:22 PM.

  15. #15
    Join Date
    Mar 2003
    Location
    San Francisco, CA
    Posts
    10,324
    Another approach to the legs is to first turn them, then hand tool the elliptical profile, then steam-bend them. The curve is a very large radius, and the leg thickness is not huge, so the steam bending may not be too nightmarish. The advantage of this approach is that when you’re shaving to the elliptical cross-section, you working on long straight parts. I think that will be easier than forming the cross-section on curved parts.

Posting Permissions

  • You may not post new threads
  • You may not post replies
  • You may not post attachments
  • You may not edit your posts
  •