Page 2 of 2 FirstFirst 12
Results 16 to 21 of 21

Thread: Resawn Leftovers, clean and trimmed

  1. #16
    Join Date
    Jun 2010
    Location
    twomiles from the "peak of Ohio
    Posts
    12,209
    Bottom drawer: I just MIGHT be getting the hang of these...this is right off the saw, Dry fit..
    Resaw Thursday, right off the saw.JPG
    Sides for this drawer are Pine...and they need a bit of jointing. so..
    Resaw Thursday, jointing a couple edges.JPG
    A block plane as a jointer? All depends on the size of the work...
    Repeat for the other front corner...
    Resaw Thursday, front corners done.JPG
    Mill the back to fit...mill a rebate to house the back...
    Resaw Thursday, Back corner details.JPG
    This is the Top drawer, bottom drawer was the same at the back...

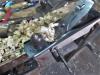
    Plywood panel was a "Cut to fit" so of thing...Drawer front had also bowed a bit....clamps will take the bow out...with the help of a couple cauls..
    Resaw Thursday, C clamps & cauls.JPG
    Try to be gaposis free, is the reason for all the clamps...
    Resaw Thursday, Bottom drawer glued up.JPG
    Cauls of all sizes...some I had to use a c clamp on...

    Let this sit a day...2 hours IN the shop, was getting a bit too much..
    Resaw Thursday, It's a start.JPG
    Got these parts milled...however, came time to do some joinery..
    Resaw Thursday, Repair a corner...JPG
    Cracked an edge...letting THIS sit until tomorrow as well...

    Stay tuned..
    A Planer? I'm the Planer, and this is what I use

  2. #17
    Join Date
    Jul 2014
    Location
    Edmond, Oklahoma
    Posts
    1,753
    Steven,

    I am enjoying the post. The project is coming along nicely. Hopefully I am getting closer to where I will get a chance to try my hand at some of what you are doing. I think progress is being SLOWLY made toward me getting a shop.

    Stew

  3. #18
    Join Date
    Jun 2010
    Location
    twomiles from the "peak of Ohio
    Posts
    12,209
    Installed the knobs on both completed drawers...
    Resaw, Friday Drawer work, finding center point.JPG
    Find the center of each drawer front..
    Resaw, Friday Drawer work, center punched.JPG
    Scratch Awl to set a hole for the drill to start..
    Resaw, Friday Drawer work, hole drilled.JPG
    Brush some glue on the knob's tenon, and press into the hole..
    Resaw, Friday Drawer work, glue and knob.JPG
    Add a clamp, let sit a spell...then a test fit of both completed drawers
    Resaw, Friday Drawer work, add a clamp.JPG
    And a test fit..
    Resaw, Friday, Drawers are done.JPG
    Then work on a base for the case..
    Resaw Thursday, It's a start.JPG

    Stay tuned...those 4 parts will be coming out of the clamps this morning...
    A Planer? I'm the Planer, and this is what I use

  4. #19
    Join Date
    Jun 2010
    Location
    twomiles from the "peak of Ohio
    Posts
    12,209
    We have another glue-up, done..
    Resaw, Friday, Base work , another view.JPG
    Had to cut special cauls to deal with the angled sides...This morning, those clamps came back off...2 of the cauls on the ends were trimmed to make glue blocks...once the base had been cleaned up, and leveled on the top and the "feet"...
    Resaw, Friday, Base work, cutting some cauls.JPG
    The cauls...ends were 2 piece...trimmed the longer bottom ones to better fit inside the base....and reduced the thickness by half..
    Resaw, Base Done, front view.JPG
    Just glue and a clamp...with a caul between the good wood and the clamp's pad...let this sit a spell while I brushed on the Special Walnut stain....by the time I got to the base...(Has to sand a bit on the case, anyway, before the stain) I could remove the 2 clamps,,,a nice heavy bead of glue on top of the glue blocks...and press down...as I also had stained the Base, except for where the glue will go, same with the bottom of the case...
    Resaw, PIP, right corner.JPG
    Trying to center the base under the case,,,


    Let the stain dry a few hours..then a couple coats of Amber shellac...Followed by a rub down with 0000 steel wool....wiped that down...then a coat of Minwax Warm Gloss..
    Resaw Project, Varnish is done.JPG
    Had to take the drawers out, to let the varnish settle better..
    Resaw Project, shiny drawer front.JPG
    Will go back later, and rub this down...delivery to set for tomorrow...
    A Planer? I'm the Planer, and this is what I use

  5. #20
    Join Date
    Jun 2010
    Location
    twomiles from the "peak of Ohio
    Posts
    12,209
    Delivery Day, today..so...
    Resaw Project Posting, front view.JPG
    Front view, after a coat of Minwax Warm Gloss has been rubbed down..
    Resaw Project Posting, end view.JPG
    End view...showing all the dovetails?
    Resaw Project Posting, back view.JPG
    Back is a bit plain...
    Resaw Project Posting, top view.JPG
    And a view of the top...

    Thanks for looking in!
    A Planer? I'm the Planer, and this is what I use

  6. #21
    Join Date
    Jun 2010
    Location
    twomiles from the "peak of Ohio
    Posts
    12,209
    Delivery day was today..."Client" is a girlfriend of my 22 yr old Grandson...not only did she "LOVE" it....she made a "Bee-line" to her car...and locked it in...Yes...I'd say she was thrilled with it..

    Thanks for looking in!

    BTW: Project did not use up all the resaw stuff..
    Another Project, the selections.JPG
    Means I will need to plan out how to use these up...we'll..
    A Planer? I'm the Planer, and this is what I use

Posting Permissions

  • You may not post new threads
  • You may not post replies
  • You may not post attachments
  • You may not edit your posts
  •