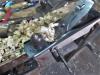
I got my hands on it today and the back of the saw and the plate are both slightly bent. I'm not sure how to fix that.
It depends on the bend. It may only be in the back. If the blade and the back can be separated you might only have to fix the back.
That would make it easier to clean the plate with a wire brush. That would let you see how much work you have ahead of you.
jtk
"A pessimist sees the difficulty in every opportunity; an optimist sees the opportunity in every difficulty."
- Sir Winston Churchill (1874-1965)


 Reply With Quote