I am definitely excited to get mine to look like your pictures. I'm even more excited to get to using it. It hasn't done work in at least most of my lifetime and probably more than.


 [OP]
Contributor
[OP]
Contributor
I am definitely excited to get mine to look like your pictures. I'm even more excited to get to using it. It hasn't done work in at least most of my lifetime and probably more than.
[OP]
Contributor
Well I suppose it could be a local and not online place. I hadn't thought of that originally.
Last edited by Joshua Hatcher; 10-12-2023 at 1:07 PM.
 Contributor
Currently I am also looking..as the last 2 places I took saws to.....one fellow died...and the other had to quit due to health reasons....and sold all of his Foley Sharpener tooling....am waiting to see IF that fellow can learn how to actually USE the machines...Piqua, OH. area...
Any ppi number higher than an 8, is too hard for my eyes to see.....and most miter saw ppis are 11, from Disston.
A Planer? I'm the Planer, and this is what I use
[OP]
Contributor
I live in near lafayette indiana. I'll just have to see about looking in the area. I have a dado stack that is also looking for a good sharpening. Hopefully I'll find a 2 in 1.
 Contributor
This is where asking around might help. If there are any old time hardware stores, a long time employee there might know. If you have a local give away classified ads paper there might be one listed there. Second hand tool sellers might know of saw sharpening services.Originally Posted by Joshua Hatcher

There is a local building supply dealer in my area who takes in saws for sharpening. A person comes up from down in Oregon every week or so to pick up and drop off saws.
Fortunately saw sharpening is not terribly difficult. The hardest part is keeping your file strokes consistent on each tooth.
Pete Taran does sharpening. He also has a web site with a great tutorial on saw sharpening > http://www.vintagesaws.com
On the top left there is a group of saws. Click on the one labeled > Library < It will take you to a page with different subjects. Click on the one labeled > Saw Filing--A Beginner's Primer < I printed it out and keep it in my shop for reference when a saw needs a bit of work.
jtk
"A pessimist sees the difficulty in every opportunity; an optimist sees the opportunity in every difficulty."
- Sir Winston Churchill (1874-1965)
[OP]
Contributor
Thank you so much!
 Contributor
I learned how to sharpen a saw after someone messed up my miter box saw. I have one of those Langdon-Acme miter boxes that I bought new, I think in 1974, but may have been 1975.
The guy that did my handsaw sharpening died in the late '70's, and I was told about someone else, so I sent several to the next guy. All the saws were screwed up. The miter box saw teeth were fine, but the plate was now out of parallel enough that if one end cut through something, the other end would drag metal. I ended up figuring it out myself, and have sharpened my saws ever since. That was well before there was an internet. I later found out the guy had pretty severe vision problems.
My 28" backsaw has been in this box since it was new, except when I was using it. I trimmed out the houses I built with it for over 3 decades before I ever found a power miter saw that I liked, and still use it sometimes when I don't want to make a big mess to clean up in a house.
The saw is second from the back in this saw box. You can see some reflections in it.
Contributor
Maybe once I recover from Cataract Surgery..MAYBE I can see the saw teeth well enough....hard to sharpen a saw, when I see 4 teeth instead of one...even with Bifocals on me nose.
And..11 ppi over 28"...that is a LOT of teeth to work on.
I built the railings for my front porch deck using a Stanley No. 2246...attached to my Type 2 Work Mate bench.
A Planer? I'm the Planer, and this is what I use
Member
Maybe a dozen years ago, or so, I sent a dovetail saw to one of the internet “darlings”, that was the end all, be all, of hand sharpening. To make shipping easier, I removed the handle and just sent the plate. Got it back in a few weeks, expecting to have unicorns jumping off my workpiece. Unfortunately, this sharpening guru not only did not hand file, but he was full Foley and actually placed the plate in backwards, cut new teeth(not needed), filed and returned. Don’t remember who re-filed the teeth, but cam back correct.
If the thunder don't get you, the lightning will.
[OP]
Contributor
Do you think you could link the post here for your rehab or send it to my inbox?
Contributor
There is a sharpening service down in Arcanum, OH.
I'll try to look up the post(s) that I did on SEVERAL mitre box rehabs..and post them here...IF you want.
And..the Millers Falls No. 72c post:
Spent the $2, now the research can begin
Garage sale find for $2..details all I went through to restore it...
Last edited by steven c newman; 10-13-2023 at 9:52 AM.
A Planer? I'm the Planer, and this is what I use
[OP]
Contributor
Anything that you think would pertain to this specific item I'll be glad to look at to learn. The I don't have experience so I must make that up with information and hard work.
Contributor
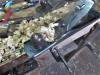
Might take a few...this is what came home with me..for $2...
Millers Falls Mitre Box, front view.JPG
A bit rusty..and the fellow had no idea where the saw went...
Millers Falls Mitre Box, logo.JPG
details..
Millers Falls Mitre Box, Details, rear.JPG
up on top of the Guide Posts...there will be either a "F" or a "B" stamp...keep that in mind...when you put this back together, Front guide post..vs Back Guide posts
Millers Falls Mitre Box, Details, front.JPG
Those red plates are bolted to the frame...LOTS of small bolts to keep track of...
A Rehab, Day 2, rusty spots.JPG
When I re-painted these plates, I did both faces...
A Rehab, Day 2, saw guides.JPG
Usually a good idea to shine up the guide posts..and a drop of light oil on the bearings inside...
A Tear Down, parts for the front.JPG
Tear down: Would be a good idea to take a few more photos...just to see how this will come apart and go back together...
A Tear Down, parts for the rear.JPG
Because there are a lot of parts to the swing arm...
Stay tuned..
A Planer? I'm the Planer, and this is what I use
Contributor
A Tear Down, Rusty Dovetail.JPG
The swing arm had 2 sections...so that you could close up the posts to allow for a shorter or LONGER saw..good idea to remove any and all rust here..and give it a drop of oil.
A Tear Down, square nuts.JPG
Had to remove the red plates, as that was the only access to the bolts holding the legs in place...
A Tear Down, will need new paint.JPG
The "King Bolt" needs a hammer to drive it out, and back in.
A Rehab, Day 2, awaiting the wire wheel.JPG
Try to get the "box" down to this point, remove the rust..give things a shot of Primer, to keep away the rust...
A Rehab, Day 2, leg bolts.JPG
These were the bolts for the legs. wire wheeled the treads on the bolts, a drop of oil, then run the nuts all the way on.
A Rehab, Day 2, dirty legs.JPG
These were wire wheeled to bare metal, then a shot of Rattle can Primer...
A Rehab, Day2, Leg bolts.JPG
This is where those bolts will go...under the red plates...
A Rehab, Day 2, more fresh paint.JPG
Waiting on paint to dry...
A Planer? I'm the Planer, and this is what I use
Contributor
Having a tad bit of trouble, with pictures being slow to load..normal around here?
Swing Arm ( Schwing Arm?)
A Rehab, Day2, locking arm assembly.JPG
The locking lever parts...this is where you will NEED a few pictures of BEFORE...to show where all of the parts were at...
A Rehab,Day 2, Swing arm.JPG
It is ok to primer this section..but leave the rest bare metal...
A Rehab,Day 2, Gib and others.JPG
This is the gib, where the saw stops after a cut...you do NOT want the saw to cut into that track. There is also a lever, where you can lock the arm in "swing" so you do not need to hold up on the locking lever, during a move...then turn the lever to lock, as it allows the locking pin to work..
A Rehab, Day 2, cleaned the scale.JPG
The quadrant Scale...be a good idea to clean it to bare metal, take a black Sharpie and rub across all the markings, and then sand again..leaving just the black IN the markings intact..
Stay tuned
A Planer? I'm the Planer, and this is what I use
 Posting Permissions

 Reply With Quote