Page 1 of 2 12 LastLast
Results 1 to 15 of 21

Thread: A side table for my mom

  1. #1
    Join Date
    Feb 2020
    Location
    Camarillo, CA
    Posts
    423

    A side table for my mom

    I made my mom a walnut chest for her sewing supplies a few years ago. She asked if I would make a low side table for it to sit on. The top of this will be 12 1/4” high and sized to be just smaller than the base of the box.

    I’m making the top a mitered bridle joint frame and panel, so I’ve started with that before making the base. The panel has nice grain and I ripped the two outer pieces from one board so I could get a nice wide piece centered in the middle of the panel. It has some sap wood that I can hide on the bottom.

    IMG_2122.jpg

    I spent some time getting the rails and stiles square and straight, then came back the next day to touch them up before laying out the miters. I laid the miters out with a knife and deepened my lines with a chisel to help with getting a crisp line.

    IMG_2123.jpgIMG_2124.jpg

    Next I’ll have to clean up the miters and tenons to fit everything, but I think this is coming along pretty well.
    IMG_2125.jpg

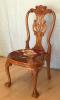
    Here’s a picture of the chest that will sit on the table.

    IMG_1412.jpg

  2. #2
    Join Date
    Apr 2017
    Location
    Clarks Summit PA
    Posts
    1,747
    Ben, nice display of hand tool joinery! The walnut is impressive. And that is a fine sewing supply chest. Keep us updated on your progress.

  3. #3
    Join Date
    Aug 2012
    Location
    Missouri
    Posts
    2,152
    Very nice work. The chest looks wonderful.
    Jim

  4. #4
    Join Date
    Sep 2007
    Location
    Longview WA
    Posts
    27,469
    Blog Entries
    1
    Looking Good

    jtk
    "A pessimist sees the difficulty in every opportunity; an optimist sees the opportunity in every difficulty."
    - Sir Winston Churchill (1874-1965)

  5. #5
    Join Date
    Feb 2020
    Location
    Camarillo, CA
    Posts
    423
    Yesterday I got the miters fit and finished the panel. Every time I make a mitered frame I get partway through and question my decision-making. I always find it demanding and think I’ll end up with ugly gaps. I just go slow and use my widest chisel, and make sure to stop and sharpen if it starts to feel difficult. At some point I’ll make a shooting board or shooting board attachment for miters. I think the fitting process would be much quicker with one.

    But, after the fiddling and testing I think this came out pretty well. I leveled the frame joints and scraped everything. On the panel I aimed for a very tight fit, and put just a tiny chamfer on the edges to give a shadow line. I wiped the panel down with a BLO/varnish/thinner mixture last night and came back this morning to glue everything up. I’ll let this dry today and go for a bike ride. I’ll get started breaking down the stock for the base soon.

    IMG_2127.jpg

  6. #6
    Join Date
    Sep 2009
    Location
    Atlanta, GA
    Posts
    6,426
    Your Mom loves you very much

  7. #7
    Join Date
    Apr 2017
    Location
    Clarks Summit PA
    Posts
    1,747
    Ben, those miters came out really nice!

  8. #8
    Join Date
    Feb 2020
    Location
    Camarillo, CA
    Posts
    423
    Well, thanksgiving and Christmas came and went. Between trips, family, friends, and work this got put aside for a while. But, I got some time last week and got all the joinery done for the base. I made a template for the legs and started shaping the first one. I’m not going for anything extreme, but I may do a little more fiddling with it until I’m happy with the shape before doing all 4. New goal is to get this done in time for my mom’s birthday in February.

    IMG_2211.jpgIMG_2212.jpg

  9. #9
    That is coming along great! How are you planning on doing the final attachment of the top to the aprons?

  10. #10
    Join Date
    Feb 2020
    Location
    Camarillo, CA
    Posts
    423
    I’ll use metal clips screwed into the bottom of the top. I like to plow grooves into the backs of the aprons, which I find simpler and more flexible than chopping little mortises.

    I really should have plowed the grooves before cutting the tenons, but I think either order works fine.

  11. #11
    Join Date
    Sep 2007
    Location
    Longview WA
    Posts
    27,469
    Blog Entries
    1
    Quote Originally Posted by Ben Ellenberger View Post

    I really should have plowed the grooves before cutting the tenons, but I think either order works fine.
    I have a note on some of my templates hanging in the shop to cut the slots and dados before the joinery or decorative cuts are made.

    Yes, it can be done after the joinery or molding is cut, but it is much easier to do before.

    jtk
    "A pessimist sees the difficulty in every opportunity; an optimist sees the opportunity in every difficulty."
    - Sir Winston Churchill (1874-1965)

  12. #12
    Join Date
    Feb 2020
    Location
    Camarillo, CA
    Posts
    423
    Quote Originally Posted by Jim Koepke View Post
    I have a note on some of my templates hanging in the shop to cut the slots and dados before the joinery or decorative cuts are made.

    Yes, it can be done after the joinery or molding is cut, but it is much easier to do before.

    jtk
    You are like me! I function much better when I can remind myself how things should be done.

  13. #13
    Join Date
    Sep 2008
    Location
    N. Idaho
    Posts
    1,621
    Looks great and I'll look forward to seeing what you come up with for the legs. And I can sympathize with life cutting into the pace of a project!

    FWIW, I take the same approach to attaching table tops with clips, though make my own buttons.

    IMG_1347.jpgIMG_1366.jpg
    (And don't tell- I countersunk this batch the wrong way and had to countersink again on the other side!)

    Best,
    Chris
    "You can observe a lot just by watching."
    --Yogi Berra

  14. #14
    Join Date
    Feb 2020
    Location
    Camarillo, CA
    Posts
    423
    I made a couple plywood templates until I was satisfied with the shape, then I shaped one leg. I used a chisel and block plane to rough it out, then spoke shaves and a rasp to tweak the shape. I finished with a card scraper. The curves look and feel fair to me. When I sight down the corners, the lines look good. I’ll look at the leg tomorrow in the daylight to be sure I’m satisfied before diving into the other three.

    I haven’t really done this kind of shaping before, so I’m enjoying trying some new techniques.

    If I had more nerve I’d probably do some more aggressive shaping, but I think this will give the effect I’m looking for.

    IMG_2216.jpgIMG_2218.jpg

  15. #15
    This looks awesome, it turned out really beautiful. I'm sure your mom appreciates it so much.

Posting Permissions

  • You may not post new threads
  • You may not post replies
  • You may not post attachments
  • You may not edit your posts
  •