Page 1 of 3 123 LastLast
Results 1 to 15 of 31

Thread: Leftovers, corner joints for a box..

  1. #1
    Join Date
    Jun 2010
    Location
    twomiles from the "peak of Ohio
    Posts
    12,184

    Leftovers, corner joints for a box..

    A bit of trickery going on?
    Monday Dovetail work, dry fitted .JPG
    No. that c clamp is NOT holding this together...
    Monday Dovetail work, fine tuned .JPG
    dovetails are...

    Have a lid built, and am trying to build a box to fit it..
    A Sunday in the shop, lid's done .JPG
    And want to match the corner joints...

    June 1st, joint details .JPG
    Just a little smaller, in the lid....

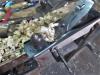
    Have that one corner done, 3 more to do....that c clamp?
    Monday Dovetail work, repair a split .JPG
    Is fixing a blow-out...

    Some on here will be hollering about Mitered Secret Dovetails.....I do NOT like them...and these are just enough of a PITA to do, that I rarely use them...

    Will post more as things get built...stay tuned..
    A Planer? I'm the Planer, and this is what I use

  2. #2
    Join Date
    Jun 2010
    Location
    twomiles from the "peak of Ohio
    Posts
    12,184
    Attempts at layouts..corner #2
    Tues. Corner #2 , lay outs .JPG
    Trying to also line up with Corner #1's marks...then a saw..
    Tues. Corner #2, Dovetail saw .JPG
    Then the Kerf chisel..
    Tues. Corner #2, Kerf chisel .JPG
    Driven down into the back corners, where no saw has gone before..
    Then the chisels take over
    Tues. Corner #2, chopped.. .JPG
    Use these to trace out the matching "sockets"
    Tues. Corner #2, over cuts .JPG
    Then the saw, watch out for over cutting. Can't use the kerf chisel here, as it will just follow the grain...chisels to remove the waste..
    Tues. Corner #2, Corner's done .JPG
    Then a dry fit..
    Tues. Corner #2, dry fit .JPG

    Hardest part of these joints...is the lay out work...and you had better take your time about it...triple checking EVERYTHING. Yes, I did use a knife wall where needed.
    Tues. Corner #2, two more to go .JPG
    2 corners done...2 to go...
    Stay tuned..
    A Planer? I'm the Planer, and this is what I use

  3. #3
    Join Date
    Jun 2010
    Location
    twomiles from the "peak of Ohio
    Posts
    12,184
    Tool Kit..
    Tool kit, refresh day.JPG
    Chisels needed a refresh of their edges...
    Tool kit, sharpener .JPG
    Sharpener?
    Tool kit, Sharner grit .JPG
    Grit used....set this down into a smear of oil...
    Tool kit, Sharpener base .JPG
    There is a special tool, for getting into corners..
    WEDS. Corner #3, Dry fit .JPG
    Looks like a Triangular File...but.
    WEDS. Corner #3, chiselfile .JPG
    The end has been ground into a bevel. like a chisel...

    Dry fit for Corner #3..
    WEDS. Corner #3, checked for square .JPG
    Checked for square... Corner #4 has been laid out...
    WEDS. Corner #3, both ends laid out .JPG
    May work on it later today...maybe tomorrow?
    Stay tuned..
    A Planer? I'm the Planer, and this is what I use

  4. #4
    Join Date
    Jun 2010
    Location
    twomiles from the "peak of Ohio
    Posts
    12,184
    Corners #3 and #4 are done..
    WEDS. Corner #4, almost done .JPG
    Almost done cleaning out...
    WEDS. Corner #4, in the way .JPG
    Worked great..except when the thumb screw got in the way of the rebate...
    WEDS. Corner #4, dry fit, squared .JPG
    Dry fit, check with a square...

    What is next? Maybe a Vintage plane to plough the grooves...
    WEDS. Corner #4, plough plane .JPG
    About..1864 or so...
    A Planer? I'm the Planer, and this is what I use

  5. #5
    Join Date
    Jun 2010
    Location
    twomiles from the "peak of Ohio
    Posts
    12,184
    A groovy day?
    A Groovy Day, Jig#1 .JPG
    Jig #1, for the shorter ends....I did try out the old Match Plane...
    A Groovy Day, Test dry .JPG
    Iron was set too deep, and it was a bit dull....worst part?
    A Groovy Day, No Depth stop .JPG
    Apparently, depth stops were NOT used for Tongue & Groove Match planes...back to the not so old reliable..
    A Groovy Day, Jig #2.JPG
    Jig #2....

    BEFORE I went and plough this grooves, I needed to joint the edges a bit..
    A Groovy Day, needs jointed...JPG
    As I wanted all 4 sides to match...along the bottom edge..
    A Groovy Day, Jointed .JPG
    Junior jack for the win..
    A Groovy Day, all matched .JPG
    All matched up...that way, the grooves will also match up, when done..
    A Groovy Day, checking alignment .JPG
    Plane tends to "Bloom"..
    Stay tuned for Part 2..
    A Planer? I'm the Planer, and this is what I use

  6. #6
    Join Date
    Jun 2010
    Location
    twomiles from the "peak of Ohio
    Posts
    12,184
    The Stanley #45 Noodle Maker?
    Attachment 502554
    Old candle, rubbed across the gross the groove, right where the cut begins...helps to speed things along...every now and then, you have to stop to clear the bloom going on..
    Attachment 502555
    This is about half of the "Krunchies" today...

    Dry fit..WITH the plywood panel for the bottom of the box..
    Attachment 502556
    Making sure it does indeed fit...

    Might as well glue this up?
    Attachment 502557
    Making sure the lid still matches up...then the glue, the glue brush...and a forest of clamps..
    Attachment 502558
    Remember to check for square...
    Attachment 502559
    And a clamp to pull until it IS square...

    letting this sit overnight...
    Attachment 502560
    Thinking about adding a few trays....these will be the sides of those trays....not sure about the ends, just yet

    Stay tuned..FIX THIS PHOTO BS!!!!!!!!!! I am NOT going to reload all of these...because ...These Are SIZED the same way as EVERY OTHER PHOTO I POST HERE...and, this IS the ONLY site this happens...no other site I post has this trouble.
    Last edited by steven c newman; 06-09-2023 at 2:09 PM. Reason: Photo BS again!
    A Planer? I'm the Planer, and this is what I use

  7. #7
    Join Date
    Jun 2010
    Location
    twomiles from the "peak of Ohio
    Posts
    12,184
    One LAST time...

    Clamps have been removed...latch side..
    Clamps are off, latch side .JPG
    And the Hinge side...

    Clamps are off, hinge side .JPG
    Then, I had to go out and mow my lawn....
    A Planer? I'm the Planer, and this is what I use

  8. #8
    Join Date
    Jun 2010
    Location
    twomiles from the "peak of Ohio
    Posts
    12,184
    And THAT simple little 2 photo post took 2 tries to get the photos to even show up? WTF!

    I'll be back IF & WHEN you figure out how to fix this photo BS, MAYBE..
    A Planer? I'm the Planer, and this is what I use

  9. #9
    Join Date
    Jun 2010
    Location
    twomiles from the "peak of Ohio
    Posts
    12,184
    Can't edit that one post with all the photos....not really sure IF I even want to try to post any more photos on THIS SITE. Have 3 others that I post the EXACT same size photos on with ZERO problems....will have to re-consider ......

    Have to work on matching the box to the lid...and maybe adding some hinges....I'd love to show you ...but..
    A Planer? I'm the Planer, and this is what I use

  10. #10
    Join Date
    Jun 2010
    Location
    twomiles from the "peak of Ohio
    Posts
    12,184
    Just imagine what I had to go through, today..to get the box and the lid to match up..
    Matching Box to lid, front done .JPG
    to the point that now it is a matter of choosing hardware..
    Matching Box to lid, hardware choices .JPG

    And a test to see IF this contributor is allowed to post photos....
    A Planer? I'm the Planer, and this is what I use

  11. #11
    Join Date
    Jun 2010
    Location
    twomiles from the "peak of Ohio
    Posts
    12,184
    Hinges have been installed...as well as a latch. And, it wasn't that big Brass one, either.

    Wondering IF I'll need handles..and where...

    Will start on trays Tuesday.

    Old washing machine has been taken away...new one is now in use...
    A Planer? I'm the Planer, and this is what I use

  12. #12
    Join Date
    Jun 2010
    Location
    twomiles from the "peak of Ohio
    Posts
    12,184
    Test, test....
    A Sunday PIP, front view .JPG

    Pilot hole drill..
    A Sunday PIP, Pilot hole drill .JPG
    With a 1/16" drill bit...why?
    A Sunday PIP, small enough .JPG
    Helps when I use these Phillips screws...
    A Sunday PIP, Opened up .JPG

    We'll see IF these show up..
    A Planer? I'm the Planer, and this is what I use

  13. #13
    Join Date
    Jun 2010
    Location
    twomiles from the "peak of Ohio
    Posts
    12,184
    Not much going on, today...seeing how it is a Monday....I do have the 4 sides of one tray cut to length...and two swing arms....so that the tray will simply raise up out of the box on the swing arms...beyond that? Wait and see...

    Stay tuned..
    A Planer? I'm the Planer, and this is what I use

  14. #14
    Join Date
    Jun 2010
    Location
    twomiles from the "peak of Ohio
    Posts
    12,184
    Try again...
    Tuesday Tray work, parts is parts .JPG
    Meed to go back to Lowes, and get the right lengths on the "pivot bolts"

    made a "prototype" to set the swing arms..
    Tuesday Tray work, details, inside view .JPG
    4th try seemed to work the best...
    Tuesday Tray work, Details, 4th try .JPG
    There are to be a pair of narrow trays underneath the "main" tray...and that the main tray will rest onto the lower trays....and still let the lid close..
    Tuesday Tray work, lid cloes .JPG

    Main tray could almost act as a dust seal, too?
    Tuesday Tray work, Pattern test, stowed .JPG

    So..later today..I'll try to build the Main tray first...and then size the lower trays to fit...
    Stay tuned..
    A Planer? I'm the Planer, and this is what I use

  15. #15
    Join Date
    Jun 2010
    Location
    twomiles from the "peak of Ohio
    Posts
    12,184
    Have 2 corners done on the Main Tray...
    Wed. Tray Work, 2 corners done.JPG
    Maybe this evening, I can get the other 2 done...?
    Wed. Tray Work, lay outs.JPG
    Need to start some more lay outs...
    Wed Tray Work, fancy bolts .JPG
    Hardware for the pivot arms is in the shop...1/2" and 1" lengths...will need to counterbore those heads a bit...

    Stay tuned..
    A Planer? I'm the Planer, and this is what I use

Posting Permissions

  • You may not post new threads
  • You may not post replies
  • You may not post attachments
  • You may not edit your posts
  •