Page 1 of 2 12 LastLast
Results 1 to 15 of 20

Thread: tearout when chamfering long edges - face & edge grain different directions?

  1. #1

    tearout when chamfering long edges - face & edge grain different directions?

    Hey everyone,

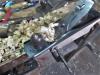
    I'm chamfering some walnut for the workbench tote project from Jim Tolpin's book, and I'm getting some nasty tearout when chamfering the long-edges. It's near the end of the project so it's very frustrating!

    Here are some pictures:

    tearout_1.jpg

    tearout_2.jpg


    tearout_3.jpg

    tearout_4.jpg

    I've tried creating the chamfers both with:
    1) LN #60 1/2 low-angle block plane, sharpened at 30 degrees
    2) LV low-angle (BU) shooting plane, sharpened at 35 degrees

    Both planes give me long, thin, continuous shavings. Both skewing the plane & planing from either direction, I'm still getting tearout. I would say the smoothing plane is leaving a slightly better finish with less tearout.


    I'm surprised I'm getting so much tearout when planing the faces & edges independently on these pieces gave me no problems. Not all the edges are problematic, but the edges that are problematic I noticed that the planing direction of the face & the edge independently were in opposite directions. Example:
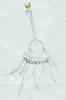
    tearout_5.jpg
    red arrow: direction to plane edge (by reading face grain)
    green arrow: direction to plane face (by reading edge grain)

    So my guess is this may be the crux of the problem here.


    So, two questions:

    1) any suggestions to how to avoid this tearout to being with?

    2) now that I am in this situation, what should I do - sand these chamfers with #180/#220-grit until the tearout is gone?


    Any help would be greatly appreciated - thanks!

    -------------------------

    This post was somewhat similar: https://sawmillcreek.org/showthread....amfering-edges

    To summarize:
    -read the grain
    -if tearout, plane in opposite direction
    -take a light cut
    -skew the plane
    -higher angles alleviate tearout

  2. #2
    Join Date
    Sep 2007
    Location
    Longview WA
    Posts
    27,433
    Blog Entries
    1
    Do you have a small plane with a chip breaker?

    If not do you have a spare blade you can use with a higher angle micro bevel?

    Your pictures show a pice with the grain on the edge running opposite of the grain on the face. These are always tricky to chamfer. Using a plane with a chip breaker helps quite a bit.

    Another option would be to use a scraper to make the chamfer.

    jtk
    "A pessimist sees the difficulty in every opportunity; an optimist sees the opportunity in every difficulty."
    - Sir Winston Churchill (1874-1965)

  3. #3
    Join Date
    Aug 2019
    Location
    Pittsburgh, PA
    Posts
    850
    As Jim suggested, use a smoother w a chipbreaker. Alternatively, (1) make sure you're not going against the grain and take very thin shavings w the planes (sharpened) you have, or (2) use sandpaper.

  4. #4
    Don’t look at “the grain direction” , look at the direction of the tiny , little , dash’s of grain , and sometimes they change direction.
    So ‘ya gotta watch em.

  5. #5
    Join Date
    Feb 2003
    Location
    McKean, PA
    Posts
    15,635
    Blog Entries
    1
    I would attach some 180 grit sandpaper to a block of wood and shaped the chamfer by sanding. When you get close to the size bevel you want switch to 220 grit paper and make long careful strokes. Or do the areas where the grain orientation is amenable to cut with a hand plane and finish the stubborn grain areas with sandpaper.
    Lee Schierer
    USNA '71
    Go Navy!

    My advice, comments and suggestions are free, but it costs money to run the site. If you found something of value here please give a little something back by becoming a contributor! Please Contribute

  6. #6
    Join Date
    Apr 2013
    Location
    Stone Mountain, GA
    Posts
    751
    Chamfers can be tricky to plane (and machine) without tearout, but a bevel down plane with chipbreaker tuned and set close should solve it. If you only have the planes you mentioned, you can try several things

    - decrease depth of cut. At some point a fine enough cut should all but eliminate the tearout, but it might have to be extremely fine, which will require a freshly sharpened blade. And it may take many, many passes to complete the chamfers.
    - close the mouth as tight as you can, so that the shaving can barely fit through.
    - sharpen with a microbevel at ~50 degrees, which will make it a high angle plane. The microbevel can be a extremely small, just a few passes on your finest stone, and then it will be easy to remove later.

    Sandpaper is good for small chamfers, for larger ones you really want to use a plane. Situations like this are why some of us harp on bevel down planes and chipbreakers, because sometimes there's no "correct" direction to plane.

    If you wind up wanting to do lots of chamfering, especially bolder ones that go beyond just easing an edge, and particularly if you incorporate them into your joinery, then look into a japanese chamfer plane. It's pretty much the perfect tool for this job.

  7. #7
    Join Date
    Mar 2006
    Location
    SoCal
    Posts
    22,510
    Blog Entries
    1
    +1 on sandpaper for small chamfers. The example you show . . . I would avoid using that piece of material for just the problems you are having. selecting your parts carefully will avoid running into reversing grain and so forth. Avoiding these trouble spots when selecting material does result in more spoil but, makes you end-game so much better.
    "A hen is only an egg's way of making another egg".


    – Samuel Butler

  8. #8
    Join Date
    Nov 2020
    Location
    East Cost
    Posts
    205
    Tearout in the pictures isn’t too bad, but unfortunately you have those large cells running right where your chamfers are. All together doesn’t look pretty. Walnut often has a spot with some crazy grain, sometimes it has kinda two strands intertwined and running opposite directions, and no matter what it tears. There’s a bunch of advices already, mine is to just compress a chamfer using something hard and smooth, like a burnisher or a piece of hardwood. With enough pressure it won’t expand back, even if finish is water based. It’s going to look burnished though, which shows on wide chamfers, but yours will look okay. A sharp scraper sometimes works, but if this is grain runout - it might be almost at a right angle to your other grain and no matter what you do it’s like scraping endgrain, so burnishing or abrasion is the only option.

  9. #9
    Join Date
    Feb 2004
    Location
    Perth, Australia
    Posts
    9,492
    Robert is on the same track as myself.

    Many years ago I built a woodie for accurate chamfers. Most of the time I would just use a block plane and, if necessary, mark the side lines. Still, there are occasions when it is a show edge and needs to be neat. No tearout, no squiggly lines, and even angles.

    The woodie is bevel up with a 15 degree bed. This has the advantage when used with two blades - one low angle for cross grain, and one high angle for edges with-and-against the grain.


    A downside (of sorts) is that there is no depth stop, and the projection of the blade must be adjusted each time. But it does work very well, and no tearout. The key element here is a high cutting angle (60 degrees). The sole is long, and this enables full follow through for clean work.

    Regards from Perth

    Derek

  10. #10
    Join Date
    Jan 2017
    Location
    Marina del Rey, Ca
    Posts
    1,937
    Quote Originally Posted by Rafael Herrera View Post
    ...use sandpaper.
    This is how I avoid the chipping.
    "Anything seems possible when you don't know what you're doing."

  11. #11
    Join Date
    Nov 2021
    Location
    Mid West and North East USA
    Posts
    2,917
    Blog Entries
    2
    A Mathers Radi Plane is a neat tool. They are not foolproof but they were designed with much of the wisdom listed above in mind. They were available for a chamfer as well as round. It appears the company may be gone? The only ones I see for sale are on eBay. It is a problem with birds eye and curly wood too. I sometimes use a rasp, file, scraper and sandpaper.

    Screen Shot 2023-03-25 at 4.44.40 AM.png
    Last edited by Maurice Mcmurry; 03-25-2023 at 5:53 AM. Reason: radi plane image
    Best Regards, Maurice

  12. #12
    Join Date
    Apr 2015
    Location
    New England area
    Posts
    588
    Use a very sharp and very finely set spokeshave so that you can change direction easily, and in tight/short spots and sections, as the grain reverses. Skewing the shave might help in certain spots as well. A shave gives nice feedback when the grain reverses and this can be used to your advantage. Work as close to the finish line as you dare, then stop and use sandpaper on a block if you have any doubts at all about being able to finish to the line with the spokeshave. Don't be a hero. If you have to sand more than you planned, so be it. Pick a better piece of stock next time -- anything to be moulded, and a chamfer is a moulding, needs to have as amendable grain as possible though without sacrificing the overall look and grain arrangement of the piece. One most often sees chamfers on door stiles and rails which should be straight grained to begin with, for stability and precision in cutting joints, and they also look better if they don't have wild grain running off the edge and generally swirling about. There are exceptions to this at times.

    Fixing what has already taken place: 100 grit around a cork block then successively finer grits. You may have to run the chamfer deeper than you had planned in order to get rid of the tear out.

    Using sandpaper will not result in the revocation of your woodworking license, so ignore the blowhard(s) who claim to have not used it since the 1970s or whatever.
    Last edited by Charles Guest; 03-25-2023 at 9:51 AM.

  13. #13
    Join Date
    Jun 2010
    Location
    twomiles from the "peak of Ohio
    Posts
    12,169
    Hmmm...
    2 door, meet the bevels .JPG
    Hmmm...wood in this case is Ash..
    2 door, workin da bevel .JPG
    Plane is a Stanley No. 118.
    A Planer? I'm the Planer, and this is what I use

  14. #14
    Hmmm… lots of great advice. Thanks to those who offered practical suggestions. I’ve learned something.

    My 2cent: My chamfers benefit from scribing/marking both edge boundaries. This way I can take shorter strokes with a block plane and alter the approach to particular sections as grain changes necessitate. Sometimes you may have to even go “cross grain”.

  15. #15
    Join Date
    Aug 2019
    Location
    Pittsburgh, PA
    Posts
    850
    It is possible to chamfer and finish endgrain with a no.4 smoother.

    This is a soft maple board, all the surfaces have been planed. The chamfers were done with a no. 4 plane. The width in the picture is about 1/2".

    20230325_115148.jpg

    I have a piece of crotch walnut that I used to test what I posted. This picture is of the plane going down grain.

    20230325_114744.jpg

    In this picture it's going up grain. The ruler and shavings placed there for scale.

    20230325_121116.jpg

    Of course, if you want near machine precision you could use a custom built or special purpose plane. There's no guaranty that you won't get tear out since they won't be much different than your bevel up planes.

    If one marks or draws a line with the width of the chamfers, provided they're not small like in my first picture, a very neat job can be done too.

Posting Permissions

  • You may not post new threads
  • You may not post replies
  • You may not post attachments
  • You may not edit your posts
  •