Page 1 of 4 1234 LastLast
Results 1 to 15 of 49

Thread: The cap iron isn't just for smoothing folks

  1. #1

    The cap iron isn't just for smoothing folks

    Yet it seems some folks are still in the woods regarding the use of the cap iron for taking thicker shavings.

    I will give two reasons why...

    Not having honed ones cap iron steep enough, I like 50, or just over it to be sure, say maybe 52 degrees, I find this to be the minimum steepness I can get away with,

    should I be working on a batch of lesser dense timbers, its nice to have camber, I've kind of settled for slightly less nowadays.

    I can see why some might be worried about this being sacrilege, possibly de-valuing ones premium plane?
    can't help you there... apart from suggesting to seek the right folks who tout the use of the cap iron.

    Having the idea of the mouth playing a part when using the cap iron,
    That is the big give away when someone mentions being familiar with using the cap iron, and goes hand in hand with the impression that the cap iron is only for smoothing.

    That goes back to the first "hurdle" of being willing to hone the cap iron slightly steeper than most "gurus" suggest.
    One won't be able to have the mouth close if they hone such an angle,
    If they choose to try, they will be taking tissue shavings only, or have a half working scenario which is
    extremely difficult to push, and not really working regarding tearout.

    But ya'know, perhaps my iroko, sapelle sipo/utile,meranti,and so on, is just tame stuff or whatever you wish to believe,
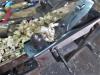
    I would call this productive working on this particularly dense batch of iroko

    Try taking heavier shavings like below, whilst ignoring the outlined will result in...
    A, Not getting influenced shavings,
    If they're curling, then you'll be going to the stones every ten mins, and that's the best case scenario, not the worst (tearing out)

    B, If one remains sceptical about having the frog back , flush with the castings that is, and keeps a tightish mouth...
    Eventually something will come along and the cap iron will not be able to give the necessary influence required,
    and those folks will be adamant that they have tried everything, yet they've never experienced the cap iron working to its real potential,
    why, because they couldn't set it any closer.

    And it goes full circle.

    All thanks to Warren Mickley for informing those willing to listen, it got David to make multiple articles on the subject about a decade ago.

    Plenty of folks like Derek have wrote much about this aswell,
    Easy to spot a half working cap iron (wimpy shaving) compared to one working stout straight shavings which jump out of the plane.

    Hope that might explain things.
    Until the next time

    All the best
    Tom
    SAM_3411.JPG
    Last edited by Tom Trees; 12-28-2022 at 9:04 PM.

  2. #2
    Join Date
    Apr 2021
    Location
    Austin, TX
    Posts
    664
    I’ll second the above advice. As a novice, I took this advice and honed my LN chip breaker to 70ish degrees and was finally able to get those straight shavings with my 4 1/2. It worked so well that I did it to my 7 and 6. Heavy shavings, no tear out. Thanks for all of the advice and coaching!

  3. #3
    Join Date
    Feb 2014
    Location
    Lake Gaston, Henrico, NC
    Posts
    9,028
    I don't use them all the time because I don't like straight shavings. I like shavings to curl up and fly away. When the surface requires it though, I deal with straight shavings-just aggravating to have to stop and pull too many off my arms. Sometimes, even with a tight iron, if I plane fast enough the shaving will fly away, but not all the time even then.

    It seems like a lot of people only want straight shavings. I'd choose to have none if I could.

    I keep multiple planes of several different numbers because I don't like to adjust one to use it. I think the no.7 and no.8 are the only ones I don't have multiples of. The number 8 was needed last Fall after I forget how many years since I had last seen it. When I took it out of its watertight toolbox, it was ready to go to work, and did.

  4. #4
    Join Date
    Jun 2008
    Location
    So Cal
    Posts
    3,767
    Once in a while I can get the shaving to shoot straight up i thinks its because of the camber. The shaving has to be just the right thickness.
    Tom did you know Iroko wood is reported to be haunted. Because it can carry sprites not good ones bad ones.
    Be careful
    Good Luck
    Aj

  5. #5
    Join Date
    Mar 2016
    Location
    Tokyo, Japan
    Posts
    885
    Quote Originally Posted by Andrew Hughes View Post
    Once in a while I can get the shaving to shoot straight up i thinks its because of the camber. The shaving has to be just the right thickness.
    Tom did you know Iroko wood is reported to be haunted. Because it can carry sprites not good ones bad ones.
    Be careful
    Good Luck

    I have an old wooden coffin smoother with no cap iron and a huge mouth, which I put a fairly pronounced camber on to use as a scrub plane...

    Oddly enough, I get those straight shavings you mention, and not nearly as much tear out as I expected. You'd think it should be a tear-out machine, but tear-out with it is fairly rare and mild.

    I still don't know why this is. Maybe your point about camber could account for it.

  6. #6
    Join Date
    Sep 2007
    Location
    Longview WA
    Posts
    27,433
    Blog Entries
    1
    The wedge on a wooden bodied plane can be made to work like a chip breaker:

    Wedge Ejected Shaving.jpg

    It can also be cut close to the action to make straight-ish shavings.

    This wedge is also shaped to direct the shaving out the side of the plane.

    In some cases a tight mouth does provide some benefit. Planing around knots in soft pine can be one of them. The squirrelly grain there is just itching to lift up even with a light shaving and a perfectly adjusted chip breaker. Just now thinking about it, it has been years since my budget required me to buy some of those cheaper boards to use on projects.

    Most of the mouths on my Stanley/Bailey planes came with a somewhat square front. Filing this at an angle can help to prevent clogging with a tight mouth and a close chip breaker. A few of my planes have a tight mouth even with the frog all the way back and a stock blade.

    jtk
    "A pessimist sees the difficulty in every opportunity; an optimist sees the opportunity in every difficulty."
    - Sir Winston Churchill (1874-1965)

  7. #7
    Keegan, takes a brave man to hone their caps to 70 degrees, from the horses mouth I take it, with the rounded profile.
    I tried this for the craic after getting some damage of my cap iron, but went back to 50 near straight away being accustomed to my known distance of things @50,
    I didn't account for that, as I was too ignorant and stupid not to set it back further, and depth adjustment was very sudden with my Bailey.
    (I could have learned something from this, but didn't have time, and I'm a bit parsimonious regarding a not so consumable component to mess around with, if I don't need to)

    Tom, not implying everyone needs to use the cap iron,
    just clearing up some things regarding heavier stock removal on denser/interlocked/figured/knotted stuff,
    which might indeed provide a lengthy workout if one omits using it.

    Aye Andrew, though I feel like I'm somehow on good terms with that, saving the stuff from the mulcher.
    Iroko is used on pretty much every wooden door in Ireland, including the shed...but UPVC for the house... that could just be the answer!
    Not that my stock is intended for such punishment,
    I'm even weary enough to keep these two around, which ended up under my guardianship!
    Attachment 492432
    I do hope the Yoruba folk don't mind them seeking refuge here!


    That's not to say this stuff is harmless, I had reactions to this before I learned to use the cap iron,
    scraper planing deep tearout on some of those lengths was sweaty business indeed, you don't want the dust on your skin.
    It's not easy like hand planing, that is, when the cap iron is set, and the edge isn't getting battered.

    I've seen a good few planes take straight shavings without a cap iron totally involved, and also with some fillister planes IIRC.
    Peter Follansbee seems to be able to take hefty cuts like that on somewhat wet oak.
    I've noticed something similar on some bits of wettish ash without the cap iron set on my beater plane,
    the shaving retains enough strength being more flexible than drier stock, is my guess.
    I don't believe I've seen him discuss this, but he has a blog, perhaps he has the definitive answer to this.


    Nearly/seemingly all my timber is similar enough to use two planes with the cap set, both honed @50ish
    and seems to be good for any pine I come across either. (I have some tougher stuff again which is uber tropical, I've yet to experiment on to decide if going steeper is an improvement)

    Below is the same distance set/camber as in my first pic, it's definitely under a 32"
    You may notice the cap iron appears skewed, more so in the second photo, though unchanged, (you'll have to zoom in on the left piccy)
    one would need to look up Derek Cohen's photos for a clear shot should they wish. (it's difficult to photograph)
    that is... should they be wanting to hone their cap iron to 50 something degrees!

    Just after a jack planing to get a flattish surface, most of this was soft resinous stuff, l'm guessing it's pitch pine.
    SAM_5111.jpgSAM_5116.jpg

    This is what is seemingly unapparent without the cap iron,
    the shavings are being compressed and have a differing look to that of someone not using the cap iron, and is the same for all species I've came across.
    It's like it extracts the oil out of the timbers, if you can make out the crinkly and waxy appearance.

    SAM_5121.jpg
    After the no.51/2 still needs some cleaning up with a no.4 smoother
    SAM_5125.jpgSAM_5130.jpg

    I ain't buying any argument about tight mouths,
    It's a friction monster on a fine set jack or panel plane, and I reckon even with a filed mouth for the escapement wear profile for the shavings to eject upwards for enabling a tight mouth to be somewhat functional,
    I'd still reckon a gun style thermometer would be able to tell one this fairly quickly.

    Even if were not so, I'd still reckon you'd be back to the hone quicker than you would be if relying on the cap iron alone,
    Those two things are pure speculation on my part, which I've not seen compared.
    That might make watchable content for those youtuber's who like to test things.

    That wasn't the point though, it's about the opposite, and not restricting the cut for the majority of the work, as many folks have the impression we're only talkin smoothing,

    I often hear all too vague comments without being specific regarding the honing of the cap iron's leading edge,
    and when queried about their opinion of the mouth, or anything to do with things, they seem to take offence.
    Surely they believe their method should be able stand up to ridicule, should they give their recipe, and not just the ingredients?

    All the best

    Tom
    Last edited by Tom Trees; 12-29-2022 at 5:07 AM.

  8. #8
    Join Date
    Feb 2003
    Location
    McKean, PA
    Posts
    15,635
    Blog Entries
    1
    I'm far from an expert on hand planes, but I ran across this interesting article regarding cap irons.

    I've messed with my hand planes a bit and they work fairly well for my limited use. I guess I would need to spend some time with someone more knowledgeable to actually see the differences in performance of adjusting cap irons with my own eyes to really understand how to tune a hand plane to perfection or nearly so.
    Lee Schierer
    USNA '71
    Go Navy!

    My advice, comments and suggestions are free, but it costs money to run the site. If you found something of value here please give a little something back by becoming a contributor! Please Contribute

  9. #9
    Join Date
    Jun 2010
    Location
    twomiles from the "peak of Ohio
    Posts
    12,169
    Sometimes...those shavings I get....like when edge jointing boards for a glue-up...will stand straight up, and then curl right around my left wrist....

    As for chipbreakers....99% of my hand planes have the Bailey designed "hump"...and all I do is mate that to the back of the iron. I will grind it's mating surface to a knife edge, where it meets (and rests on) the back of the iron...I am more worried about shavings getting stuck between the iron and chipbreaker, and jamming things up. I also polish the front edge of the "hump", so that shavings will have a smooth ride, and nothing for the shavings to catch on.

    I do have a 22" long Sandusky No. 81 Jointer...that the shavings will shoot straight up. Has the original Butcher iron and chipbreaker, BTW.

    Cambered: I do NOT reshape the chipbreaker to match the camber, ever. Waste of time, actually....I will stop the Bailey Chipbreaker right at the corners....because I rarely would ever NEED that much of the iron to show in use. 8" radius...on a Jack plane's iron....we are NOT talking Smoother thin shavings..we are talking flattening work.

    Normal space between the edge of an iron and the "hump" edge of the chipbreaker on the smoothers I use? 1mm.
    A Planer? I'm the Planer, and this is what I use

  10. #10
    Join Date
    Apr 2017
    Location
    Clarks Summit PA
    Posts
    1,744
    Quote Originally Posted by Lee Schierer View Post
    I'm far from an expert on hand planes, but I ran across this interesting article regarding cap irons.

    I've messed with my hand planes a bit and they work fairly well for my limited use. I guess I would need to spend some time with someone more knowledgeable to actually see the differences in performance of adjusting cap irons with my own eyes to really understand how to tune a hand plane to perfection or nearly so.
    I agree Lee. I think an in person experience with cap iron technique would be invaluable.

  11. #11
    Join Date
    Aug 2019
    Location
    Pittsburgh, PA
    Posts
    850
    When preparing a piece of rough lumber, the objective is to do it quickly, with the least amount of effort and material waste. The cap iron helps with all of that.

    In particular, if the piece of lumber is not perfect, hitting a knot can cause a deep tear out (I've had gashes as deep as 1/4" deep in the past). Now one has to plane the whole board to make the tear disappear.

    Using the chipbreaker to control tear out comes into play at this early stage, not just when smoothing.

    Preparing the chipbreaker is not difficult, takes at the most 10 minutes and you don't need to do it ever again. It's perplexing the amount of pushback one gets when advocating its use. It just makes the plane work better and accomplishes the objectives above.

    For example, this board is dry soft maple, it has knots and it's a bit brittle. The surface is out of the mill. It took 15 minutes from rough to ready for final smoothing, no tear outs to erase. Used only the three planes in the picture.

    20221227_232531.jpg20221227_234116.jpg

    Intermediate stage, while jack planing, minimizing tear out.

    20221227_233154.jpg

    I recently found this video, from the looks of it it may predate the 1980s Kato & Kawai study, which was geared towards supersurfacers. It's self explanatory and it's specific to hand planes.

    https://youtu.be/c0N5pV8N1H0

  12. #12
    This might be of interest for those following this thread
    https://smallworkshop.co.uk/2016/02/...-the-cap-iron/

  13. #13
    Join Date
    Apr 2019
    Location
    Madison, Wisconsin
    Posts
    283
    Never again need to prepare the cap iron/chip breaker? I have found that I benefit from tuning it slightly from time to time; a “maintenance “ tuning rather than a full tuning, but certainly not nothing.

    I agree with Tom that the largest benefit of the cap iron/chipbreaker lies not with smoothing but with thicker shavings. Today, I’m making a raised panel from cherry with reversing grain; the shavings are .018 inches at the thick side (see image; about 0.5mm) with no tear out in spite of the rising grain at the far edge. My cap iron is set close (?? inches: I didn’t measure, but looks similar to Tom’s or maybe a little closer if anything) and has a ~80 degree leading edge that smoothly curves back per Warren Mickley’s recommendation (or, at least, my recollection thereof). It works well for me.
    B63D0226-E15F-4177-903D-DC13E0421237.jpgC9DD4478-BB2A-4466-BFB5-7F900B90BDFF.jpg

  14. #14
    Quote Originally Posted by Edward Weber View Post
    This might be of interest for those following this thread
    https://smallworkshop.co.uk/2016/02/...-the-cap-iron/
    I read this piece on the double iron; there were a number of errors, so here are some that I remember.

    Thick irons were common in wooden planes in the 19th century, but when the double iron planes were being used in the 18th century, irons were thin.

    The terms York pitch, half pitch, date from the mid 19th century. If they date from before the double iron era, I would be interested in seeing the evidence.

    As mentioned by others in this thread, the cap iron doesn’t have to be extremely close to have an effect.

    The accordion effect on shavings occurs when the cap iron is too close for the shaving thickness. Either moving the cap iron back, or taking a lighter cut will alleviate the problem. There is no such thing as too close a cap iron without consideration of the shaving.

  15. #15
    Join Date
    Oct 2005
    Location
    Helensburgh, Australia
    Posts
    2,710
    Quote Originally Posted by Tom Trees View Post
    Yet it seems some folks are still in the woods regarding the use of the cap iron for taking thicker shavings.


    Not having honed ones cap iron steep enough, I like 50, or just over it to be sure, say maybe 52 degrees, I find this to be the minimum steepness I can get away with,
    I often get confused by discussion of cap irons and I wonder of others do as well. The old original type of cap iron had a curved face to it and the new irons all appear to have a flat bevelled face to them so what type are you referring to?

    The question I then have is if it is the rounded type how do I put a 50 degree face on it, I doubt there is enough material to do that. I suppose the next question is what angle does the original rounded face equate to in practise.

    I inherited all my hand planes from my father and his father so they do not have the straight bevelled cap iron.
    Chris

    Everything I like is either illegal, immoral or fattening

Posting Permissions

  • You may not post new threads
  • You may not post replies
  • You may not post attachments
  • You may not edit your posts
  •