VERY nicely done


 Contributor
VERY nicely done
Steve Jenkins, McKinney, TX. 469 742-9694
Always use the word "impossible" with extreme caution
OMG Phil, that is awesome!! Can you tell us little more about the different veneers you used? Shop sawn or commercial? Did you saw with birds mouth/scroll saw or cut with knife? Why do you prefer one technique over the other?
Absolutely fantastic - thanks for posting.
Cheers, Mike
 [OP]
Friend of the Creek
[OP]
Friend of the Creek
Thanks Mike!
It was all commercial veneer. The lighter veneer is figured curupixa, and the darker is 1/4 sawn fumed etimoe. I hadn’t heard of either of these, but going through the veneersupplies site I chose them primarily for the color. Both proved to be quite challenging. Very tight grain and even after softening, prone to break at the grain line. The center circle and medallion kept me from having to worry about the points of the triangles…which broke just looking at them wrong. Went through a lot of veneer to get the usable pieces.
Most of the shapes were made from plexi templates. The template was used to cut the veneer and in some cases (like the football shape and the leg insert) used to knife the “mortise” for the piece. Mortises were then cleaned out with chisels and small router plane. It’s fairly easy to set the depth and “peel” away the existing glued down veneer.
Templates were rough cut with a scroll saw, and filed and sanded to final shape. All the veneer was knifed. I wanted to gang cut some of the veneer on the scroll saw, but found with even the 33 tpi blade and zero clearance top, it chipped and broke…getting about 2 good pieces from a stack of 6 or so. Did I say this particular veneer was challenging? So knifing was my preferred method for this veneer. Also, I think a well sharpened veneer saw would have been quicker, but I’m left handed and using the saw right handed is just too awkward for me.
The edge banding around the top was ridiculously tough. A strip of the veneer that small (3/4”) cut with vertical grain broke like no tomorrow. I have no idea how many separate little pieces I ended up gluing. And if that wasn’t enough, I used that 3M green stretchy tape to “clamp” it - covering every part of the veneer with no gaps, and it still buckled in some spots. The minor ones I could sand flat, others just needed to be removed and a new piece fitted. I was very glad when what should have been a no brainer was done.
The stringing is walnut and purchased, not made by me. All of the stringing was done with power router assist. The table top stringing was done with a router circle guide, and the apron and legs were done with a dremel and custom router base (the Steve Latta technique). I’ve used the Veritas router inlay tools in the past and it works well. Just went with power this time to speed things up.
When the triangles were all rough cut, I combine them between 30 degree templates and edge sand to joint. Perfect fit wasn’t really necessary as I knew I would be putting stringing between them. So that took a little pressure off that step.
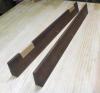
Taking the time to make the templates, clamping cauls, etc, was definitely worth it. Here’s most of what was made along the way:
7996DA6C-2A6B-4242-AEB8-A31817F15871.jpg
I don’t own any molding planes, and frankly have had little luck with a scratch stock, so the moldings around the leg at the apron and above the spade feet were done on the router table out of walnut. The spade feet were hand carved and planed separately, then epoxied with dowels to the bottom of the leg.
I do prefer the peace and quiet of hand tools, but for this kind of work, power routers have become my friends.
As you well know, these projects can be overwhelming, but broken down into separate “builds” makes it quite enjoyable.
Hope all is well. Looking forward to seeing what you have up your sleeve next!
Last edited by Phil Mueller; 11-27-2022 at 10:30 AM.
Contributor
I just shake my head and smile when I see one of your tables Phil. Words cannot convey.
 Posting Permissions

 Reply With Quote