Results 1 to 15 of 15

Thread: Trying to figure out best option for these joints....

  1. #1
    Join Date
    Oct 2008
    Location
    Columbus, OH
    Posts
    3,064

    Trying to figure out best option for these joints....

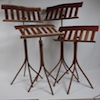
    I'm building 4 somewhat decorative braces to replace some that were lost. Thought I had the plan in mind of how to put all the little parts together but now that I'm actually at the point of doing it, I'm second guessing myself and could use some opinions on the best way forward. My original thought was to use dowels to give a physical bridge across the joint but I'm now thinking it might be impossible to drill all the holes properly to assure alignment. I assumed I could cobble together some sort of clamp to hold the pieces on the drill press but even if I can, I have my doubts that I can drill that many holes in end grain and get it all straight. The holes only need to be 3/16" deep. For reference the parts are 1/2" x 1/2". The dowels in pic 1 are 1/4" x 3/8" long.


    20221104_155155.jpg20221104_155343.jpg

    So I got to wondering if it would hold together with just glue. It is acting as a brace of sorts with potentially some minimal sideways load (from left to right). Would be hard to quantify how much load but it is not much. Then I got wondering if CA would be strong enough but figured it might not be, which then got me to thinking why not just use epoxy?

    What do you all think?

    Thanks!
    Last edited by Brian Tymchak; 11-04-2022 at 4:46 PM.
    Brian

    "Any intelligent fool can make things bigger or more complicated...it takes a touch of genius and a lot of courage to move in the opposite direction." - E.F. Schumacher

  2. #2
    Join Date
    Feb 2016
    Location
    NE Iowa
    Posts
    1,246
    Brian,

    I'm sure a lot people will laugh or scoff, because I'm about to propose a non-precision solution, but when I'm faced with a difficult to fit dowel joint, I drill one side of the joint oversize - usually 1/16, but sometimes more - and then glue up with epoxy. Epoxy easily handles the 1/32 to 1/16 gaps that result, and has long enough open time, you can scramble the pieces around to get them clamped into place. In your case, I"d probably use tight holes in the long grain, and loose holes in the end grain. Dry assemble the thing first on a piece of MDF or plywood and screw blocks to that in strategic spots to hold it together tightly, then drill as above, slather in some epoxy, and reassemble between the blocks.

  3. #3
    Join Date
    Feb 2003
    Location
    McKean, PA
    Posts
    15,664
    Blog Entries
    1
    If the pieces weren't already made, I would suggest lap joints. With your existing parts, dowels would probably be best. You can use dowel pin centers to mark the corresponding hole location once you drill one side of each joint.
    Lee Schierer
    USNA '71
    Go Navy!

    My advice, comments and suggestions are free, but it costs money to run the site. If you found something of value here please give a little something back by becoming a contributor! Please Contribute

  4. #4
    Join Date
    Oct 2008
    Location
    Columbus, OH
    Posts
    3,064
    Quote Originally Posted by Steve Demuth View Post
    Brian,

    I'm sure a lot people will laugh or scoff, because I'm about to propose a non-precision solution, but when I'm faced with a difficult to fit dowel joint, I drill one side of the joint oversize - usually 1/16, but sometimes more - and then glue up with epoxy. Epoxy easily handles the 1/32 to 1/16 gaps that result, and has long enough open time, you can scramble the pieces around to get them clamped into place. In your case, I"d probably use tight holes in the long grain, and loose holes in the end grain. Dry assemble the thing first on a piece of MDF or plywood and screw blocks to that in strategic spots to hold it together tightly, then drill as above, slather in some epoxy, and reassemble between the blocks.
    I hope no one laughs at your suggestion. I think it's pretty good. As well as using fixed blocks to aid in glue up. I hadn't yet figured out how to clamp it all up but you've saved me some time there! Really appreciate your suggestions. Thanks!

    [
    Brian

    "Any intelligent fool can make things bigger or more complicated...it takes a touch of genius and a lot of courage to move in the opposite direction." - E.F. Schumacher

  5. #5
    Join Date
    Oct 2008
    Location
    Columbus, OH
    Posts
    3,064
    Quote Originally Posted by Lee Schierer View Post
    If the pieces weren't already made, I would suggest lap joints. With your existing parts, dowels would probably be best. You can use dowel pin centers to mark the corresponding hole location once you drill one side of each joint.
    Thanks Lee! As soon as I read your suggestion, I had that Homer Simpson moment... Never entered my kind to use dowel centers. I've had them in the drawer for years..

    I agree that lap joints would have been a better path. Would have likely made a stronger assembly too.
    Last edited by Brian Tymchak; 11-04-2022 at 9:19 PM.
    Brian

    "Any intelligent fool can make things bigger or more complicated...it takes a touch of genius and a lot of courage to move in the opposite direction." - E.F. Schumacher

  6. #6
    Is the finished piece visible from one side, or both?

    A possibility is to glue up, and then let in splines on the back side.

  7. #7
    Join Date
    Jun 2012
    Location
    New Westminster BC
    Posts
    3,020
    +1 on the oversized dowel holes and thickened epoxy I've used that technique building driftwood tables, benches etc. where you can't get everything to align perfectly.

  8. #8
    I would drive the dowels thru a thick plate with a chamfered top . That won’t cut the dowel, it just “squeezes” it smaller. Use yellow glue
    slightly thinned with water . The dowels go in easily , but they don’t come out. Tried and true.

  9. #9
    Join Date
    Oct 2008
    Location
    Columbus, OH
    Posts
    3,064
    Quote Originally Posted by Cameron Wood View Post
    Is the finished piece visible from one side, or both?

    A possibility is to glue up, and then let in splines on the back side.
    Hi Cameron, yes the piece is visible on both sides. Appreciate the suggestion. Will probably use that sometime in the future.
    Brian

    "Any intelligent fool can make things bigger or more complicated...it takes a touch of genius and a lot of courage to move in the opposite direction." - E.F. Schumacher

  10. #10
    Join Date
    Oct 2008
    Location
    Columbus, OH
    Posts
    3,064
    Quote Originally Posted by Mel Fulks View Post
    I would drive the dowels thru a thick plate with a chamfered top . That won’t cut the dowel, it just “squeezes” it smaller. Use yellow glue
    slightly thinned with water . The dowels go in easily , but they don’t come out. Tried and true.
    Ah, like compressed beech biscuits. Good tip. Thanks Mel!
    Brian

    "Any intelligent fool can make things bigger or more complicated...it takes a touch of genius and a lot of courage to move in the opposite direction." - E.F. Schumacher

  11. #11
    You may be past this point, but if you made a double set of parts half as thick and staggered the butt joints you could laminate the layers and have a strong assembly without doweling.

  12. #12
    Join Date
    Dec 2010
    Location
    WNY
    Posts
    9,770
    I'd make them as half lap joints, as already suggested, or I'd make it as a 3 layer assembly. The out layers would have the joints cut the same way so it would look the same from both sides. w

    John

  13. #13
    Join Date
    Oct 2008
    Location
    Columbus, OH
    Posts
    3,064
    Quote Originally Posted by Bradley Gray View Post
    You may be past this point, but if you made a double set of parts half as thick and staggered the butt joints you could laminate the layers and have a strong assembly without doweling.
    Quote Originally Posted by John TenEyck View Post
    I'd make them as half lap joints, as already suggested, or I'd make it as a 3 layer assembly. The out layers would have the joints cut the same way so it would look the same from both sides. w

    John
    Yea, I'm past the point of no return on these. The parts for all 4 brackets are cut and fitted.

    However, if I ever bump into another project like this, I will certainly go the other route with lap joints or layers.

    Thanks for the suggestions.
    Brian

    "Any intelligent fool can make things bigger or more complicated...it takes a touch of genius and a lot of courage to move in the opposite direction." - E.F. Schumacher

  14. #14
    Join Date
    Feb 2016
    Location
    NE Iowa
    Posts
    1,246
    Quote Originally Posted by Mel Fulks View Post
    I would drive the dowels thru a thick plate with a chamfered top . That won’t cut the dowel, it just “squeezes” it smaller. Use yellow glue
    slightly thinned with water . The dowels go in easily , but they don’t come out. Tried and true.
    That's a great technique for easy assembly if you're confident your dowel holes align. It's of much less value if your task is to deal with small misalignments, because the expanding dowels will move the wood to get the dowel holes alilgned, which can lead to misalignment of the assembly.

  15. #15
    Join Date
    Oct 2008
    Location
    Columbus, OH
    Posts
    3,064
    Quote Originally Posted by Steve Demuth View Post
    Dry assemble the thing first on a piece of MDF or plywood and screw blocks to that in strategic spots to hold it together tightly, then drill as above, slather in some epoxy, and reassemble between the blocks.
    Quote Originally Posted by Brian Tymchak View Post
    ...I hadn't yet figured out how to clamp it all up but you've saved me some time there..
    Just a followup regarding Steve's comment on glue up. Turns out figuring out the gluing jig has been the easiest part of the project. Wedges at the 3 points of curve lock the bracket in.

    20221105_145322.jpg
    Brian

    "Any intelligent fool can make things bigger or more complicated...it takes a touch of genius and a lot of courage to move in the opposite direction." - E.F. Schumacher

Posting Permissions

  • You may not post new threads
  • You may not post replies
  • You may not post attachments
  • You may not edit your posts
  •