


As the old one had snapped in 2....right between where I clamp it to the saw and the saw's blade....besides, the area for the blade was worn out, and getting a bit too wide...tossed that into the fire pit barrel....
A piece of decent 1/4" plywood was cut to size..
Zero clearance overlay, rebuild.JPG
Wanted it to reach all the way, front to back...didn't need any overhang at the back...lowered the blade all the way down..
Zero clearance overlay, hold it down.JPG
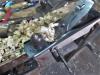
and set the plywood in place...needed enough support to the left of the saw blade.. and plenty of space to use on the right side....wasn't exactly sure where the blade was...just a guess...used the rip fence to clamp things down....don't want it to move...
Zero clearance overlay, raised the blade.JPG
Then start the saw...and slowly raise the blade until it won't go any higher....then set the saw down..( and take the picture)
Zero Cearance overlay, NO gaps.JPG
Goal here was zero gaps....
If you could see the throat plate on this saw......I've seen jack planes with tighter mouths...and, the steel plate that is the throat plate sits a hair lower the the saw's top. Fine for any normal rips, or cross cuts...NOT for resaws. So, IF I needed to thin parts for a Frame & Panel project....or do resaw kerfs ( followed up with a D8 Rip saw)
Weekend work, set the width.JPG
I want a nice flat area around the blade, to where the part will not drop down inside the saw...I also checked that the saw was at 90 degrees to the top of the saw.
Makes for a nice, steady cut..
Weekend work, results.JPG
And, if there is a good push stick handy..
Weekend work, push stick.JPG
To keep any fingers away...
Last one lasted a couple years...hopefully this one will too? May make a second one, for doing the 10 degree bevels I used on Raised Panels..?
Might work on just about any "Job Site" style saws?


 Reply With Quote