Results 1 to 15 of 15

Thread: Just a box...

  1. #1
    Join Date
    Jun 2010
    Location
    twomiles from the "peak of Ohio
    Posts
    12,170

    Just a box...

    Well...I did have a nice supply of resawn "scraps" to do something with...
    Thin stockpile, 1.JPGThin stockpile, 2.JPG
    Picked a few "keepers" and set the rest aside, for now..
    A Box Project, parts is parts.JPG
    All needed a good working over with a plane, of course...
    A Box Project, scrub down.JPG
    Trying to get things smooth and flat...
    A Box Project, ends need planed.JPG
    Some took a bit more than others...
    A Box Project, side planed.JPG
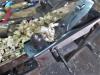
    One needed cut in half...
    A Box Project, mitre box.JPG
    To provide the 2 ends of a box...
    A box Project, size of box.JPG

    Stay tuned...been a busy 2 days, so far...
    A Planer? I'm the Planer, and this is what I use

  2. #2
    Join Date
    Jun 2010
    Location
    twomiles from the "peak of Ohio
    Posts
    12,170
    Part 2? Sides needed jointed, to get them all to the same width...
    ABox Project, edges jointed.JPG
    THEN I could finish the cross cuts to square all 4 sides' ends...

    Corner Joints? Need a "special" lay out tool...of course..
    A Box Project, 2 layout tools.JPG
    A 6mm chisel....to get the spacings just right...square to finish marking things out, along with a few other tools..
    A Box Project, more layout tools.JPG
    Both of the long sides were ganged up, this time...
    A Box Project, fingers laid out.JPG
    There IS an extra wide finger in there....as that is where I will saw the lid off at...set one aside..
    A Box Project, cuts made.JPG
    And, once all the lines have been carried round...I can lower the board down into the vise...no vibrations that way. They set up to do some chopping...
    A Box Project, inside chops.JPG
    Remember that 6mm chisel? That is doing the chopping....after, a knife wall was made, after the "show side" was chopped about 1/2 way down...then flip the board over to complete the chopping...

    Stay tuned...just getting started..
    A Planer? I'm the Planer, and this is what I use

  3. #3
    Join Date
    Jun 2010
    Location
    twomiles from the "peak of Ohio
    Posts
    12,170
    Next? Use the just chopped fingers to lay out the matching fingers on one of the end pieces..
    A Box Project, test for fit.JPG
    And repeat the saw and chop....test fit was all that great....but, I can turn the end piece around, do better layout (TIGHTER!) on the other end...#1 becomes #2....
    3 Corners, chopping new #1.JPG
    Keeping that fat finger in the correct spot...test fit again..
    3 Corners, test #1.JPG
    When one NEEDS a mallet to drive parts together...and no gaps....then, used the old #1 to lay out new fingers...
    3 Corners, checking layouts.JPG
    Trace around, run the lines around...saw the waste sides...chop..
    3 Corners, 2 corners done.JPG
    And a second dry fit...#2 corner on the right...we are getting the "hang" of this....

    Then just repeat for a 3rd corner...taking my time..
    3 Corners, 3rd corner done.JPG

    Which leaves corner #4 for tomorrow..
    3 Corners, one more to go.JPG
    Then MAYBE a glue-up? We'll see....right now just want the last corner done...

    Stay tuned..
    A Planer? I'm the Planer, and this is what I use

  4. #4
    Join Date
    Jun 2010
    Location
    twomiles from the "peak of Ohio
    Posts
    12,170
    Corner #4 is done did...
    4th Corner, dry fit.JPG
    and dry fitted....and a supply of cauls laid on....need to go and buy a bag of Acid Brushes at Harbor Freight, this week.....need them to spread the glue around the the fingers..EXCEPT mine.

    Those wide fingers? That will be where I will be sawing, to split the lid off of the box....plan is to glue the 4 sides together, then add the top and bottom, then a bit of saw work....then some hardware, and a finish.....

    Stay tuned...Just a box...nuttin fancy-schmanzy...
    A Planer? I'm the Planer, and this is what I use

  5. #5
    Join Date
    May 2004
    Location
    N Illinois
    Posts
    4,602
    GO Steve.....another interesting project.....thanks
    Jerry

  6. #6
    Join Date
    Jun 2010
    Location
    twomiles from the "peak of Ohio
    Posts
    12,170
    Had to stop by Harbor Freight today...and pick up a bag of Acid Shop Brushes (36 count)....had to walk through/past 2 Clearance aisles....walked out with a bag full of stuff, besides them brushes. Debating on trying to do a glue up today....or leave the wood shop closed on a Monday.....
    A Planer? I'm the Planer, and this is what I use

  7. #7
    Join Date
    Jun 2010
    Location
    twomiles from the "peak of Ohio
    Posts
    12,170
    Calm before the storm...
    .Glue up Monday, calm before the storm.JPG
    Bottle of glue and a NEW Acid Shop Brush at the ready....and the "after"
    Glue up Monday, enough clamps.JPG
    Should be just enough clamps....maybe..

    Let this sit a day...clean it up tomorrow...work on the top and the bottom panels...
    Glue up Monday, bottom panel.JPG
    Bottom panel will need a bit of work, though...

    Stay tuned..
    A Planer? I'm the Planer, and this is what I use

  8. #8
    Join Date
    Jun 2010
    Location
    twomiles from the "peak of Ohio
    Posts
    12,170
    Just waiting on a second glue-up to dry...
    The Lids, glued up.JPG
    Since all the corners were cleaned up and trued up...and the panels were cut to size...bottom panel was flattened as needed..
    The Lids, Grain details.JPG
    And a detail of a corner joint..
    The Lids, corner details.JPG

    Letting this sit a while....stay tuned...
    A Planer? I'm the Planer, and this is what I use

  9. #9
    Join Date
    Jun 2010
    Location
    twomiles from the "peak of Ohio
    Posts
    12,170
    1/2 the clamps were removed, today..
    Wednesday , 12 way un-clamped.JPG
    And, since nothing creaked, cracked ,or popped...figured it was safe to remove the rest...
    Wednesday, ready for clean-up.JPG
    Some beltsanding to remove stuff the plane shouldn't be touching...
    Wednesday, cleaning up.JPG
    And the Stanley No. 3,Type 11 to plane things smooth..
    Wednesday, side cleaned up.JPG
    Both sides, and both ends, then the bottom was worked over...and then wound up on top of things...
    Wednesday, top of lid done.JPG
    All set to saw the lid free...need to mark a cut line..

    Stay tuned...
    A Planer? I'm the Planer, and this is what I use

  10. #10
    Join Date
    Jun 2010
    Location
    twomiles from the "peak of Ohio
    Posts
    12,170
    Marking a line to cut..
    Wednesday, in use.JPG
    Right hand was busy, playing Cameraman....
    Wednesday, Marking a line.JPG
    Darken the line with a pencil....
    Wednesday, the 3rd saw cut.JPG
    I used that No.68 Dovetail saw on the ends, first..THEN the 3rd cut was with the old back saw...
    Needed a shim, before the last cut could be done..
    Wednesday, Shimmed.JPG
    Keeps things from snapping shut on the saw....
    Wednesday, 4th cut.JPG
    So...a bit of clean up..
    Wednesday, ready to install.JPG
    Install some hardware..
    Wednesday, box hardware.JPG
    And then decide on a finish, of some sort...Might have this done before August 1st?

    Stay tuned...
    A Planer? I'm the Planer, and this is what I use

  11. #11
    Join Date
    Jun 2010
    Location
    twomiles from the "peak of Ohio
    Posts
    12,170
    Had some gaps to level out..so..
    Hardware, leveling.JPG
    Almost got it...
    Hardware, almost there.JPG
    Needed a couple tools to install the hardware..
    Hardware, tools.JPG
    And the MK-II Eyeballs...Clamp the box up in the bench vise, so things don't get all squirrelly while I'm working...
    Hardware, hinges installed.JPG
    Hinges first..then flip the box over, re-clamp...
    Hardware, not latched.JPG
    Install a latch up in front...then stand the box up on end ( twice)...
    Hardware, handled.JPG
    And install a handle on each end....needed to go out and buy a couple brushes this morning...

    Will add a coat of Witch's Brew after Lunch has settled in...

    Stay tuned...
    A Planer? I'm the Planer, and this is what I use

  12. #12
    Join Date
    Jun 2010
    Location
    twomiles from the "peak of Ohio
    Posts
    12,170
    Ok..will see how this turned out..
    Front view..
    PIP, Front view.JPG
    The Goal was to try to get the grain to "flow" all the way around the outside of the box..
    Left corner..
    PIP, left corner.JPG
    And the Right corner...
    PIP, Right corner.JPG
    It is around in back, where things got tricky..hinge side..
    PIP, Hinge side.JPG
    And a look at the handle details...
    PIP, Handle detail.JPG
    Notice where that "Fat Finger" used to be? I was trying to split it....saw kerf helped out a bit..

    Letting this dry a while..then a few coats of 1 pound cut Amber Shellac...and see how it looks.

    Stay tuned...
    A Planer? I'm the Planer, and this is what I use

  13. #13
    Join Date
    Jun 2010
    Location
    twomiles from the "peak of Ohio
    Posts
    12,170
    Varnish has dried, been rubbed out with 0000 steel wool....
    July Project Box, front.JPG
    Front view...
    July Project Box, Hinge.JPG
    View from the back...
    July Project Box, lid.JPG
    wasn't sure how best to match up the grain to the top...
    July Project Box, handle.JPG
    Steel wool did kind of buff up the handles....makes them look a bit worn?

    Box is just over 10" by 4" and stands 4" tall with the lid closed....

    Whatever one wants to stash away inside this box......was just saving a few nice scraps from the fire pit...

    Thanks for looking in...
    A Planer? I'm the Planer, and this is what I use

  14. #14
    Join Date
    Apr 2007
    Location
    Columbus, Ohio, USA
    Posts
    3,441
    I like the grain of the wood, but I am a sucker for that.

  15. #15
    Join Date
    Jul 2014
    Location
    Edmond, Oklahoma
    Posts
    1,750
    +1 for what Andrew said, I like the grain too. Nice job.

    Stew

Posting Permissions

  • You may not post new threads
  • You may not post replies
  • You may not post attachments
  • You may not edit your posts
  •