Page 1 of 3 123 LastLast
Results 1 to 15 of 31

Thread: Plane Sharpening Issues

  1. #1
    Join Date
    May 2022
    Location
    Colorado
    Posts
    4

    Plane Sharpening Issues

    I've read numerous threads on this forum but this is my first post!

    I am sharpening the irons for three planes which I recently acquired. These are all Stanley Type 13 with Sweetheart irons. Right now I am working at getting a primary bevel using a diamond plate and a honing guide. All of the irons have issues:

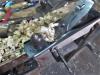
    Iron for my No. 6 - The primary bevel is about 15 degrees. I've changed about half of the bevel to 25 degrees, but would have to shorten the iron about 1/8" to get the entire primary bevel to 25 degrees. I have a similar problem with a No. 5 iron that must have been sharpened by hand on a bench grinder and has a "primary radius" in lieu of a bevel. Should I leave it where it is now, or correct the entire primary bevel? (This photo may be from the No. 5)

    Stanley-01.jpg

    Iron for my No. 7 - This one was looking really good. It didn't take a lot of work to get a 25 degree primary bevel and the cutting edge is square to the long edge. But when I was comparing it against the iron from the No. 6 I found that the iron is bent. It has a bend about 4-1/2" from the cutting edge and is bent at about a 3 degree angle. I put the iron back in the plane and now I see that the iron does not fully contact the frog. Can this iron be straightened?

  2. #2
    If it were me: No.6: No need to get the whole bevel to 25. Use 25 as the micro bevel. Over months/years, you'll grind it back completely as you resharpen.

    For the No. 7, I'd buy a new blade. It should contact the frog and chipbreaker cleanly.

  3. #3
    Join Date
    May 2021
    Location
    Spartanburg South Carolina
    Posts
    386
    This makes me wonder, how do you bend a plane iron?

  4. #4
    Join Date
    May 2022
    Location
    Colorado
    Posts
    4
    Quote Originally Posted by Prashun Patel View Post
    If it were me: No.6: No need to get the whole bevel to 25. Use 25 as the micro bevel. Over months/years, you'll grind it back completely as you resharpen.

    For the No. 7, I'd buy a new blade. It should contact the frog and chipbreaker cleanly.
    Thanks. I suspected I'd need a new iron for the No. 7. I've been looking at the Veritas, but I don't want to modify the mouth.

  5. #5
    Join Date
    May 2022
    Location
    Colorado
    Posts
    4
    Quote Originally Posted by Scott Clausen View Post
    This makes me wonder, how do you bend a plane iron?
    Looking at the way it is bent (more on one side than the other side) I'm guessing someone dropped the plane and it landed on the upper corner of the iron.

  6. #6
    Join Date
    Jun 2015
    Location
    Northern California
    Posts
    665
    If you have a metal working/machinist’s vise, you can try straightening the blade in it by gradually putting pressure on one side, turning it around and doing the same thing on the other side, repeating until straight. I did that with a slightly bent blade (can’t remember if I heated it with a propane torch) and got it to rest flat on the frog of an old #4 Stanley. Otherwise a new blade is in order (Veritas PMV-11 or Hock) and I don’t think you’ll have to mess with the mouth.

  7. #7
    Join Date
    Sep 2007
    Location
    Longview WA
    Posts
    27,427
    Blog Entries
    1
    Iron for my No. 7 - This one was looking really good. It didn't take a lot of work to get a 25 degree primary bevel and the cutting edge is square to the long edge. But when I was comparing it against the iron from the No. 6 I found that the iron is bent. It has a bend about 4-1/2" from the cutting edge and is bent at about a 3 degree angle. I put the iron back in the plane and now I see that the iron does not fully contact the frog. Can this iron be straightened?
    Hi Nick and welcome to the Creek.

    Stanley blades are usually laminated. The hard steel only runs to the area with the slot for the chip breaker screw. The area beyond that is softer steel and should be easy to "adjust" as needed to seat well on the frog.

    jtk
    "A pessimist sees the difficulty in every opportunity; an optimist sees the opportunity in every difficulty."
    - Sir Winston Churchill (1874-1965)

  8. #8
    Join Date
    Aug 2019
    Location
    Pittsburgh, PA
    Posts
    849
    As long as the bevel at the cutting edge is 25 degrees, it should be fine.

    The iron is hardened only below the slot, the upper part can easily bend. Don't fret too much about it since the only points of contact that matter between the iron and frog are the top and bottom, where the lever cap exerts pressure, contact in the center is inconsequential. Besides, if you think about it, the cap iron creates a slight flex on the iron when installed.
    Last edited by Rafael Herrera; 07-20-2022 at 8:25 PM.

  9. #9
    Join Date
    Sep 2007
    Location
    Longview WA
    Posts
    27,427
    Blog Entries
    1
    Don't fret too much about it since the only points of contact that matter between the iron and frog are the top and bottom, where the lever cap exerts pressure, contact in the center is inconsequential.
    This point is debatable. Full contact of the blade against the frog dampens vibration. Even with the lever cap pressing on points near the top and bottom of the blade the unsupported center can begin to resonate creating other problems.

    Simple physics enters the act.

    jtk
    "A pessimist sees the difficulty in every opportunity; an optimist sees the opportunity in every difficulty."
    - Sir Winston Churchill (1874-1965)

  10. #10
    Join Date
    Jun 2010
    Location
    twomiles from the "peak of Ohio
    Posts
    12,165
    Depends on the chipbreaker....and how tight one cranks it down onto the iron...Have seen a few irons "bowed" by too tight of a chipbreaker....

    EARLY Stanley irons were laminates....but that soon changed...
    A Planer? I'm the Planer, and this is what I use

  11. #11
    Join Date
    Sep 2007
    Location
    Longview WA
    Posts
    27,427
    Blog Entries
    1
    Quote Originally Posted by steven c newman View Post
    Depends on the chipbreaker....and how tight one cranks it down onto the iron...Have seen a few irons "bowed" by too tight of a chipbreaker....

    EARLY Stanley irons were laminates....but that soon changed...
    Part of "tuning up a plane" involves the chip breaker.
    Chip breaker tuning is covered a little here > https://sawmillcreek.org/showthread.php?114373 < scroll down to the 27th post if you are viewing in linear mode. (Chips Ahoy or is that a Cap Iron?) A chip breaker can be "tuned" to divert chips and not bow the blade.

    Some of the links in that thread may have broken since it was posted. Some have been archived.

    If a blade is bowed (or bent) one way, it can likely be move in the other direction to remove the bow (or bend).

    jtk
    "A pessimist sees the difficulty in every opportunity; an optimist sees the opportunity in every difficulty."
    - Sir Winston Churchill (1874-1965)

  12. #12
    Join Date
    Aug 2019
    Location
    Pittsburgh, PA
    Posts
    849
    Quote Originally Posted by Jim Koepke View Post
    This point is debatable. Full contact of the blade against the frog dampens vibration. Even with the lever cap pressing on points near the top and bottom of the blade the unsupported center can begin to resonate creating other problems.

    Simple physics enters the act.
    Several of my smoothers have a gap of at least 2 thousands between the iron and frog around the lever cap screw, it does not affect their performance. Any vibration started at the edge while cutting will be dampened/cut off when it hits the area where the cap iron is pressing the cutting iron against the frog.

    The plane on the left is an old Bedrock. The chip breaker indeed flexes the cutting iron, and not just the thin ones. The picture on the right, that's a PM-V11 iron, that's a 0.1" thick piece of steel.

    All irons will flex when you attach the cap iron/chip breaker, just take a straight ruler to it when you assemble it, wanting to somehow tune the assembly so it tightens flat is counter productive since the plane does not need that to work.

    One can certainly fettle and adjust things so there's no gap, there's no rule against it.

    20220721_002646.jpg20220721_002338.jpg

  13. #13
    Join Date
    Apr 2015
    Location
    New England area
    Posts
    588
    Plane irons are meant to be used up and replaced and are part of the ongoing cost of the hobby/profession. That said, they last a good long time and if you sharpen one down to nothing you will have done a whole lot of woodworking. If you lose some length learning how to hone, no big deal, it's a pretty cheap way to learn compared to the alternatives.

    You're basically hand grinding it sounds to me. I'd grind away however much is needed to get a nice, clean and even bevel that you can work with. If that means taking off an eighth then so be it. You might later want to hollow grind and then tip up for a secondary bevel, but what you're doing now by using a jig is producing a flat bevel and that's fine too. You might find in the fullness of time that it's hard to elegantly impart curvature to the iron that goes in your No. 5, but some jig makers have figured that problem out as well. You can of course freehand that shape onto the iron at a point when you feel up to it.

    If the iron for the No. 7 is visibly bent (i.e. you can see the bend without putting a straightedge on it), I'd simply replace it. Find something else to beat, bang, and squeeze on.

    Some planes and their irons make a more or less airtight fit between the iron and the frog. Some don't. A tiny bit of light usually isn't a problem, but the ones that show no light not surprisingly end up being the ones that plane the best in my experience. Don't let any of this stuff send you into a tailspin of plane fettling, or worry. At this stage you may do more harm than good. Get the irons sharp, replace the bent iron, and see how the planes work. If you take a detour into extreme plane rehab, you run the risk of never returning to the actual craft itself in any meaningful way. Woodworking tools are made to remove material down to a mark you've made on the wood. A plane is no different. Don't overcomplicate things.
    Last edited by Charles Guest; 07-21-2022 at 5:29 AM.

  14. #14
    Join Date
    Jan 2007
    Location
    Michiana
    Posts
    3,068
    I've refurbed a dozen or so Stanleys of various sizes and ages. Occasionally I've run across an iron that's seen hard duty like the one the OP features in his post. If I plan on keeping the plane as a user I just order up a blade and matching chipbreaker from Ron Hock, and save the originals in the old blade archive. The new iron gets you started off right. If you ever sell the plane you have the historically accurate cutter for those that like that sort of thing, and a cutter you can sell with the plane or separately for nearly what you paid for it.
    Sharp solves all manner of problems.

  15. #15
    Join Date
    Jan 2007
    Location
    Michiana
    Posts
    3,068
    Quote Originally Posted by Rafael Herrera View Post
    Several of my smoothers have a gap of at least 2 thousands between the iron and frog around the lever cap screw, it does not affect their performance. Any vibration started at the edge while cutting will be dampened/cut off when it hits the area where the cap iron is pressing the cutting iron against the frog.

    The plane on the left is an old Bedrock. The chip breaker indeed flexes the cutting iron, and not just the thin ones. The picture on the right, that's a PM-V11 iron, that's a 0.1" thick piece of steel.

    All irons will flex when you attach the cap iron/chip breaker, just take a straight ruler to it when you assemble it, wanting to somehow tune the assembly so it tightens flat is counter productive since the plane does not need that to work.

    One can certainly fettle and adjust things so there's no gap, there's no rule against it.

    20220721_002646.jpg20220721_002338.jpg
    I think the photo on the right illustrates why the blade flexes. The frog is adjusted back too far and the blade is riding on the body casting that is protruding under the frog. This causes it to deflect when clamped down by the lever cap. I never adjust frogs that far back for just that reason. At the rearmost position, the frog surface should be coplanar with the angled portion of the body casting below. If this position doesn't offer enough clearance between the cutting edge and the front of the mouth, address this with a file. I've only had to do this once.

    Screenshot 2022-07-21 062625.jpg
    Sharp solves all manner of problems.

Posting Permissions

  • You may not post new threads
  • You may not post replies
  • You may not post attachments
  • You may not edit your posts
  •