Got bored, last night....even though Shop is normally closed on Mondays.....spent a little time in the shop, anyway.....all but the cauls came off the glued up panel, made it a bit easier to move around, and to get my fat body past the bench. Box came off the tablesaw for a little bit. Reset up the rip fence...2" tall collar was judged to be too tall...so..
Collar part2 rip fence set.JPG
We will try 1-3/8" width....ran all 4 pieces through....best side against the fence..
Collar part2, new width.JPG
Checked the length of the long sides...trimmed those to match the box, NOT the panel...and, make sure the ends were square. Needed to then move the tablesaw out of the way..
Collar part2, router table.JPG
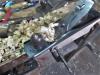
And haul this out to where I can use it....set the fence up..
Collar part2, set for dovetails.JPG
Checked the Start & STOP lines on the fence so they match the thickness of the tail board..1st cut...
Collar part2, 1st cut.JPG
4 at this setting, 1 on each end of the 2 long side pieces...reset the fence a bit, by eyeball (MK II ?) and go again..
Collar part2, 2nd cut.JPG
Ok, all done with the router table, it can go back into it's storage spot, until needed again...Tablesaw moved back to it's "Home Station", box and lid plopped on top of it...
Collar part2, can sit here.JPG
Which leaves...
Collar part2, needs trimmed.JPG
Cutting the 2 short ends for final length....stay tuned for part 2, of the Monday Night Follies..


 Reply With Quote
 We'll see...
")


