Page 1 of 2 12 LastLast
Results 1 to 15 of 19

Thread: Geometry Fail- Greene & Greene Lanterns

  1. #1
    Join Date
    Feb 2011
    Location
    Carlsbad, CA
    Posts
    2,230
    Blog Entries
    2

    Geometry Fail- Greene & Greene Lanterns

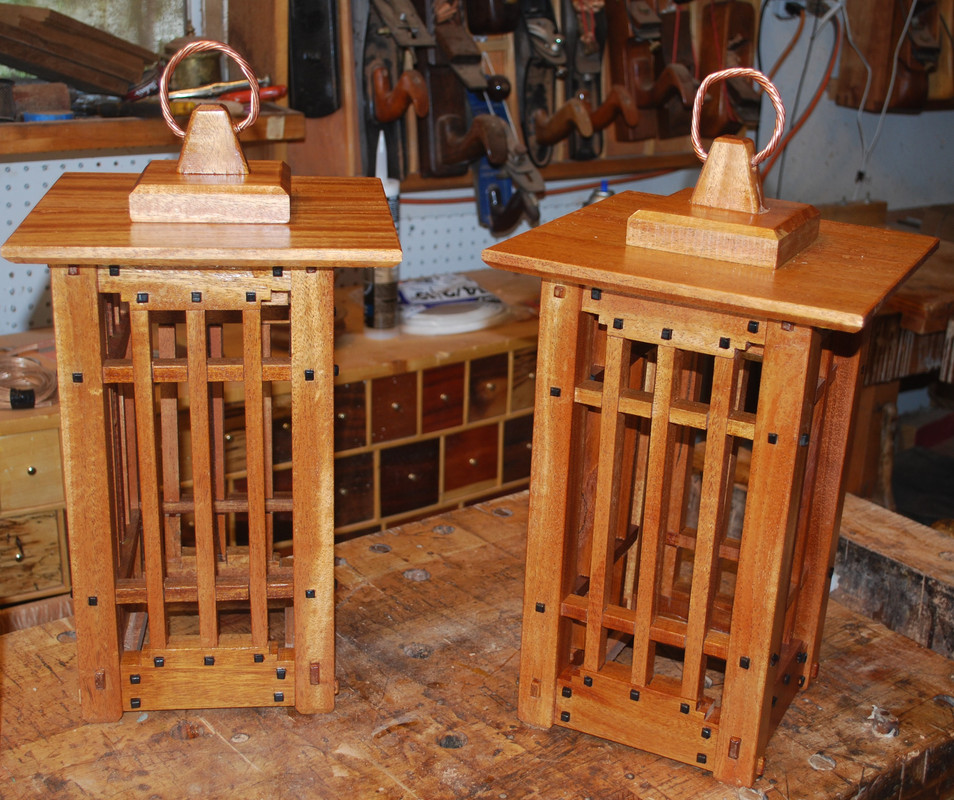
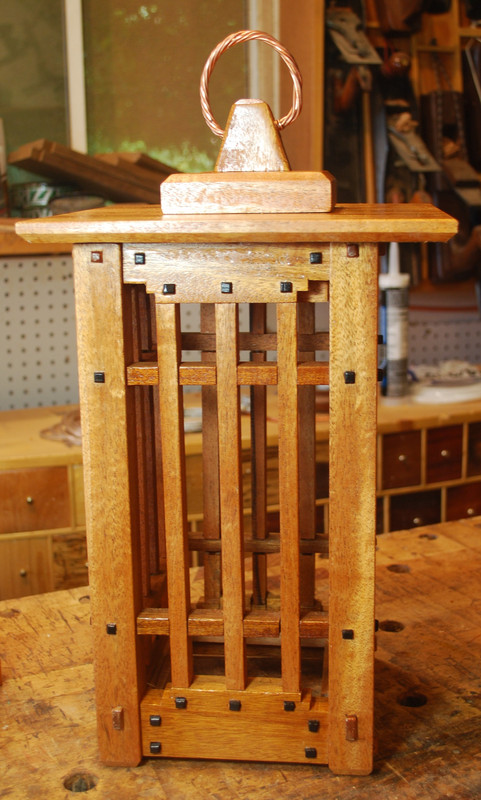
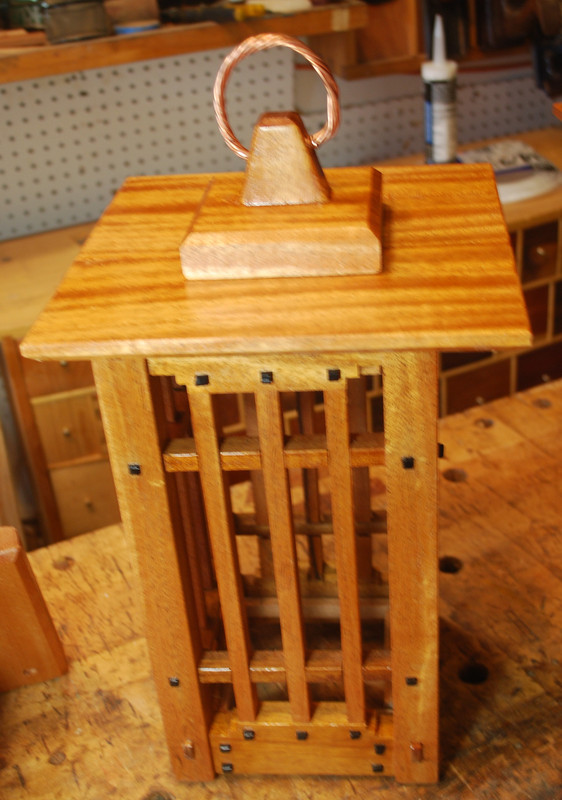
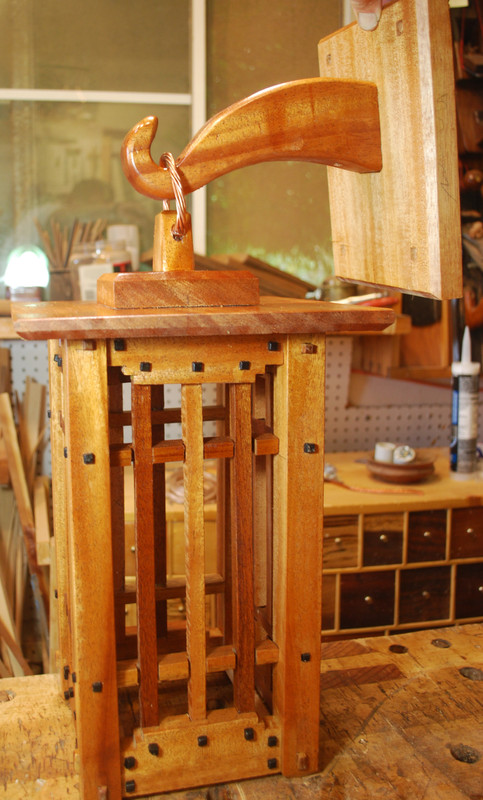
    I have a long-standing dream of retiring, buying an old craftsman style home and fixing it up. Think of all the built-ins, interior trim etc., would be a fun way to put my woodworking hobby to some practical use. One of my favorite craftsman design elements is the front porch with the cool mahogany front door and some lantern/porch lights. To date I regret to report I've made zero progress towards that goal. However in an effort to at least get started, I built the lanterns that I hope might look decent as porch lights. They're made of African mahogany, with exposed through tenons and ebony plugs, reminiscent of the Greene & Greene style I very much admire.

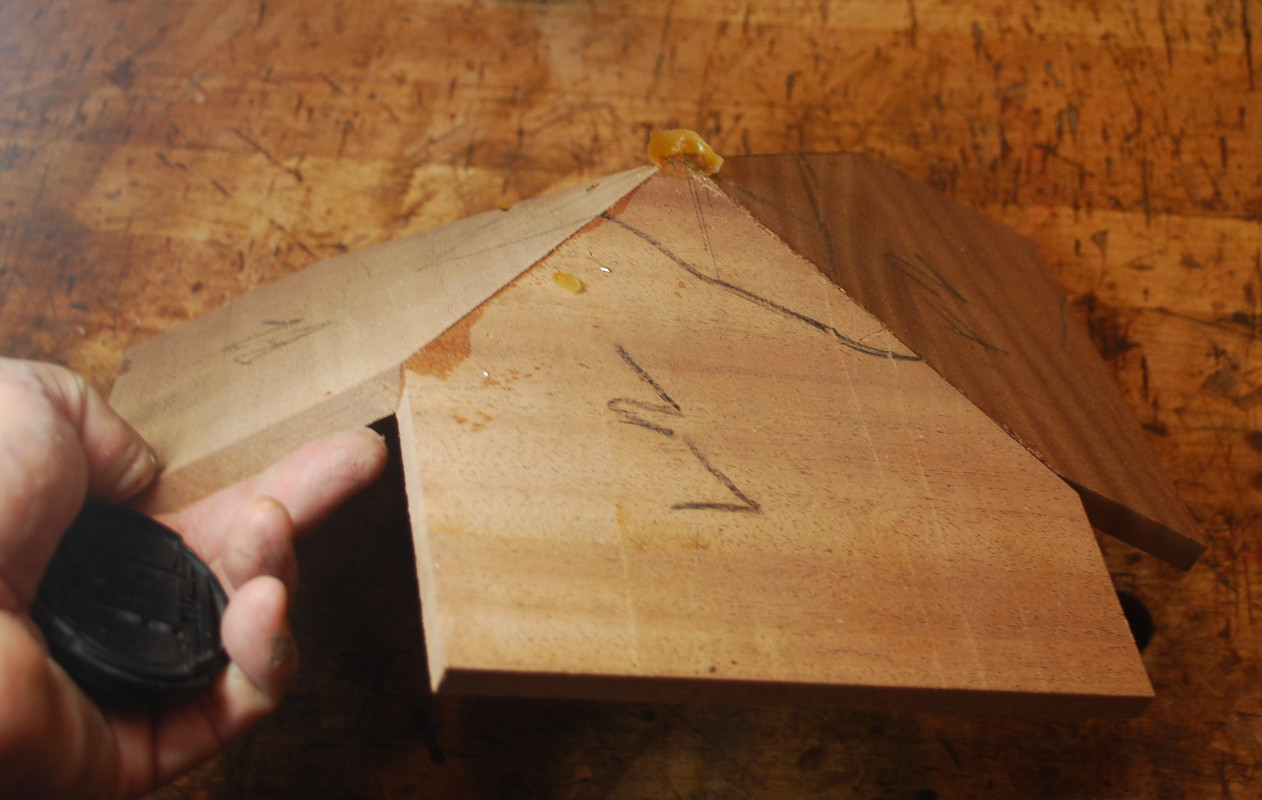
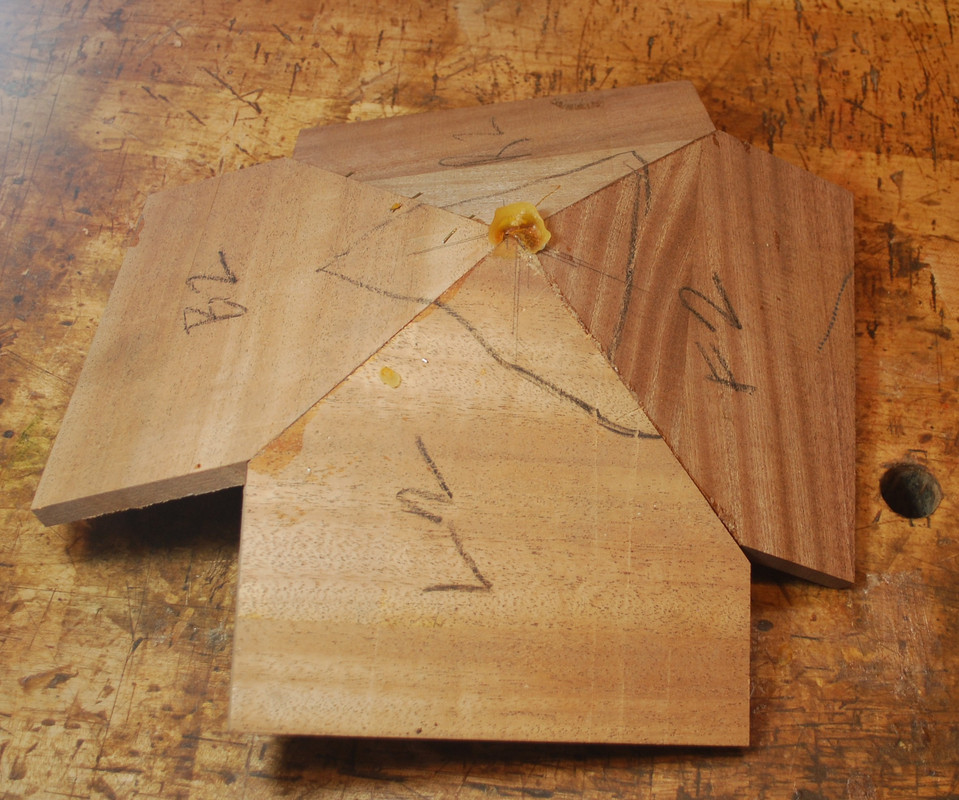
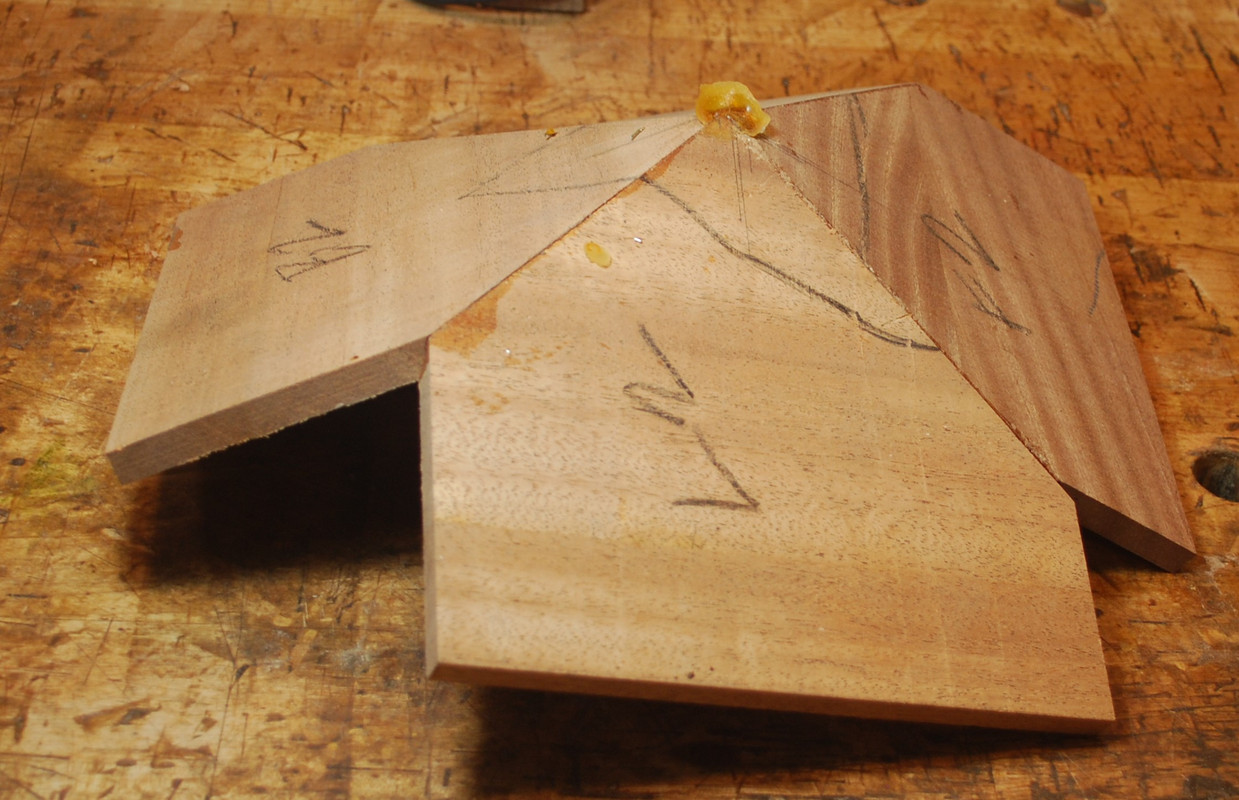
    My original intent was for a 4 piece top to sloped down to the outside of the lanterns from a central point. Based on my rudimentary (and clearly flawed) understanding of geometry, I assembled the top from four separate pieces with the mating sides cut at a 45° angle and then planed a bevel on the mating surfaces to try and eyeballed the slope I wanted. The dry fit sort of looked okay, but it was really hard to dry fit all four pieces together without them shifting all over, so I just glued the adjacent pairs together and thought I would be able to put the two half's together in a simpler final glue up. I'm still not exactly sure what went wrong. The dry fit looked good when all the pieces were placed flat in a single plane on the benchtop. However I think once I tried to shift the pieces from the single flat plane into the sloped pitch of the roof, the complementary angles were no longer 45°, but looks like something less than that? Either that or I just utterly screwed up the execution. Any geometry experts out there who might be able to help me how to figured this correctly next time?


    I ended up going with just a flat roof. Turns out I'm not smart enough to be able to build in more than two dimensions!


    Next step will be to get some plexiglass to keep the lightbulb dry. I'm also sure I'll discover that I don't know squat about wiring up a light fixture, but that's an adventure for another day.

    Cheers, Mike

  2. #2
    Join Date
    Feb 2014
    Location
    Lake Gaston, Henrico, NC
    Posts
    9,039
    I found this a great help in building a pyramid roof for a roof cupola:

    https://www.blocklayer.com/pyramid-calculator.aspx

    All four sides fit perfectly, first try.

  3. #3
    Join Date
    Aug 2012
    Location
    Missouri
    Posts
    2,152
    Hi Mike, I don’t know if this will help you much but it works for me. When working with a hip roof to find the length of the hip rafter you use 16.97” per foot run of a common rafter. I than just use the math from there because the 16.97” is constant no mater the pitch. When doing this smaller I just either draw a square the size I want or use some lathe to make a square to work from and than measure and do the math. Hope this helps. It’s easy for me to remember the 16.97” having done it so many times.
    Jim

  4. #4
    Join Date
    Feb 2011
    Location
    Carlsbad, CA
    Posts
    2,230
    Blog Entries
    2
    Quote Originally Posted by Tom M King View Post
    I found this a great help in building a pyramid roof for a roof cupola:

    https://www.blocklayer.com/pyramid-calculator.aspx

    All four sides fit perfectly, first try.
    Thanks Tom- this calculator is awesome!!!

  5. #5
    Join Date
    Aug 2019
    Location
    Pittsburgh, PA
    Posts
    853
    You may have to dive into the realm of "descriptive geometry" to figure out the precise angles to assemble a pyramid like you originally wanted. The website above may be a good starting point. The angles, I'm guessing, will not be simple whole values, you may have to do a bit of fitting.

    Have you considered instead of gluing the pieces together, gluing them to a frame?

    How about making the pyramidal top out of a solid piece? That would be my choice, now that I have thought about it for a bit.

  6. #6
    Join Date
    Nov 2009
    Location
    Peoria, IL
    Posts
    4,517
    Nice work! My dream has been to build the Frank Lloyd Wright butterfly chandeliers in the Dana Thomas House in Springfield, IL. At 70, I probably won't see that through. I designed and built some sconces inspired from the Meyer May House in Grand Rapids, Mi when I worked at Woodworker's Journal. Also built a copy of this reader submission we had at WWJ that we photographed at the Dana Thomas House.
    Prairie lantern.jpgmeyer house sconce.jpg

  7. #7
    Join Date
    Feb 2014
    Location
    Lake Gaston, Henrico, NC
    Posts
    9,039
    James, any time I've ever framed a hip roof on a building, we just change the 12 to 17 on the framing square. The three hundredths don't matter for framing.

    When I made that pyramid roof for a cupola, I used a Wixey gauge to set the blade on the table saw by that calculator, and it fit perfectly. I don't remember what they were, but a tenth of a degree was plenty accurate enough. I'm too tired this late to figure out how to do it with a handsaw.

    Sorry, I forgot to say the lamps look great anyway!!
    Attached Images Attached Images
    Last edited by Tom M King; 05-26-2022 at 10:10 PM.

  8. #8
    Join Date
    Mar 2019
    Location
    Los Angeles, California
    Posts
    972
    A similar lamp with an angled pyramid glass top can be found here: https://www.woodworkersjournal.com/w...airie-Lamp.pdf
    Regards,

    Tom

  9. #9
    Join Date
    Feb 2011
    Location
    Carlsbad, CA
    Posts
    2,230
    Blog Entries
    2
    Quote Originally Posted by Tom M King View Post
    James, any time I've ever framed a hip roof on a building, we just change the 12 to 17 on the framing square. The three hundredths don't matter for framing.

    When I made that pyramid roof for a cupola, I used a Wixey gauge to set the blade on the table saw by that calculator, and it fit perfectly. I don't remember what they were, but a tenth of a degree was plenty accurate enough. I'm too tired this late to figure out how to do it with a handsaw.

    Sorry, I forgot to say the lamps look great anyway!!


    Thanks Jim and Tom for the coaching! I don't know anything about construction but am eager to learn.

    Just to be clear, are you saying if you know the length of the flat/common rafter, (say 100" in this example) then the length of the angled rafter (hip rafter?) is always the ratio of 17/12= 1.42? In this example: 1.42 x 100=141.6"? And are you also saying this formula holds true no matter the roof pitch?

    thanks in advance for your help!

  10. #10
    Compound miters can be calculated the using traditional method but I prefer using an online calculator.
    https://jansson.us/jcompound.html

  11. #11
    Join Date
    Feb 2014
    Location
    Lake Gaston, Henrico, NC
    Posts
    9,039
    No need for calculations framing a roof with a framing square. Say the slope is a 9 in 12. Measure the run of that rafter, and step it off with gauges on the framing square on the 9 and 12 inch marks. It doesn't matter what the rise is per foot, it's always done the same way.

    Use a second square off the 12 side of the gauged one for the last fraction of a foot. For a hip rafter, change the 12 to 17. Much quicker than figuring lengths and marking angles. The angles are exactly right off the square.

    That's all I did for the framing under that little 2' square cupola roof even.

    edited to add: If that is not clear, Google "stepping off rafters with a framing square video"

    also edited to add: I really didn't want to use wood with knots in it, but those were the only dry pieces of treated wood I had on hand. The sash were made from dry treated wood too. Top was marine baltic birch, fake standing seam battens Cypress, and the whole top glassed over with a couple of layers of 2 oz. fiberglass cloth. It hinges open to be able to access the solar led light.
    Attached Images Attached Images
    Last edited by Tom M King; 05-27-2022 at 2:08 PM.

  12. #12
    Join Date
    Feb 2014
    Location
    Lake Gaston, Henrico, NC
    Posts
    9,039
    These are the square gauges I like, and have used for close to 50 years. Starrett calls them stair gauges, because they are used for stair stringers too, but I also use them for rafter layout.

    Someone else sells some hexagonal ones, but I like the ends of the Starrett's better because they are not affected by rounded edges of framing lumber. You can put the Starrett's right on the marks you're using, like that 9 and 12 example I used. You will see people putting the hexagonal ones on the other side of the square blade, but that's just another step to me. I set mine to the marks, and use a sharp no. 3 or 4 pencil. The first one you cut pretty is used as a gauge to mark the rest by.

    https://www.toolbarn.com/products/st...RoCuIsQAvD_BwE

    The only thing you need to know about rafter total length is close enough to be sure you buy ones long enough.
    Last edited by Tom M King; 05-27-2022 at 2:02 PM.

  13. #13
    Join Date
    Aug 2012
    Location
    Missouri
    Posts
    2,152
    You have it Mike. To prove it to yourself just lay any square against a straight edge and just start raising the blade changing the pitch. You will notice the angles don’t change only the lengths change. This works for 90*. If you change the angle you need to do the math.
    Jim

  14. #14
    Join Date
    Feb 2011
    Location
    Carlsbad, CA
    Posts
    2,230
    Blog Entries
    2
    Quote Originally Posted by Tom M King View Post
    These are the square gauges I like, and have used for close to 50 years. Starrett calls them stair gauges, because they are used for stair stringers too, but I also use them for rafter layout.

    Someone else sells some hexagonal ones, but I like the ends of the Starrett's better because they are not affected by rounded edges of framing lumber. You can put the Starrett's right on the marks you're using, like that 9 and 12 example I used. You will see people putting the hexagonal ones on the other side of the square blade, but that's just another step to me. I set mine to the marks, and use a sharp no. 3 or 4 pencil. The first one you cut pretty is used as a gauge to mark the rest by.

    https://www.toolbarn.com/products/st...RoCuIsQAvD_BwE

    The only thing you need to know about rafter total length is close enough to be sure you buy ones long enough.
    Tom, I really appreciate your advice. I have a fantasy of building/remodeling an craftsman house. I would love to work on your crew for free just for the learning experience. Any openings for fit 62 year olds with good hand tool skills, willing to do hescut work?
    Cheers, Mike

  15. #15
    Join Date
    Feb 2014
    Location
    Lake Gaston, Henrico, NC
    Posts
    9,039
    I take that as a compliment, but if you can read a tape measure, you're more qualified than any help I've ever had. I hired people that no one else would. With you ten years younger than me, we'd probably do pretty good.

Posting Permissions

  • You may not post new threads
  • You may not post replies
  • You may not post attachments
  • You may not edit your posts
  •