Page 2 of 2 FirstFirst 12
Results 16 to 28 of 28

Thread: Build a Shaker Style Table Project

  1. #16
    Join Date
    Jun 2010
    Location
    twomiles from the "peak of Ohio
    Posts
    12,165
    Ran the drawer front a few times, milling both ends....Had had enough hand chopping dovetails..
    2 hour Saturday, all milled.JPG
    Pins first, of course...then over to the bench
    2 hour Saturday, tails, next.JPG
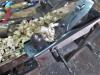
    Lay out the tails, saw, leaving the lines by cutting on the waste side...THEN the chisel went back to work....chop out the waste..clean things up, try a dry fit..
    2 hour Saturday, 1st dry fit.JPG
    Had some crumbs in the back to clean out..kept at it...more test fits, until..
    2 hour Saturday, last dry fit.JPG
    BOTH corners looked like this....whew...
    Decided to at least get a plane ready for tomorrow...
    2 hour Saturday, No.45.JPG
    Stanley No. 45....the reset was it was still set up to mill beads....change cutter, move the fence a bit...
    2 hour Saturday, reset for grooves.JPG
    It is now set up to plough a 1/4" x 1/4" groove...1/4" in from the bottom edges of the front and sides....to house a plywood panel for the bottom of the drawer

    Will need to mill the dados at the back to house the drawer's back....then try to assemble this drawer with glue and clamps....and maybe a few screws....should be a fun day?

    Stay tuned
    A Planer? I'm the Planer, and this is what I use

  2. #17
    Join Date
    Jun 2010
    Location
    twomiles from the "peak of Ohio
    Posts
    12,165
    Late last night...had to run down to the basement...Boss needed something.....Couldn't help it, just had to try the plane out...jigged up the drawer front..had to back off the cutter one turn..
    The Groovy Stuff, Drawer front.JPG
    Came back later to take that photo....did it again..
    The Groovy Stuff, candle.JPG
    That candle seemed to speed things up...and the other drawer side went from..
    The Groovy Stuff, before.JPG
    To about 3 minutes later..
    The Groovy Stuff, after.JPG
    Then decided to reset the other Stanley No. 45...
    The Groovy Stuff, 2 of them.JPG
    To get it ready to mill 2 dados
    The Groovy Stuff, #16 dado blade.JPG

    Hmmm, long rods are too long, but the short rods are too short...

    Back of the drawer will sit in dados, glued and screwed in place..

    Yep, dangerous to actually send me TO the basement....stay tuned
    A Planer? I'm the Planer, and this is what I use

  3. #18
    Join Date
    Jun 2010
    Location
    twomiles from the "peak of Ohio
    Posts
    12,165
    Dados are done..
    Drawer Build 101, dado 1.JPG
    Spurs are in bad shape,,,used the dovetail saw to just saw the walls of the dado...45 to remove most of the waste...
    Drawer Build 101, tilted.JPG
    And the #71-1/2 to level the floor, as the #45 wanted to tilt..a lot...Dry fit..3 times...to finally get the drawer back the right size..
    Drawer Build 101, dry fit.JPG
    Went to size the plywood bottom panel....panel on hand was not big enough.....trip to Lowes before they closed...$7.38 for a 1/4" x 24" x 24" plywood panel...that I could cut down to the right size...
    Drawer Build 101, bottom panel.JPG

    The bottom corners of the sides, where the drawer first slides in at..
    Drawer Build 101, starter ends.JPG
    Get a "Starter Bevel"...I also checked for square..
    Drawer Build 101, checked for square.JPG

    So...the tasks for today...drill and counter sink for screws in the dados ( I do not rely on glue alone) glue and clamps and screws to hold the bottom to the back.. Let that sit for the day.

    Have the proper screws for the corner blocks...install them, today. Drill slotted holes in the corner blocks. Mill the drawer guides to proper thickness, and glue in place. May champfer the bottom edge of the top...but, no other "fancy" stuff. Sounds like a rather full day IN the shop?

    Stay tuned...
    A Planer? I'm the Planer, and this is what I use

  4. #19
    Join Date
    Jun 2010
    Location
    twomiles from the "peak of Ohio
    Posts
    12,165
    Drawer has been glued up..
    Monday Afternoon, glued up.JPG
    Screws were added to the back glue blocks..
    Monday Afternoon, Screwdriver.JPG
    Proper screws, proper screwdriver...North Brothers 135
    Monday Afternoon, slots made.JPG
    Slots drilled to attach the base to the top...
    Monday Afternoon, drawer guide.JPG
    Drawer Guides glued in place...

    Spent a whopping (according to my right leg) 90 minutes in the shop, today...

    Waiting on all the glue to dry.

    Stay tuned..
    A Planer? I'm the Planer, and this is what I use

  5. #20
    Join Date
    Jun 2010
    Location
    twomiles from the "peak of Ohio
    Posts
    12,165
    Will have to wait a day or two, but..
    Working Tuesday, assembled table.JPG
    We getting there..
    A Planer? I'm the Planer, and this is what I use

  6. #21
    Join Date
    Jun 2010
    Location
    twomiles from the "peak of Ohio
    Posts
    12,165
    1st coat of Amber Shellac is on....table and drawer...waiting to see how it turns out, now...
    A Planer? I'm the Planer, and this is what I use

  7. #22
    Join Date
    Jun 2010
    Location
    twomiles from the "peak of Ohio
    Posts
    12,165
    Between the glare of the overhead lights..
    Table PIP 2.JPG
    And this table does not stand all that tall..
    Table PIP 1.JPG
    Makes it hard to get a decent PIP..
    Table PIP 3.JPG
    Yes, I even shellacked the drawer...
    Table PIP 4.JPG
    Will work on this tomorrow....maybe one more coat, before the varnish goes on...
    A Planer? I'm the Planer, and this is what I use

  8. #23
    Join Date
    Jun 2010
    Location
    twomiles from the "peak of Ohio
    Posts
    12,165
    update....
    1st coat rubbed out...2nd coat of amber shellac has been brushed on...

    will take a picture or 2 later...not much change..spots I had missed on the 1st coat, now taken care of..


    stay tuned
    A Planer? I'm the Planer, and this is what I use

  9. #24
    Join Date
    Jun 2010
    Location
    twomiles from the "peak of Ohio
    Posts
    12,165
    Coat #2 has been steel wooled...will get a wipe down, later today...and then a coat of "Warm Gloss" poly will get brushed on...

    Stay tuned....
    A Planer? I'm the Planer, and this is what I use

  10. #25
    Join Date
    Jun 2010
    Location
    twomiles from the "peak of Ohio
    Posts
    12,165
    1st coat of varnish has dried, been hand-sanded @180 grit....I need to take an old T-shirt to the shop, later...and rub down, wipe off the table and drawer....then see about a 2nd coat of varnish...

    Film at 2300 hrs...
    A Planer? I'm the Planer, and this is what I use

  11. #26
    Join Date
    Jun 2010
    Location
    twomiles from the "peak of Ohio
    Posts
    12,165
    Gloss varnish has been rubbed out..table is DONE And will be heading out to the Gazebo...
    table project post, corner view.JPG
    table project post, front knob.JPG
    table project post, dovetails.JPGtable project post, thin edged top.JPG
    A Planer? I'm the Planer, and this is what I use

  12. #27
    Join Date
    Nov 2021
    Location
    Central Arkansas
    Posts
    75
    Another job well done. I'm amazed at how quickly you finish your projects. You have a lot more focus and perseverance than I do.
    BillL

  13. #28
    Join Date
    May 2015
    Location
    NJ
    Posts
    1,389
    Nice project.

Posting Permissions

  • You may not post new threads
  • You may not post replies
  • You may not post attachments
  • You may not edit your posts
  •