Results 1 to 12 of 12

Thread: quick and dirty bowl assemble press

  1. #1
    Join Date
    Jan 2013
    Location
    FINGER LAKES AREA , CENTRAL NEW YORK STATE
    Posts
    259

    quick and dirty bowl assemble press

    I am new at this segment bowl turning thing returning to woodworking after a 20 years off printing tees shirts and embroidered apparel.
    In my past woodworking life I dabbled in some furniture , mantles , jewelry boxes and a couple of humidors. I share that only to bring in the workbench you see in the picture.
    It simply a bench top with a series of holes drilled through. Today it was re-employed to glue a feature ring to a partial finished bowl in the same method it was previously used to build other glue up assemblies. Most will likely be familiar with this assembly tool but I thought it might be of some value.
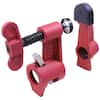
    The setup is real simple, quick and capable of any amount of pressure you care to apply and functions as a work bench most of the time .
    Two pipe clamps, a piece of 2 x 4 lumber and done
    mike calabrese
    Attached Images Attached Images

  2. #2
    Join Date
    Mar 2016
    Location
    Elmodel, Ga.
    Posts
    798
    I'd watch the glue squeeze out from your segments. Wouldn't want it on the benchtop. You might have a big problem separating your work from the bench. Just an observation, not being critical.
    It's a great idea, but perhaps you might put a piece of wax paper or a melamine board, or anything that glue doesn't stick to under it.
    My Dad always told me "Can't Never Could".

    SWE

  3. #3
    Join Date
    Jan 2013
    Location
    FINGER LAKES AREA , CENTRAL NEW YORK STATE
    Posts
    259
    Hi Steve
    Actually in the picture I am only adding the feature ring, you can see the profile of the bowl above the feature is mostly turned so there is a minimum of glue involved.
    I tend to minimize squeeze out by thin coating both surfaces with glue intentionally with the focus of reducing squeeze out.

    Way back in the day I had a wood shop teacher who was pretty sharp. He taught us that on a good wood joint you should not see the glue that does the work, (nice tight joint) and the glue you could see just creates more work. Never forgot that lesson.

    About your comments NO PROBLEM EVER ..... I have been working wood, off and on, for about 50 years BUT have always done so in almost total isolation from other woodworkers. With that I completely realize there is a universe of information and talent out there that never reaches my eyes and ears. So any guidance I can get is always welcome, no worries mate .

    mike calabrese

  4. #4
    Quote Originally Posted by mike calabrese View Post
    Hi Steve

    Way back in the day I had a wood shop teacher who was pretty sharp. He taught us that on a good wood joint you should not see the glue that does the work, (nice tight joint) and the glue you could see just creates more work. Never forgot that lesson.
    In one of James Krenov's books he recounts an instructor's question to a student - "What are you going to do with all that extra glue?'

    That's a good simple setup. An acquaintance who often does segmented bowls has a permanent setup like a book press with uprights and a crosspiece attached to a solid baseplate, with a veneer screw centered in the bridge. https://woodworker.com/9-press-screw-mssu-125-050.asp
    Last edited by Kevin Jenness; 04-04-2022 at 10:06 AM.

  5. #5
    Join Date
    Jan 2013
    Location
    FINGER LAKES AREA , CENTRAL NEW YORK STATE
    Posts
    259
    Hi Kevin,
    The book press rigs are nice if you have the room . I seen one somewhere along the line that didn't use a screw for compression but had a small bottle jack attached (inverted) in the top cross bar. I would guess with the right amount of spacers that could be pretty neat operation also.
    mike calabrese

  6. #6
    Join Date
    Sep 2015
    Location
    San Diego, Ca
    Posts
    1,647
    Mike, a friend of mine was asking for suggestions for a simple/cheap press. I told him to jack up his truck and slide the glue up under the tire. It would get about 500 pounds of force. He did it ! Ha ha.

  7. #7
    Join Date
    Feb 2008
    Location
    E TN, near Knoxville
    Posts
    12,298
    Quote Originally Posted by mike calabrese View Post
    Hi Kevin,
    The book press rigs are nice if you have the room . ...
    This is the one I bought, cast iron, quite sturdy. Mounted it to some blocks for more height, attached to a sturdy base. It cost me $61. Looks like it's no longer carried by Amazon, maybe elsewhere?

    https://smile.amazon.com/gp/product/B00012X504

    book_press.jpg

    JKJ

  8. #8
    Join Date
    Jan 2011
    Location
    Norristown, Pa
    Posts
    270
    Mike,
    Have almost the same set up, but instead of bench used 1 1/2 " counter top with two holes for pipe clamp. I put pipe flange on the under side of the board so if needed I could change the pipes. I used the adjustable clamp for easy adjustment for height.

    Bob
    Attached Images Attached Images
    Last edited by Bob Coates; 04-04-2022 at 7:39 PM. Reason: Added picture

  9. #9
    Join Date
    Apr 2017
    Location
    Michigan
    Posts
    2,772
    Hi Mike
    Nice use of what you have instead of encumbering your shop with another fixture. Just one concern, does the clamping force warp your bench top?

  10. #10
    Looks like a good way to put a bunch of pieces to a project, hopefully we can see the turned vace.Great idea on clamps

  11. #11
    Join Date
    Jan 2013
    Location
    FINGER LAKES AREA , CENTRAL NEW YORK STATE
    Posts
    259
    Hi Tom
    Thanks for lookin in. To answer you question, no, the bench top is 3/4 flake board I have had for many years. You can see a bunch of things have happened on the top and it is still going strong.
    There is no set pattern to the holes in the top I just added more here and there based on what i was building at the time.
    Thanks for you comments and time.
    mike calabrese

  12. #12
    Join Date
    Jan 2013
    Location
    FINGER LAKES AREA , CENTRAL NEW YORK STATE
    Posts
    259
    Hi Tim
    Below are some pics of the finished condition of the bowl you asked about.
    I have also included some of the feature ring in progress .
    This is my 3rd bowl and my first of many disasters. The feature ring was to have one 3/4 inch ring of maple and one 1/4 thick ring of walnut above that BUT I got a real nasty catch with a carbide tool that dug the grand canyon into the inside of the feature ring. So what you see is the lemonade I had to make form the lemons from the catch.
    The gouge was deep enough that it resulted in only allowing me to get the ring to finished thickness by the time the damage was gone so no possibility really to continue with the original plan. I thought about parting the ring off and starting with a new feature after the catch but my parole officer (my wife) talked me out of it.
    Thanks for looking in .
    mike calabrese
    55-3 DSCF3027.jpg55-3b DSCF3027.jpg55-3a DSCF3027.jpg

Posting Permissions

  • You may not post new threads
  • You may not post replies
  • You may not post attachments
  • You may not edit your posts
  •