Page 1 of 2 12 LastLast
Results 1 to 15 of 20

Thread: Making a dovetail saw: Shaping, Filing and Setting.

  1. #1
    Join Date
    Feb 2004
    Location
    Perth, Australia
    Posts
    9,497

    Making a dovetail saw: Shaping, Filing and Setting.

    This article is for all who wish to make a dovetail saw, but feel intimidated, and for all who need to sharpen their dovetail saws, which is everyone. Sooner or later, even the most expensive saw will need to be re-sharpened. Even touched up every now-and-then.


    We have many, many threads on sharpening plane blades and chisels, but not many on sharpening backsaws. Well, I am not an expert on making backsaws, having done about a dozen, although I have been sharpening my saws for about 15 years. Still, I consider myself a novice, which places me in touch with all others who feel a little overwhelmed by the process. I have developed a few strategies to make it all easier, and these I want to pass on. It would be great if those who are more experienced are prepared to comment, and add their advice.


    This is a long post, as there are so many photos, and so I have divided it into two sections: firstly, building the dovetail saw; secondly, sharpening and setting the teeth.


    Building a Dovetail Saw


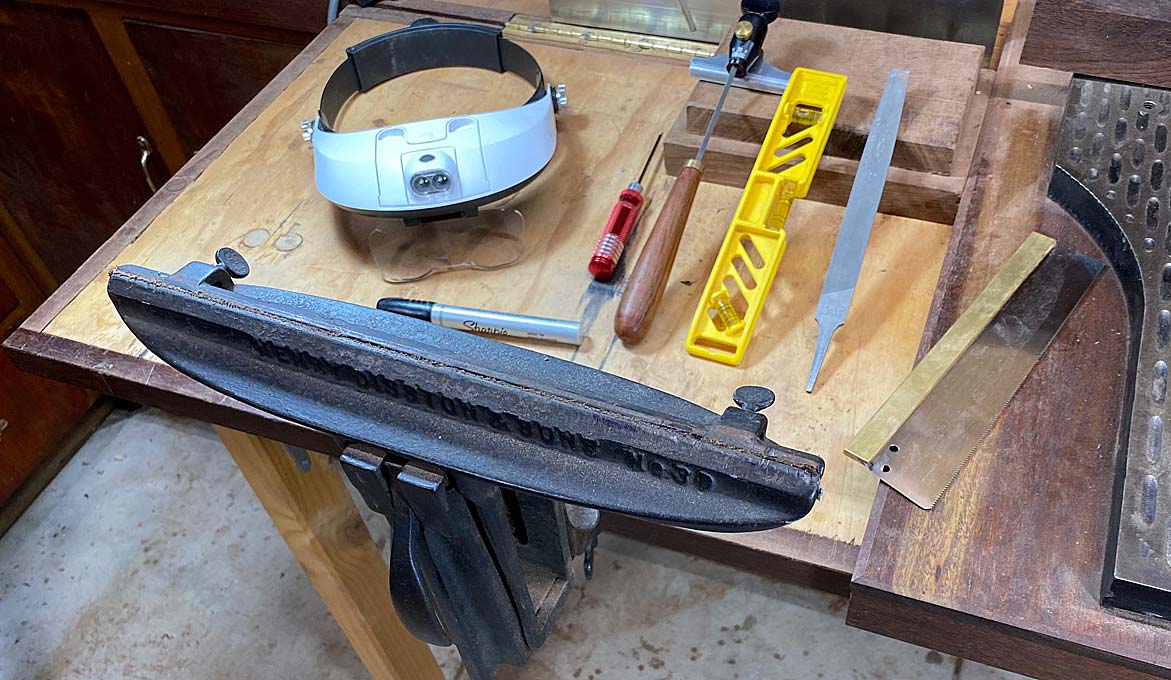
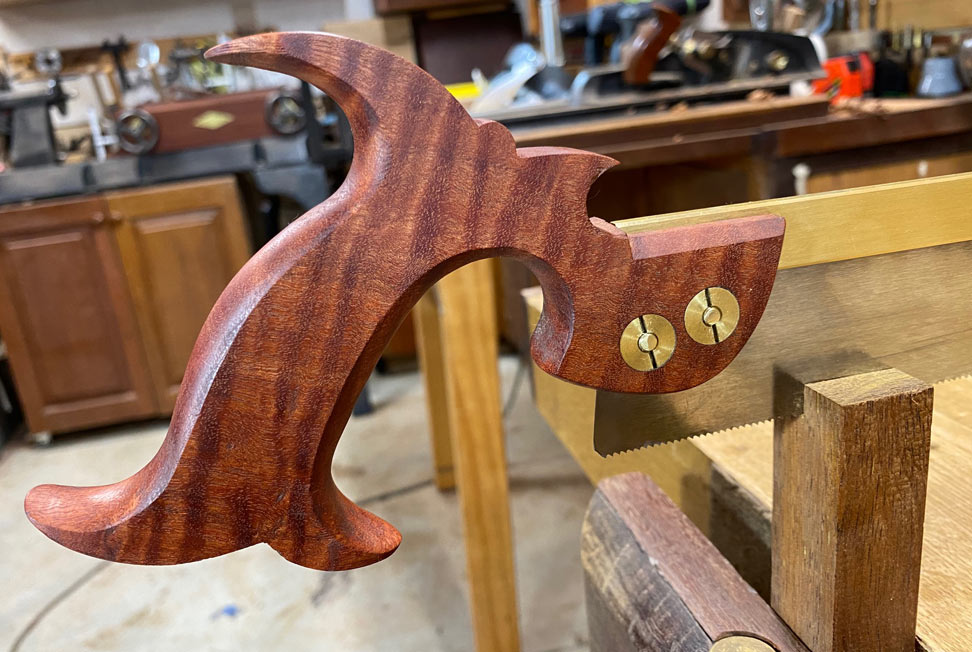
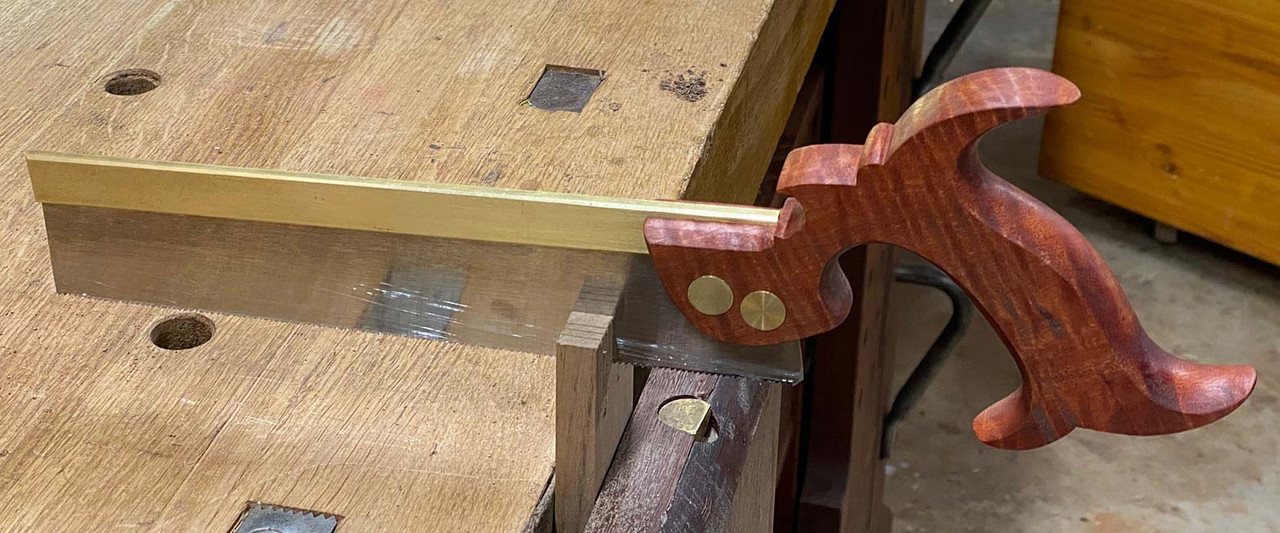
    There are four components in a dovetail saw: the plate, the brass back, saw nuts, and the handle.
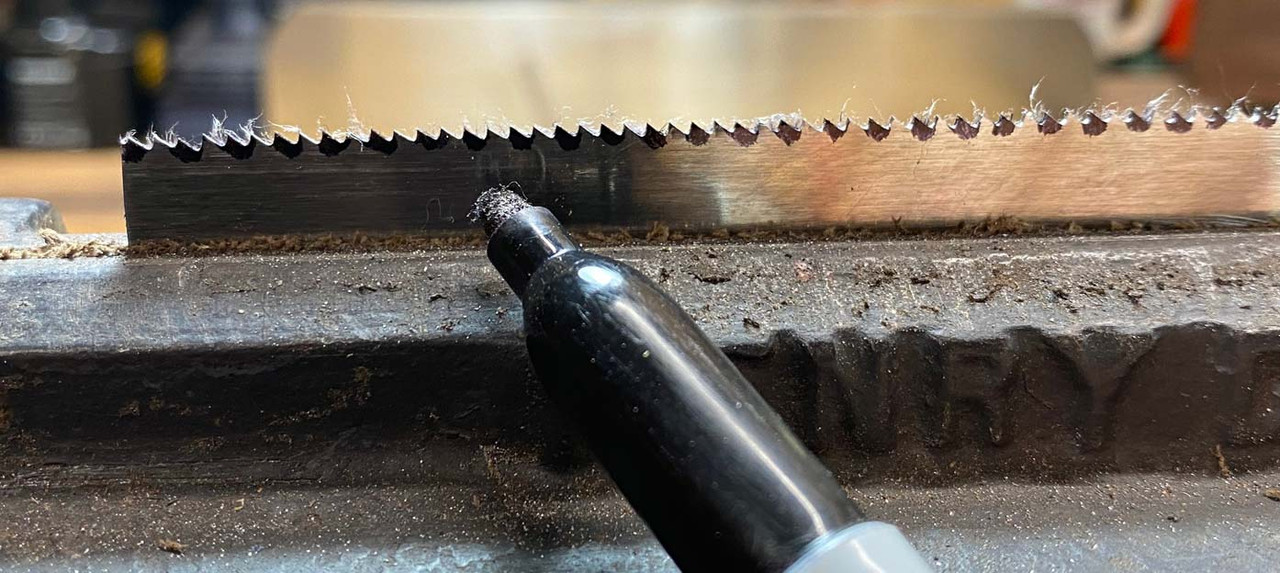
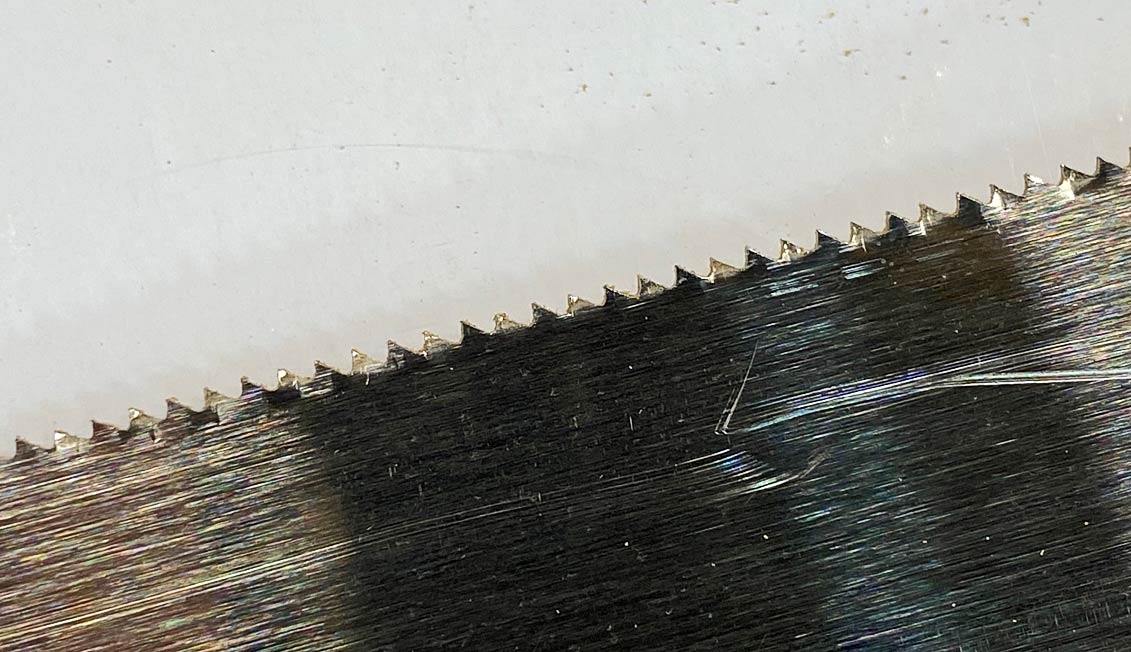

    In this case, the 9” plate and brass back came from Isaac Smith at Blackburn Tools. The motivation for making this saw is that I was curious about a thin-plate dovetail saw. The supplied plate is 0.015” thick, and comes machine filed (i.e. not sharpened) at 16 ppi with 5 degrees of rake.


    This will be a tapered plate, with 1 5/16" at the toe and 1 1/2" at the heel. Total cost $39 USD.


    The saw nuts I already had, having purchased a bunch over a decade ago from Mike Wenzloff. This is the last of them.


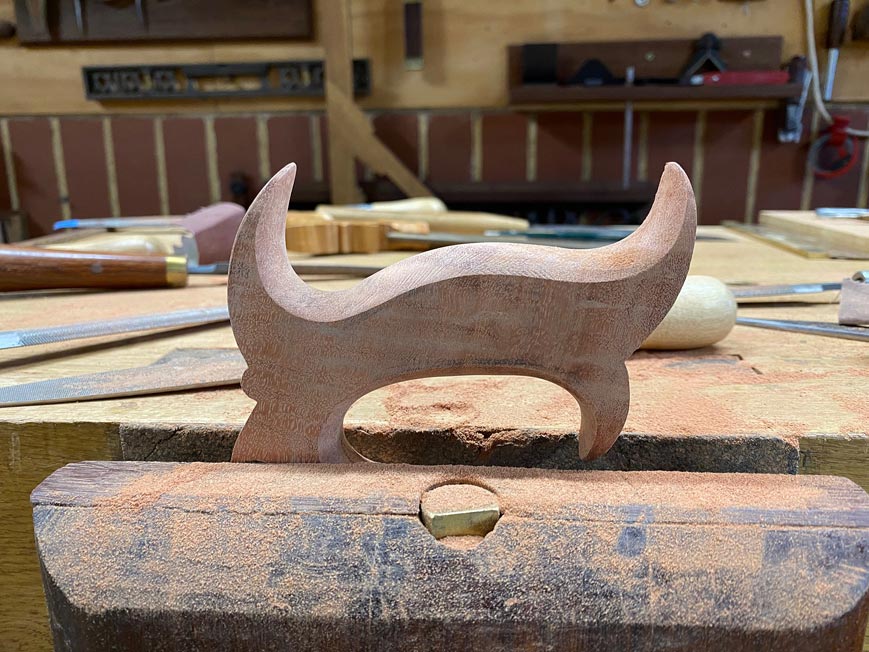
    The wood for the handle is an offcut in gorgeous fiddleback Jarrah.


    You are also going to need to drill the saw plate, and Isaac also stocks solid carbide spade drill bits. Photo in a little while.
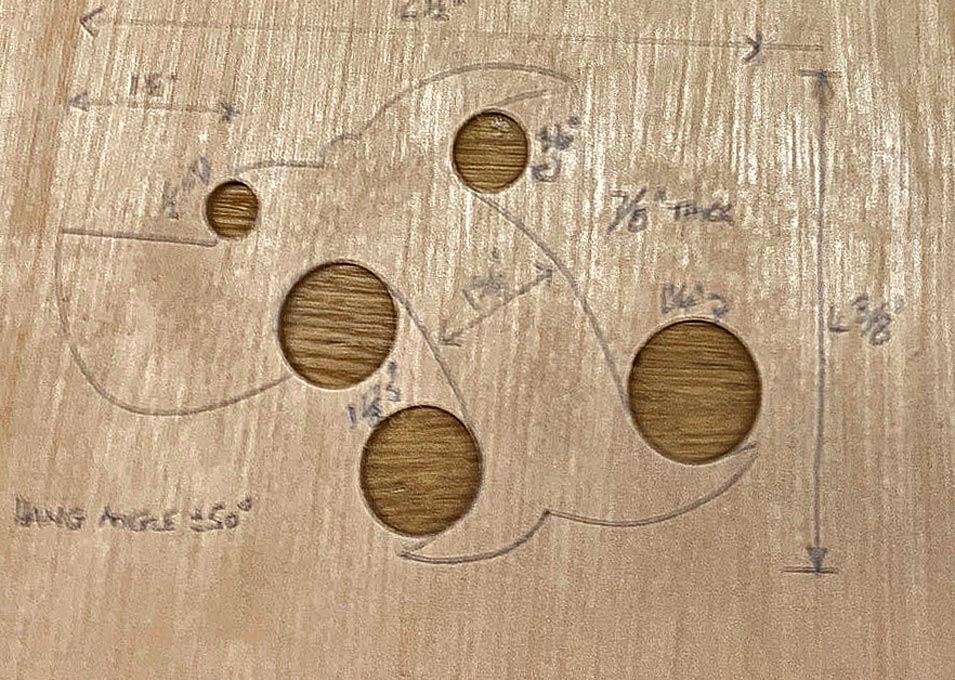
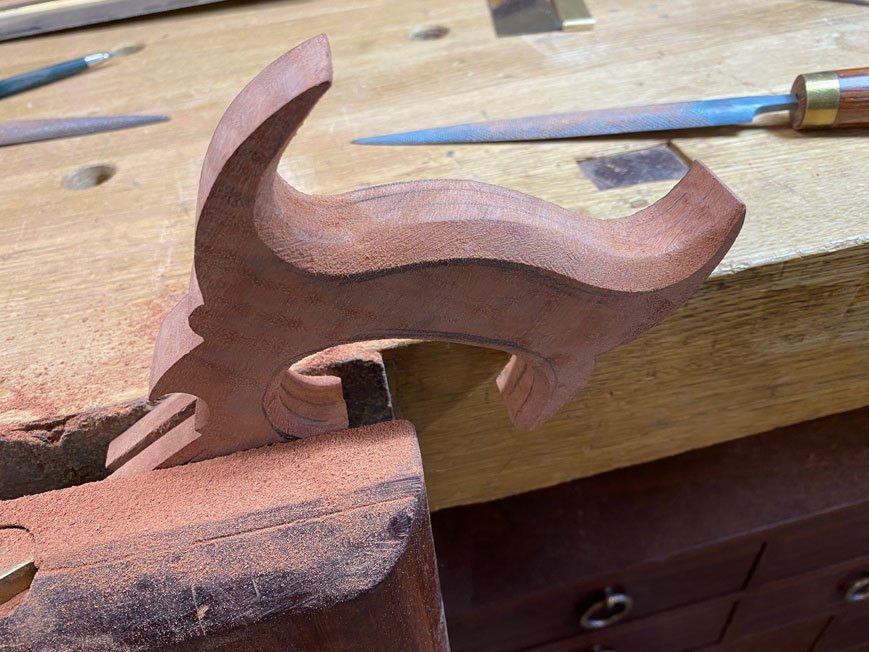

    Isaac’s site freely offers a number of templates of handles. I chose to make my own, based on a vintage Groves dovetail saw.


    Below is the template I made, showing the cut outs to aid in sawing the outline. Not the clearest photo.


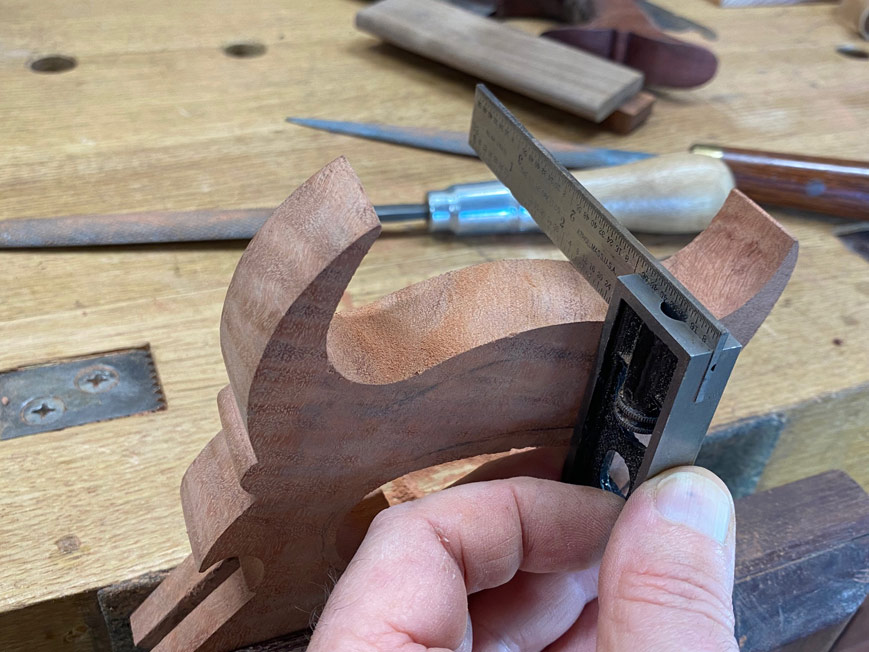
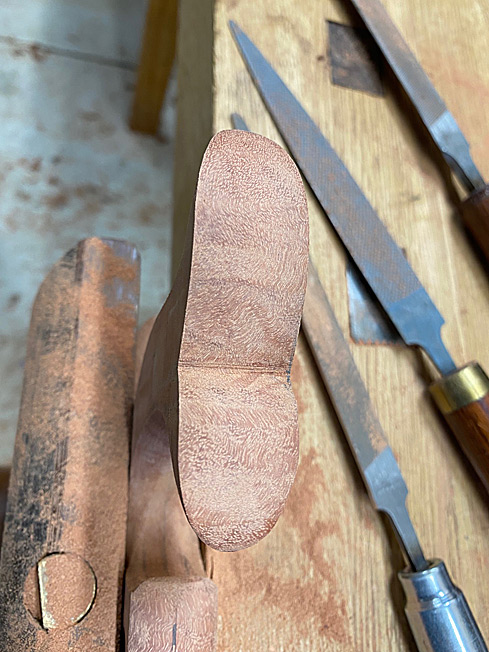
    I am going to assume that everyone can get as far as sawing the outline. The first tip I will give is that it is vital that square is maintained throughout …


    Secondly, mark guide lines to work to …


    Only begin to fare in the curves when the final outline is completed …


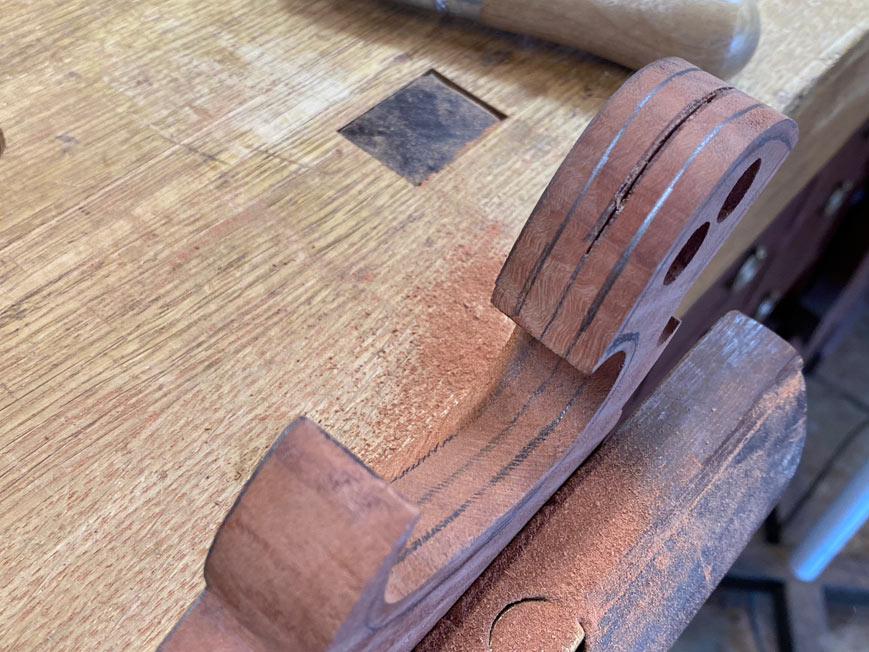
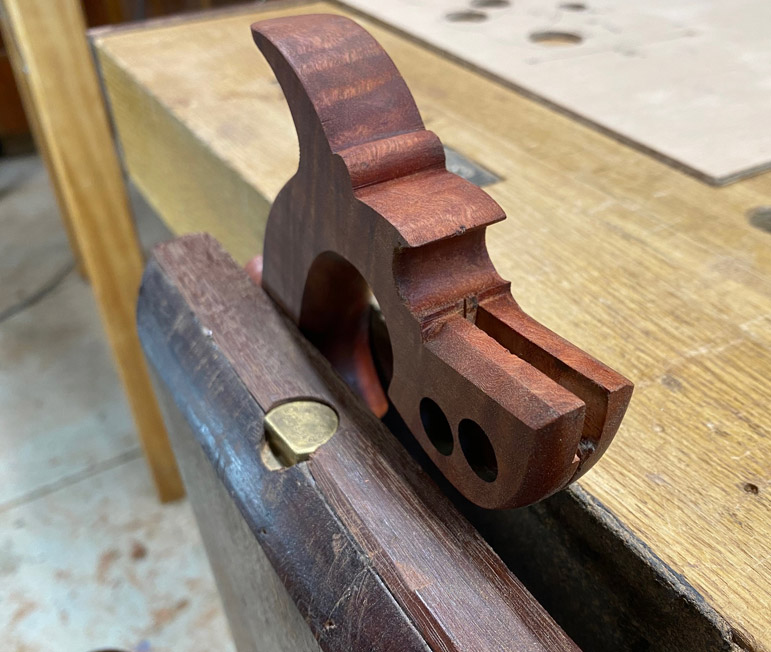
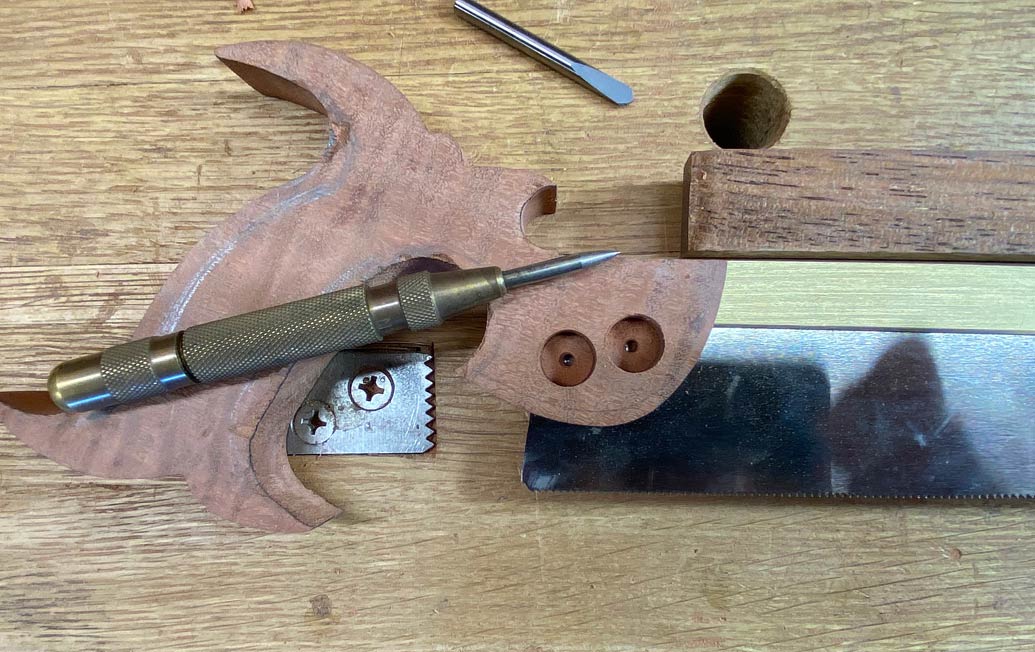
    As you reach the end of shaping, the mortice for the brass back needs to be cut before the slot for the blade. Mark out the boundary lines, and drill out the centre to depth. Leave a little to pare away …


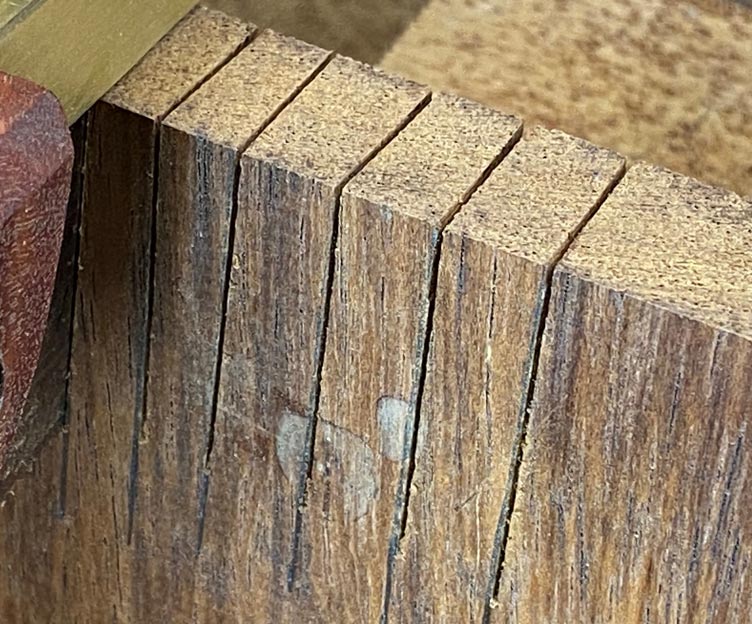
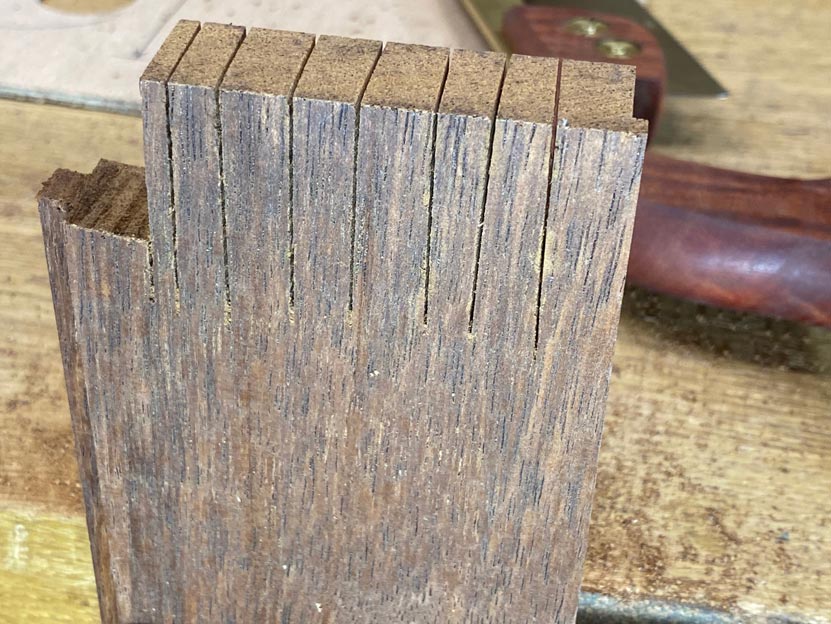
    Getting the blade slot square and centred is vital to keeping the plate straight. An out-of-square slot will the thin plate to its shape, and leave a curved tooth line.


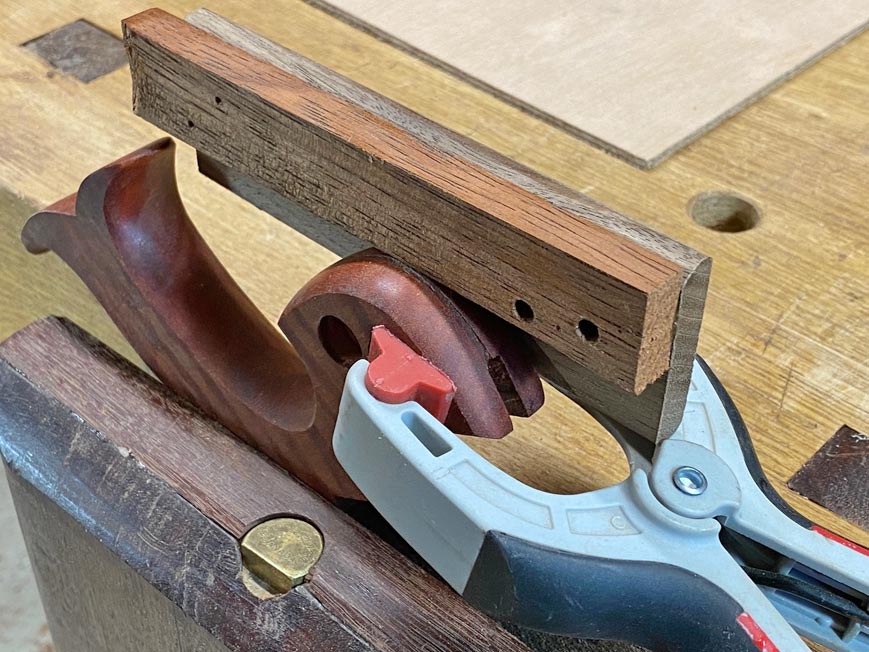
    In order that the slot remains square and vertical, I made a simple jig to guide the saw used to make the slot. Incidentally, the saw used – one which cut a tight kerf – was a Japanese Z-saw …


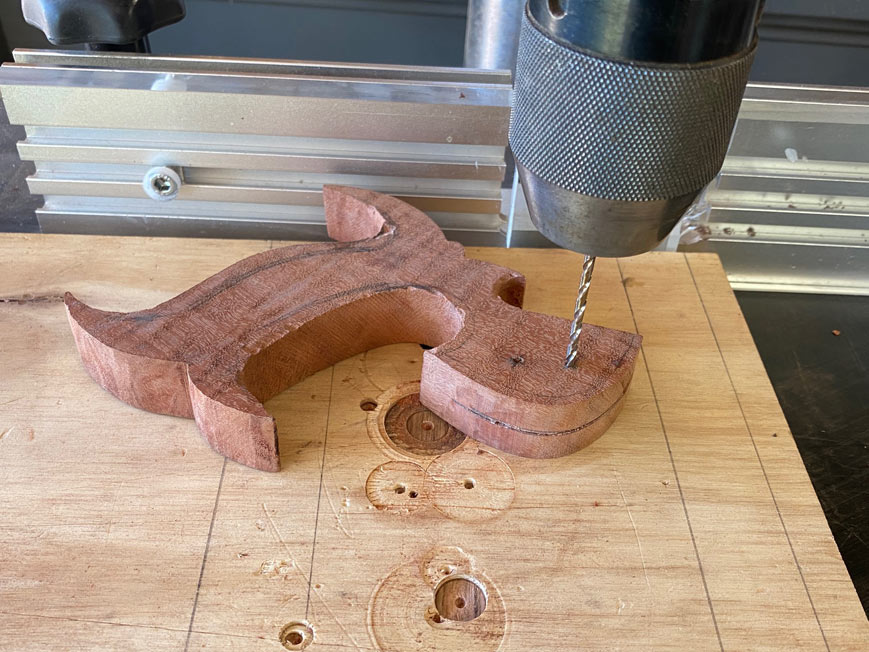
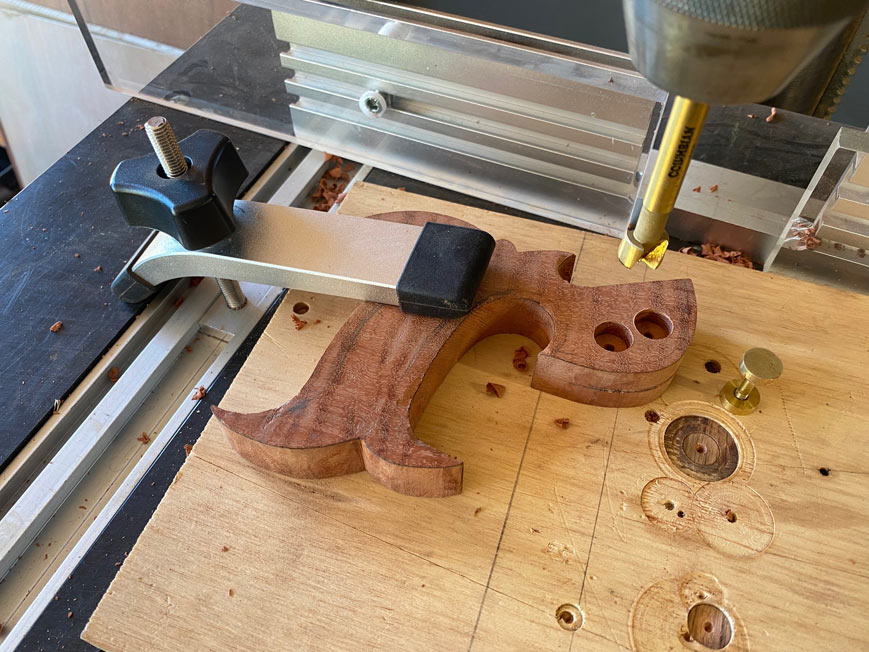
    The order of drilling the holes for the saw nuts is to start with a pilot hole …


    … followed by countersinking the heads and split nuts …


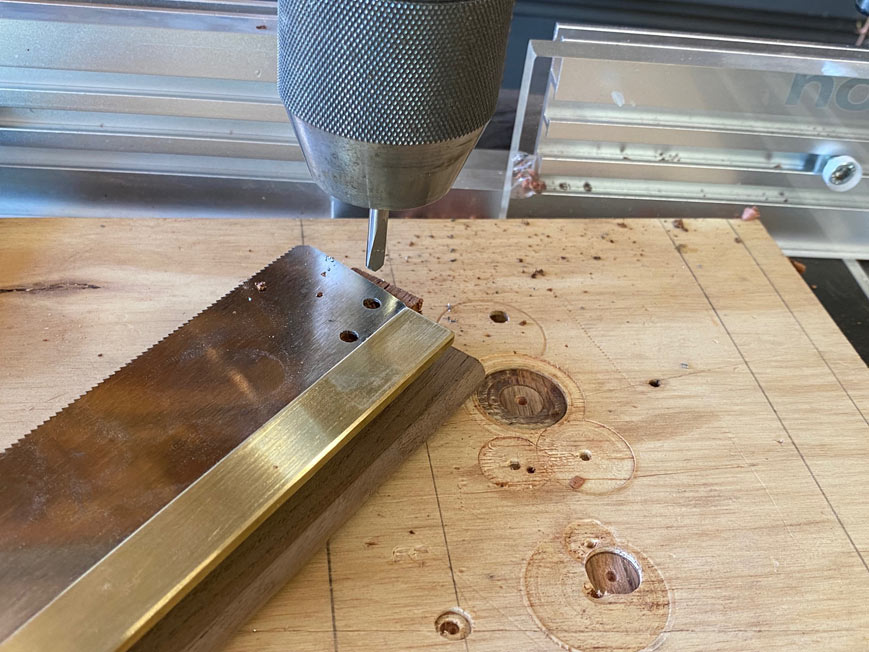
    Now you are ready to mark the positions on the saw plate …


    … and drill the holes with the carbide spade bit …


    Note that the drilling is done prior to any shaping. This is to maintain the maximum registration surface.


    I did not take photos of gluing the plate into the brass back. This is too easy – just use Locktite. The brass back will need to have the edges eased or chamfered with a file or sander, and then polished.


    End of Part One.


    Regards from Perth


    Derek
    Last edited by Derek Cohen; 03-07-2022 at 11:21 AM.

  2. #2
    Join Date
    Feb 2004
    Location
    Perth, Australia
    Posts
    9,497
    Part Two – Filing and Setting the Teeth of a Dovetail Saw


    We start here. On the right is the saw plate glued to the brass back. In front is a saw vise. Not least of all, as much light as you can find and a lensed visor for magnification of the tiny teeth …


    The plate is inserted and clamped with about 1/8” showing above the top of the vise. This is levelled …


    Why levelled? This is the first step in ensuring that the rake angle of the punched teeth are maintained exactly. I like 5-7 degrees rake for a dovetail saw.


    This is the Veritas saw file holder. Modified (of course!) with a small Stanley spirit level added. The file is a 4 ½” extra slim triangular file. Vallorbe and Bahco are two available brands.


    The file is inserted in the gullet, and the holder levelled …


    This indicates that the rake is 7 degrees …


    … on the protractor, which is marked in 5 degree increments. The vernier scale on the collar is marked in 1 degree increments.


    The next step is to run a Sharpie along the tips of the teeth …


    … and then run a mill file along the teeth. This will leave a silver tip on each tooth. Think of this like the light shining off a wire or dull edge on a plane blade. The aim of sharpening is to remove the silver tip. Doing so leaves level teeth and two intersection sides. I do this each time I sharpen a saw blade.


    Filing the teeth is easy. Start at the heel end, keep the guide square and level, and push one stroke. That should be enough to sharpen each tooth.


    Half on the right are done, with the other half yet to be done …


    Continue until all the teeth have been sharpened. Now go back and check there are no shiny tips left. File these, if necessary. Also check the spacing of the teeth. If these is one too close to another tooth, you can “move” the tooth by filing with more pressure against the offending side.


    Once all the teeth are done, it will be time to set the teeth. These are the more popular two pistol setters: Stanley #42X at the top, and Eclipse #77 at the bottom. Both work well, both may be tuned for different size teeth. Tuning involves filing the width of the hammer (the pointy bit, below).


    Setting the teeth involves bending a tooth over fractionally. This increases the width of the kerf as the teeth cut, and prevents them jamming. The teeth are bent alternately, creating an equal amount of set each side of the plate. This is easier in theory, and more consistently achieved with practice.


    One of the difficulties in creating set with the setter is seeing the teeth! As you move along the saw plate, setting each alternate tooth, then flipping the saw over to set the other side, you eye will glaze over, you will begin to see double, and the result will be that you lose track of what you have set. This is a problem since uneven set on each side of the plate will cause the teeth to cut inaccurately … more to one side than the other.


    I have a method to make this easier to be consistent.


    Take a fine Sharpie and mark each alternate tooth on one side …


    Now go ahead and set the teeth on that side. Once done, wipe the ink off with alcohol, and repeat on the other side of the plate.


    This method is extremely helpful with setting new teeth. Teeth which have been set previously will retain some of the past set, and you can take a cue from this. It is not always necessary to reset the teeth each time you sharpen. An indication that setting is needed is when the teeth do not cut freely, acting as if dull, or the saw binds in the cut.


    Here are the sharpened and set teeth …


    Before we move on it is a good idea to test the saw and see if it cuts straight. If it does not, then the set will need to be tuned. This involved using a fine diamond stone to remove some of the set on the side that is moving most. One stroke is often enough. Rather take off too little at a time than too much and have to start over. It is often also a good idea to lightly run the diamond plate along both sides to remove any set that is sticking out further on some of the teeth, and even all.


    A test cut. The aim is to follow drawn lines …


    This looks good. And the kerf looks clean …


    … as does the other side of the board …


  3. #3
    Join Date
    Feb 2004
    Location
    Perth, Australia
    Posts
    9,497
    The saw is done. Here are final photos …


    Regards from Perth


    Derek

  4. #4
    Join Date
    Jan 2019
    Location
    Fairbanks AK
    Posts
    1,566
    quote : as much light as you can find and a lensed visor for magnification :end quote

    This exactly. For 8 point saws I take my bifocals off and use one raking light.

    For 14 tpi (I have only ever sharpened 2 saws) I needed every light in the shop, plus a raking light, and not only did I need the magnifier visor, but I have to use the bifocal lenses in my glasses and the highest power magnifier in my kit, 3.5x.

    Once I got the planes of my glasses and magnifier in parallel I didn't want to move my head, but I had to keep tipping my head down to use the magnifier to get the file into the correct tooth gap, and then tip my head up so I could peer under all the glass to use the guide angles on the file guide. I must have looked like some kind of a water bird, a heron or a flamingo or some such.

    Thanks for the thorough write up Derek.

  5. #5
    Join Date
    Jan 2019
    Location
    Fairbanks AK
    Posts
    1,566
    I do have a further question about setting teeth. I have now 4 saw sets. All four have not only wide hammers for full sized saws, but anvils with probably a bunch more slope than I would want to put on a joinery saw.

    On the 42x did you need to modify the anvil shape while you making the hammer more narrow, or does that lowest least set mark work well for you on backsaws? Mine has 5 bars of increasing length to indicate more and more set delivered, looks very much like the signal strength icon on my phone.

    I noticed in Jim Koepke's thread about a month ago he has 2 of Stanley 42X, one with a pointy hammer and one with a regular hammer, but didn't mention if they have different anvils...

    Quote Originally Posted by Jim Koepke View Post

    My two user saw sets are set up different:

    Attachment 473441

    The one on the left has had the plunger filed for setting smaller teeth. Stanley, according to the instruction sheet, offered a plunger for setting teeth smaller than 14 ppi. Good luck finding one.

    jtk
    Thanks one and all.

  6. #6
    Join Date
    Jan 2009
    Location
    Philly 'burbs
    Posts
    153
    Great - now​ I want to make my own dovetail saw! Great write-up Derek. Thanks!
    It's better to be a spectacular failure than an apologetic one...

  7. #7
    Join Date
    Jul 2015
    Location
    Broadview Heights, OH
    Posts
    714
    Whatever saw you patterned that handle after was an exceptional specimen!

  8. #8
    Join Date
    Feb 2004
    Location
    Perth, Australia
    Posts
    9,497
    Quote Originally Posted by Pete Taran View Post
    Whatever saw you patterned that handle after was an exceptional specimen!
    Pete, one of the saws I admire and influences me is an old Independence Tools saw. Have you any experience with them?

    My IT is a little narrow for my larger hand, so this current saw was given more girth. Better details ...


    Regards from Perth

    Derek

  9. #9
    Join Date
    Sep 2007
    Location
    Longview WA
    Posts
    27,486
    Blog Entries
    1
    Great write up and great looking saw.

    I noticed in Jim Koepke's thread about a month ago he has 2 of Stanley 42X, one with a pointy hammer and one with a regular hammer, but didn't mention if they have different anvils...
    The anvils are both stock and unaltered.

    On the #42X, if need be, the adjusting screw can push on the bottom of the anvil below the slot to create minimal set.

    jtk
    "A pessimist sees the difficulty in every opportunity; an optimist sees the opportunity in every difficulty."
    - Sir Winston Churchill (1874-1965)

  10. #10
    Join Date
    Feb 2004
    Location
    Perth, Australia
    Posts
    9,497
    If you look carefully, you can see the hammer strikes on the tips of the teeth ...


    Regards from Perth

    Derek

  11. #11
    Join Date
    Aug 2012
    Location
    Missouri
    Posts
    2,152
    How in the world would Pete Taran know anything about Independence saws.😀😀😀😀😜
    Jim

  12. #12
    Join Date
    Aug 2012
    Location
    Missouri
    Posts
    2,152
    Very well done saw and write up Derek.
    Jim

  13. #13
    Join Date
    Feb 2004
    Location
    Perth, Australia
    Posts
    9,497
    Quote Originally Posted by James Pallas View Post
    How in the world would Pete Taran know anything about Independence saws.
    Jim


    Regards from Perth

    Derek

  14. #14
    Join Date
    Jun 2010
    Location
    twomiles from the "peak of Ohio
    Posts
    12,194
    So...NOW you'll will need to build a "Traveling Box" for this saw, as well?
    A Planer? I'm the Planer, and this is what I use

  15. #15
    Join Date
    Feb 2011
    Location
    Carlsbad, CA
    Posts
    2,230
    Blog Entries
    2
    Quote Originally Posted by Derek Cohen View Post
    Pete, one of the saws I admire and influences me is an old Independence Tools saw. Have you any experience with them?

    My IT is a little narrow for my larger hand, so this current saw was given more girth. Better details ...

    .


    Regards from Perth

    Derek
    Derek I see what you did there- well played my friend , well played 🙂👍!

    More substantive response to your excellent build thread to follow.

Posting Permissions

  • You may not post new threads
  • You may not post replies
  • You may not post attachments
  • You may not edit your posts
  •