Page 2 of 3 FirstFirst 123 LastLast
Results 16 to 30 of 36

Thread: Something new to try, maybe

  1. #16
    Join Date
    Jun 2010
    Location
    twomiles from the "peak of Ohio
    Posts
    12,181
    Ok, will see how many pages this takes, at 8 photos a post....
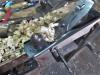
    Set up the Stanley 45 with a No.11 cutter....and a test run..
    The Sellers Box, started a groove.JPG
    Trying to center it....end grain wasn't working too well....so..
    The Sellers Box, groove adjuster.JPG
    A few changes, and a few end grain grooves were done..45 did the long grain edges...
    The Sellers Box, 2 panels grooved.JPG

    Will fine tune these to fit..first I need grooves to fit them into...might help..
    The Sellers Box, lid's 1st groove.JPG
    Test fit?
    The Sellers Box, test fit ,lid end.JPG
    Ends done for the lid's panel..then the long sides...
    The Sellers Box, long side's groove thang.JPG
    Then adjust the fit of the lid's panel. strip that fits into the groove needs to be cut down a bit.so..
    The Sellers Box, lid panel fitted.JPG
    Lid is fitted. When I plane the sides for the radius...it comes in towards the lid's panel. Mark that line. Next

    Stay tuned, have the bottom panel to do..
    A Planer? I'm the Planer, and this is what I use

  2. #17
    Join Date
    Jun 2010
    Location
    twomiles from the "peak of Ohio
    Posts
    12,181
    Same as before, almost....panel is a bit thinner, so things were adjust for that size....fence on the 45 was moved a bit closer to the edge...
    The Sellers Box, groove for the bottom.JPG
    Bottom of these groove stop at the 3/16" rebates on the ends....and the sides match that depth..
    The Sellers Box, panel details 2.JPG
    Again, the strip that fits into the side's grooves gets cut back a bit as in the plan. Turned out, the panel for the bottom was a bit too long....adjusted that, and the grooves,,,until..
    The Sellers Box, bottom panel fitted.JPG
    Bottom is fitted.

    other than sweeping up all the Krunchies..
    The Sellers Box, Krunchies!.JPG
    Yep, one of those days....Right knee was hurting, back was just starting in....figured this was a good place to stop...always tomorrow, eh?

    Stay tuned...
    A Planer? I'm the Planer, and this is what I use

  3. #18
    Join Date
    Jun 2010
    Location
    twomiles from the "peak of Ohio
    Posts
    12,181
    3 hours of shop time, today...and paying the price. Still had a few tasks from Episode #2 to complete.....First off, I NEED a divider.....of the right length, right width and right thickness....Wound up having to cut a piece of 1/2" thick red oak..
    The Sellers Box 2, sock for a divider.JPG
    Then figure out how wide...as 5-1/2" is a bit too much....and, since this is 1/2" thick, and I needed 3/8" thick...
    The Sellers Box2, resaw.JPG
    2 passes solved that....NOW I can lay out the stopped dados this will sit in...
    The Sellers Box2, layout stopped dado.JPG
    Then some chopping and shearing...
    The Sellers Box2, one dado done.JPG
    These only have to be about 1/8" deep....test fit?
    The Sellers Box2, divider fits.JPG
    And this task is complete...
    The Sellers Box2, dados done.JPG
    Next up...need a jig...
    The Sellers Box2, jigged up.JPG
    Mark a stop line along the edge...
    The Sellers Box 2, stop line.JPG
    And use the Miller Falls No. 9 to plane a radius....Radius is almost 12"....Plane until the stop line is cut, check back towards the center for any flat spots....flip the board around, and repeat until the ends have a nice round look..
    Stay tuned
    A Planer? I'm the Planer, and this is what I use

  4. #19
    Join Date
    Jun 2010
    Location
    twomiles from the "peak of Ohio
    Posts
    12,181
    I clamped both of the ends in the vise..
    The Sellers Box 2, curvy ends.JPG
    With the curves to the outside...Next, do the same for the sides..
    The Sellers Box2, long sides next.JPG
    Adjust the jig to fit...dry fit?
    The Sellers Box2, dry fitting.JPG
    Yep, will need to trim the excess pin and tail "Nibs" as Sellers calls them....Had to adjust the lid panel for a better fit...but
    The Sellers Box2, done for today.JPG
    I left the bottom panel off, as I need to tap this apart, before any glue up can be done...

    I did adjust the length of the bottom panel...1/16" off of each end...evens things out....
    The Sellers Box2, busy day.JPG
    Was a Busy, busy...BUSY day...

    Will review Episode #3 later, and see what is next on the to do list....back is sore, back of right knee too....had just about enough fun for today..

    Stay tuned..
    A Planer? I'm the Planer, and this is what I use

  5. #20
    Join Date
    Jun 2010
    Location
    twomiles from the "peak of Ohio
    Posts
    12,181
    Taking the day off, hope nobody minds. Too many errands today, too much walking with this bad leg.....throw in a CAT Scan of the head....yep, today I'll just rest up a bit....

    Cat Scan because of headaches I've had since I rolled off the bed, face down...and only woke up AFTER the impact.....and, that was after Thanksgiving? Hard to remember..

    Meanwhile, I can fix a cup of Black Tea, with a shot of Ryan's Irish Cream(er) and dial up Episode #3 and see what I need to do next...

    Stay tuned...
    A Planer? I'm the Planer, and this is what I use

  6. #21
    Join Date
    Jun 2012
    Location
    Lubbock, Tx
    Posts
    1,490
    Hope you start to feel better. Head injuries are a wild/unpredictable mess (damhik)

  7. #22
    Join Date
    Jun 2010
    Location
    twomiles from the "peak of Ohio
    Posts
    12,181
    Got to watching Paul Sellers Masterclass Episode #3.....Then figured I could try the first 2 tasks.....doing roundovers, and a glue up.....meh.....at least the box can sit overnight, while the glue cures....Didn't take a camera to the shop....not much to see..inside that forest of clamps. sellers used just 4 clamps....for some reason, I wound up with a LOT of clamps in use ....He used bar clamps..all I had was F Style clamps

    Knee did NOT enjoy the round trip to the shop....steps....Still have that headache...

    Tomorrow's tasks, IF I get to the shop.....remove the clamps, clean up all the corners...mark a cut line all the way around..then handsaw the lid free from the box..and then level the cuts...sounds like a long, busy day?

    Stay tuned...
    A Planer? I'm the Planer, and this is what I use

  8. #23
    Join Date
    Jun 2010
    Location
    twomiles from the "peak of Ohio
    Posts
    12,181
    May head down after lunch .....and see how that glue up turned out...stay tuned...camera will go along, this time...
    A Planer? I'm the Planer, and this is what I use

  9. #24
    Join Date
    Jun 2010
    Location
    twomiles from the "peak of Ohio
    Posts
    12,181
    Everybody still awake? Ok..photo of the clamped up box....( I use different style clamps than Paul uses)
    Episode #3, the glue up.JPG
    And, once these all were removed, today..
    Episode #3, before the clean up.JPG
    Had a lot of sanding and planing to do....and fill in a few gaps...
    Episode #3, during the clean up.JPG
    I just worked my way around...still had that little nib to take care of...

    Next,,,drew some lines
    Episode #3, hole to fill, cut lines.JPG
    Just connecting the dots...with a straightedge..
    Episode #3, connect the dots.JPG
    Until I get to this point...then the real fun begins...

    Might want to get an Energy Drink..you'all gonna need it
    Stay tuned..
    A Planer? I'm the Planer, and this is what I use

  10. #25
    Join Date
    Jun 2010
    Location
    twomiles from the "peak of Ohio
    Posts
    12,181
    And we're off...saw the 4 corners first...then move things and saw the ends...
    Episode #3, one end cut.JPG
    Both ends done? then use that kerf to help guide the long side cuts...
    Episode #3, almost done.JPG
    One done...flip over, and saw the other side...might want to just barely set things into the vise....or you will get pinched...
    Episode #3. separation.JPG
    And wind up like this. Then a smooth plane can do a little more work, today..
    Episode #3, leveling the cuts.JPG
    Level the sawn edges, mainly any and all high spots....I also opened up the stopped dados. and test fit the divider...
    I kept checking for gaps..
    Episode #3, checking for high spots.JPG
    Got a high spot on the left corner to plane down...

    And that was it for today...leg said it was quitting time at 1300 hrs.....I even worked up a sweat....the saw is just a Disston No.4, 9ppi, 14" long. Filed rip.

    That was all Episode #3 said to do....will have to watch Episode #4 later, and see what Paul does next.....
    Stay tuned...
    A Planer? I'm the Planer, and this is what I use

  11. #26
    Join Date
    Jan 2019
    Location
    Fairbanks AK
    Posts
    1,566
    This is coming out to be a good looking little box. Thanks for sharing.

  12. #27
    Join Date
    Jun 2010
    Location
    twomiles from the "peak of Ohio
    Posts
    12,181
    Thanks.
    Episode #4.....install the divider by opening the 2 stopped dados...Done. Decide which to call either the front or back of the box...we'll see..
    Mortise and install the hinges for the lid to be install onto the box......need to go out to buy the hinges

    Adjust the hinges for best fit of the lid...need the hinges, first..

    Carve a finger lift notch.

    Make some feet and install those at each corner...this might take a bit..

    Waiting on the Fliver to warm up...as it is currently 1 degree above zero outside...about 64 degrees too cold.

    Might get to the shop after Lunch is done...
    A Planer? I'm the Planer, and this is what I use

  13. #28
    Join Date
    Jun 2010
    Location
    twomiles from the "peak of Ohio
    Posts
    12,181
    Hinges are bought...along with a quart of Amber Shellac...looking like a 1300 hrs start time...

    Difference between just me going to Lowes..vs..taking the Boss along....about $50....

    Stay tuned...
    A Planer? I'm the Planer, and this is what I use

  14. #29
    Join Date
    Jun 2010
    Location
    twomiles from the "peak of Ohio
    Posts
    12,181
    Well, that WAS the plan..and things did NOT go too well...
    Episode #4 called for the dados to be opened up..to allow for the 3/8" thick divider to slide in..or out..
    Episode #4, dado opened.JPG
    Already had that task done...Hinges have been taken to the shop..
    Episode #4, hinges at the ready.JPG
    Only need half of these...I do have plans for the other half, though...

    Task was to finish leveling the cut lines so the lid will fit without any gaps....in the process of planing the one last high spot..lid flipped off the bench, and onto the floor...so..

    Episode #4, repair the lid.JPG
    Lid has been re-assembled, squared up , and glued up. Waiting on the glue to dry...decided to get 2 chisels sharpened up..
    Episode #4, chisels sharpened up.JPG
    As Red Oak is a bit tough to chop. I also dug out the Cordless Pilot Hole Drill...
    Episode #4, Pilot hole drill.JPG
    Gonna need it for brass screws into Red Oak.

    As for a finish? Thought I'd try this stuff..
    Episode #4, NOT poly.JPG
    And see how it turns out.

    That's where things stand, at the moment....thinking 6 hours might be enough time for the glue to set....we'll see..
    If not, there's always tomorrow...Stay tuned..
    A Planer? I'm the Planer, and this is what I use

  15. #30
    Join Date
    Jun 2010
    Location
    twomiles from the "peak of Ohio
    Posts
    12,181
    So...let the glue dry for about..8 hrs. Removed the 2 clamps, and go back to fitting it to the box...
    Episode #4A, End view.JPG
    About as close as I can get this....set this together in the bench vise, and plane and sand any and all rough spots....then, when the "Back" was done...layout for the hinge locations...
    Episode #4A, Distance set.JPG
    And this is how Sellers does this. Hinge sets the distance in from the ends of the box. Make a small line across both parts. Then set the box half aside,,,and install the hinges to the lid first..
    Episode #4A, 2nd hinge.JPG
    A pilot hole helps, plus wax the threads with an old candle. Ah, a cordless screwdriver....
    Before the box can get it's hinges done...I have to carve a finger lift..
    Episode #4A, Finger Lift.JPG
    THEN attach the box to the lid..
    Episode #4A, Lid installed.JPG
    Then close the box, and check how things fit....
    Episode #4A, front view.JPG
    And call it a night....while I think of what feet to make for this little box...and go watch Episode #5

    Stay tuned
    A Planer? I'm the Planer, and this is what I use

Posting Permissions

  • You may not post new threads
  • You may not post replies
  • You may not post attachments
  • You may not edit your posts
  •