Page 1 of 2 12 LastLast
Results 1 to 15 of 16

Thread: Advise: Miller Falls 2-A Chuck Jaw allignment

  1. #1
    Join Date
    Feb 2021
    Location
    Israel
    Posts
    317

    Advise: Miller Falls 2-A Chuck Jaw allignment

    Hi all,

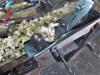
    Hoping for advise, I recently got my hands on a vintage Miller Falls 2-A hand drill. Overall I am pleased with its condition but there is one issue that bugs me. when I close the jaws tight they don't align completely. I am not sure how to fix it. any pointers would be welcome

    WhatsApp Image 2022-01-09 at 13.54.35.jpegWhatsApp Image 2022-01-09 at 13.54.35 (1).jpegWhatsApp Image 2022-01-09 at 13.54.35 (2).jpeg
    WhatsApp Image 2022-01-09 at 14.02.13.jpegWhatsApp Image 2022-01-09 at 14.02.13 (1).jpegWhatsApp Image 2022-01-09 at 14.02.14.jpeg

    Appreciated,
    Assaf

  2. #2
    Join Date
    Aug 2019
    Location
    Pittsburgh, PA
    Posts
    853
    The interior may be dirty. There are three springs keeping the jaws evenly spaced. They could also be dislodged and or damaged.

    To disassemble, find two drill bits or nails that fit those two holes in the chuck, place them in a vice or a piece of wood and unscrew that cap. Make sure you loosen the screw on the side of the chuck also.

    After unscrewing the base of the chuck carefully remove the jaw assembly, making sure the springs don't go flying.

    20220109_101141.jpg

  3. #3
    Join Date
    Feb 2021
    Location
    Israel
    Posts
    317
    Thanks!

    but I'm not sure I understand. the springs should be responsible for opening up the jaws, and the chucks center screw (I don't know the name) determine the closure.

    If it were an issue with the springs, wouldn't it open asymmetrically? I think there might be some gunk in there.

    either way great idea with the drill bits
    Last edited by Assaf Oppenheimer; 01-09-2022 at 12:01 PM.

  4. #4
    Join Date
    Sep 2007
    Location
    Longview WA
    Posts
    27,440
    Blog Entries
    1
    As Rafael said it could be dirt or the springs could be damaged.

    Another possibility is someone tried replacing the springs before and the springs are a bit too long.

    Disposable cigarette lighters have springs that are small enough to use in drill chucks if there isn't a local source.

    They will need to be cut. They are a bit harder metal and will fly a mile if you aren't careful when cutting them.

    BIC lighters have two different springs. One is under the spark wheel and one is under the valve lever.

    jtk
    "A pessimist sees the difficulty in every opportunity; an optimist sees the opportunity in every difficulty."
    - Sir Winston Churchill (1874-1965)

  5. #5
    Join Date
    Aug 2019
    Location
    Pittsburgh, PA
    Posts
    853
    Unless the jaws are misaligned, don't bother disassembling, just pour some penetrating oil in there to clean up. Sometimes that cap is really tight in there and one can end up marring the metal trying to take it appart.

    My no. 2 jaws close similarly to yours. I've been trying the trick I mentioned above with nails and they're bending. I'll either will need to try with drill bits or apply heat to chuck. I might not bother to do that. 20220109_121434.jpg

  6. #6
    Join Date
    Sep 2007
    Location
    Longview WA
    Posts
    27,440
    Blog Entries
    1
    When one strolls down the path of rust hunting and rehabilitating old tools it is very helpful to have a good metal bench vise.

    For situations like taking apart an eggbeater chuck a few other tools help:

    Adustable Pin Spanners.jpg

    Search > pin spanner wrench < to find other options.

    To protect the chuck if using a vise, put a few layers of cloth between the chuck and the vise jaws. Also use cloth between the jaws of large slip jaw pliers and the other part of the chuck.

    One can also make sacrificial jaws from wood to hold the chuck. Bore a hole the same size as the chuck. Rip saw through the center of the hole. Insert the chuck and then hold it together in a vise.

    jtk
    "A pessimist sees the difficulty in every opportunity; an optimist sees the opportunity in every difficulty."
    - Sir Winston Churchill (1874-1965)

  7. #7
    Join Date
    Jun 2010
    Location
    twomiles from the "peak of Ohio
    Posts
    12,169
    Sometimes..it is not the jaws, nor the springs.....The inside of the "cone" can get a bit on the rough side, from dirt and rust....and not allow the jaws to slide in and out smoothly. IF you are able to remove the cone/shell....clean and smooth the inside of it. Maybe find a wire brush ( used to use a chamber brush from a 7.62mm M60..) set into a drill...add in a bit of RBC ( Rifle Bore Cleaner) and give it a spin until nice and clean and smooth inside...Mainly right where the cone forms..up to the opening where the drill bits come in. And..to help out the next time..clean the threads and oil them a bit.

    BTW: I do have the Millers Falls No. 2-01......
    Drills, Standby rack.JPG
    These are not small drills...
    A Planer? I'm the Planer, and this is what I use

  8. #8
    Join Date
    Aug 2015
    Location
    Wentzville, MO
    Posts
    166
    I've restored numerous hand drills. I never thought of using drill bits to get the case apart. I use a couple punches with a large pair of vise grips. Wrap the chuck with some old leather and clamp that in a vise. I always soak the chuck in Evaporust first. I had a pin spanner, but it bent. I then went with the punches. I've only had a hard time with one chuck using this method. I've found no matter how much you try you just can't clean the chuck out without taking it apart. If you do take it apart do some light sanding of the inside of the chuck to smooth it along with the jaws. It doesn't take much, but makes a difference.

    As for the slight gap you have, as long as they clamp the bit it's not an issue with function. Of course I'm pretty anal myself, so understand

  9. #9
    Join Date
    Sep 2007
    Location
    Longview WA
    Posts
    27,440
    Blog Entries
    1
    Holy cow, Mea Culpa and a few other things that shouldn’t be said in public. It has been a long time since my last foray in to a Millers Falls #2 eggbeater’s chuck.

    Don’t go looking for cigarette lighters to fix these, that must have been my Goodell Pratt. Looking at my two it seems my main user (the one on the left) could be a little bit better:

    Two Millers Falls #2 Eggbeater Chucks.jpg

    There isn’t a lot to grip on the bottom of the chuck. This is where a good vise and a little care comes into play:

    Chuck Disassembly.jpg

    Without a pin spanner this may be the easiest way to take apart an eggbeater chuck. The old tee shirt material is folded over a few times.

    Be careful to keep the parts from falling on the floor or flying behind the bench:

    All the Chuck's Pieces.jpg

    The jaws look like someone cranked them down on the threads of a hard bolt:

    Jaw Damage Detail.jpg

    A little honing on a soft Arkansas stone removed the deformed metal between the flats of the jaws.

    This made the jaws close up a bit better:

    After the Hone.jpg

    The same chuck after & Before:

    After & Before.jpg

    After is on the left, before is on the right.

    Hope this helps,

    jtk
    "A pessimist sees the difficulty in every opportunity; an optimist sees the opportunity in every difficulty."
    - Sir Winston Churchill (1874-1965)

  10. #10
    Join Date
    Aug 2019
    Location
    Pittsburgh, PA
    Posts
    853
    Well, I couldn't leave it well enough after seeing that the chuck jaws are not kept apart by springs. That was the design of another drill I restored a while ago and I assumed it was similar in this case.

    Since the bottom of my chuck was stuck and I was marring the holes with the nails I decided to use heat to loosen it up. A few moments under a plumber's torch was enough to get it unstuck, this is what I found:

    20220109_210831.jpg20220109_210930.jpg20220109_211112.jpg

    I really like the simplicity and the superior manufacturing quality of the chuck mechanism.

    Damage to the chuck bottom (a pin spanner is really the way to go) and after filing, which I don't like to do, but I couldn't leave it alone:

    20220109_211124.jpg20220109_230922.jpg

    After the wire wheel:

    20220109_212630.jpg

    Before and after:

    20220109_133640.jpg20220109_214942.jpg

    It pretty much looks the same.

  11. #11
    Join Date
    Sep 2007
    Location
    Longview WA
    Posts
    27,440
    Blog Entries
    1
    Interesting, neither of mine has the locking screw through the side of the shell.

    jtk
    "A pessimist sees the difficulty in every opportunity; an optimist sees the opportunity in every difficulty."
    - Sir Winston Churchill (1874-1965)

  12. #12
    Join Date
    Jun 2010
    Location
    twomiles from the "peak of Ohio
    Posts
    12,169
    Had to go down and get mine out of the till.....no locking bolt in the chuck. Also, instead of those pin holes, mine has a slot. Mine is a No. 2 by Millers Falls, but it is a No. 2-01...a much "newer" Model, maybe? Also, has zero gaps between the jaws,

    It also makes my Goodell Pratt No. 329 look like a toy....
    A Planer? I'm the Planer, and this is what I use

  13. #13
    Join Date
    Aug 2019
    Location
    Pittsburgh, PA
    Posts
    853
    Quote Originally Posted by Jim Koepke View Post
    Interesting, neither of mine has the locking screw through the side of the shell.
    I just chanced on this no. 2 a few weeks ago, haven't had a chance to give it a proper clean and date it

    What's really impressive about this model is that the bottom of the chuck screws into the shell and it bottoms out aligning the hole in the sell and the threaded hole in the bottom of the chuck piece. I imagine they assembled these two pieces together and then drilled and tapped hole to implement this feature.

  14. #14
    Join Date
    Jun 2010
    Location
    twomiles from the "peak of Ohio
    Posts
    12,169
    Ok..not sure IF this was an Improvement by Millers Falls....when they went from a No. 2A to the No. 2-01 about 1955..
    Millers Falls drill, gears.JPG
    14-1/2" long end to end...
    Millers Falls drill, logo.JPG
    These things are just a (small) step down from being a Breast Drill...will hold up to 3/8" shanked drill bits.
    A Planer? I'm the Planer, and this is what I use

  15. #15
    Join Date
    Sep 2007
    Location
    Longview WA
    Posts
    27,440
    Blog Entries
    1
    These things are just a (small) step down from being a Breast Drill...
    The pages on Millers Falls at > https://oldtoolheaven.com/hand_drills/drill2.htm < say something about that in the type study:

    1899 — as above, but head is now flat-topped to allow for use as a breast drill
    Another site mentions the side handle being added to facilitate the #2's use as a breast drill.

    The ability to use 3/8" bits came with a different chuck in 1907. This chuck used a different spring set up than the chucks shown by Rafael and me. Our chuck's design (Ryther's spring chuck) came around in ~1922-1923.

    Another source of information > http://www.wktools.com/y_MillersFall...alls-tools.asp < for those who may be interested.

    jtk
    Last edited by Jim Koepke; 01-11-2022 at 4:12 PM.
    "A pessimist sees the difficulty in every opportunity; an optimist sees the opportunity in every difficulty."
    - Sir Winston Churchill (1874-1965)

Tags for this Thread

Posting Permissions

  • You may not post new threads
  • You may not post replies
  • You may not post attachments
  • You may not edit your posts
  •