Page 1 of 3 123 LastLast
Results 1 to 15 of 36

Thread: Options/technique for black inlay grooves

  1. #1
    Join Date
    Apr 2010
    Location
    Houston, Texas area
    Posts
    1,308

    Options/technique for black inlay grooves

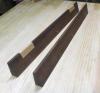
    I'm planning to add black grooves to some built-in cherry cabinets currently under construction. There will be ebony plugs at the (domino) joints and I want to add some grooves such as seen in the attached photo.

    IMG_6157.jpg

    How are people creating such black grooves?

    I was thinking to apply a few coats of garnet shellac on the cherry face frames to color and seal the surface, then route the grooves, then paint in ebony stain or paint.

    What's your approach?
    Mark McFarlane

  2. #2
    Join Date
    Feb 2003
    Location
    McKean, PA
    Posts
    15,635
    Blog Entries
    1
    I added a Holly border to a box I made using a router with an up spiral bit that cut a flat bottom groove.
    cherrybox1.jpg
    Lee Schierer
    USNA '71
    Go Navy!

    My advice, comments and suggestions are free, but it costs money to run the site. If you found something of value here please give a little something back by becoming a contributor! Please Contribute

  3. #3
    Join Date
    Apr 2010
    Location
    Houston, Texas area
    Posts
    1,308
    Quote Originally Posted by Lee Schierer View Post
    I added a Holly border to a box I made using a router with an up spiral bit that cut a flat bottom groove.
    cherrybox1.jpg
    Thanks Lee. I'm not concerned with how to cut the groove, just how to color the bottom and sides of a groove without messing up the cherry finish, and to get the best 'black' I can.

    I considered doing an inlay veneer or ebony strips but I've kind of run out of time. The ebony plugs are gonna kill half a day to mill the plugs from rough stock, insert, and plane,...

    I have 8 strips to do ranging in length from 18" to 40".
    Mark McFarlane

  4. #4
    Join Date
    Mar 2003
    Location
    SE PA - Central Bucks County
    Posts
    65,855
    Guided router since these are stopped grooves with the ends cleaned with a sharp (and narrow) chisel or knife. Then inlay the color, but I STRONGLY recommend you get shellac in the groove first to avoid the paint or resin migrating into the grain and making the line "fuzzy".
    --

    The most expensive tool is the one you buy "cheaply" and often...

  5. #5
    Likely wouldnt be dead black but wood burner? Or finish the piece to seal up the grain, color the bottoms/sides with whatever you choose, before your finish coat? Either that or just gingerly color the bottoms/sides and cut the face back (sand) but thats always sketchy.

  6. #6
    Join Date
    Jul 2016
    Location
    Lebanon, TN
    Posts
    1,721
    Use a laser to burn your lines in. Here's a walnut tray (unfinished). Ortur laser, about $200, great addition to my shop for things like this.

    Happy to share more info on this process.

    Last edited by ChrisA Edwards; 12-06-2021 at 11:12 AM.

  7. #7
    Join Date
    Nov 2009
    Location
    Peoria, IL
    Posts
    4,506
    I was really worried the first time I did inlay strips. I took a piece of 1/2" mdf and with stop cuts on the table saw, I made a template to use with a router and guide bushing. All 4 sides, one operation. Just had to come back in and square the corners. Worked great! Painting is not easy either. You often have to break the corner of the router cut to remove fuzz. Now where do you stop the paint? It makes getting a clean line almost impossible.

  8. #8
    Join Date
    Apr 2010
    Location
    Houston, Texas area
    Posts
    1,308
    Quote Originally Posted by Jim Becker View Post
    Guided router since these are stopped grooves with the ends cleaned with a sharp (and narrow) chisel or knife. Then inlay the color, but I STRONGLY recommend you get shellac in the groove first to avoid the paint or resin migrating into the grain and making the line "fuzzy".
    Thanks Jim, that sounds like a good approach. To keep the black lines clean I was going to shellac first, then cut the grooves on my router table. I wasn't think about the stain/paint seeping into the sides of the grooves and underneath the shellac. Ebony stain won't work if I shellac the grooves first but I can get some black paint and drizzle it into the groove.

    Seems like I want to keep the grooves fairly shallow so I don't need to worry about painting the sides.

    If I end up with a mess I can sand down the surface and shellac again over the black paint.

    So,...

    1. cut grooves and squares for plugs
    2. Put in ebony plugs and plane/sand level
    3. one coat of SealCoat, making sure sides of grooves are coated
    3b. tape around grooves 'just in case' there are drips,...
    4. paint black in groves
    5. resand if necessary, and apply another coat of sealcoat where sanded
    6. 2-4 coats of garnet shellac (the cherry plywood is a little darker than the face frame stock, it will be interesting to see what happens over a decade of UV exposure)
    7. ARM-R-Seal satin top coat, possibly with a toner

    FWIW, I should be able to do the grooves on my router table. I marked 'start cut' and 'stop cut' lines on the table and I can drop the piece to start cutting and turn off the router to stop cutting. I did a test and it was a pretty simple and easy process.
    Last edited by mark mcfarlane; 12-06-2021 at 11:56 AM.
    Mark McFarlane

  9. #9
    Join Date
    Apr 2010
    Location
    Houston, Texas area
    Posts
    1,308
    Quote Originally Posted by Mark Bolton View Post
    Likely wouldnt be dead black but wood burner? Or finish the piece to seal up the grain, color the bottoms/sides with whatever you choose, before your finish coat? Either that or just gingerly color the bottoms/sides and cut the face back (sand) but thats always sketchy.
    Thanks Mark, all helpful ideas I have incorporated in the process I put in another post in this thread.
    Mark McFarlane

  10. #10
    Join Date
    Apr 2010
    Location
    Houston, Texas area
    Posts
    1,308
    Quote Originally Posted by ChrisA Edwards View Post
    Use a laser to burn your lines in. Here's a walnut tray (unfinished). Ortur laser, about $200, great addition to my shop for things like this.

    Happy to share more info on this process.
    That's an awesome idea Chris ! No time on this project to order a new tool, but I can see a laser in my future.
    Mark McFarlane

  11. #11
    Join Date
    Apr 2010
    Location
    Houston, Texas area
    Posts
    1,308
    Thanks Richard for the help.
    Mark McFarlane

  12. #12
    The lazer looks excellent.

    If I didnt have a way to do that id do a test sample and router the slot, tape off and blow NGR stain from a three feet away pointed fan. You might be ale to tape first then router and get a clean cut on tape edges and maybe not. To verify that id use 3M green auto body tape which is a standard in car shops.

    NGR goes on as a mist coat so a few passes, it flashes off fast and dry almost instantly. Likely be a better choice than a wiping stain slow dry then would suck into the porous wood shown and see it in the pores. Peel your tape off and go straight to your usual finish.

  13. #13
    Any paint/stain option is going to be sketchy at the least. Those plans should have a backfire warning printed right on the front of the can. That is unless you have the option to sand back hard and even then stain is a no-go and paint likely wont look very crisp. That was why I figured even filing down a shoe for a woodburning iron just to the correct width of your routed slot and with a radius on the end(s) to match the bit, you may get a nice dead black especially with low-ish heat. But it still has the backfire potential but much less so.

    Pretty much anything would be faster than a true inlay if you could eliminate the backfire (drips, bleed, burn not dark enough)

  14. #14
    Join Date
    Mar 2015
    Location
    SE Michigan
    Posts
    3,225
    One more idea. You can get black dyed veneer. Just cut a strip the same size as the bottom of the groove and glue it in.

  15. #15
    Join Date
    Apr 2010
    Location
    Houston, Texas area
    Posts
    1,308
    There have been lots of great ideas and support here. Thank you one and all.

    Maybe I'll just do one cabinet and an inlay. As I said, these cabinets are part of a tight production schedule and I'm doing many parts of it. Today I am correcting mistakes made by a 4 man paint crew yesterday. Gotta get the face frames on before the granite and brick crews come.
    Mark McFarlane

Posting Permissions

  • You may not post new threads
  • You may not post replies
  • You may not post attachments
  • You may not edit your posts
  •