Page 3 of 3 FirstFirst 123
Results 31 to 40 of 40

Thread: 2 boxes, a build along story

  1. #31
    Join Date
    Jun 2010
    Location
    twomiles from the "peak of Ohio
    Posts
    12,169
    Ok,,although shop is NORMALLY closed on Mondays...decided to try my luck, anyway,,,needed to remove the clamps, first 8..
    The Lid,2. 8 removed.JPG
    out of 16..
    The Lid, 2, last 4.JPG
    Only 4 more to go....nothing cracked, nor flew apart....amazing..

    Worked my way around the 4 sides...leveled the dovetails,,,checking for square..
    The Lid,2, checked for square.JPG
    Once the sides were done..next was the bottom of the box..
    The Lid,2, flattening the bottom.JPG
    All nicely flat...panel to the sides...next..
    The Lid, 2, flattening the top.JPG
    Worked on the top...had a high spot down the centerline of the panel....
    The Lid,2, checking for a high spot.JPG
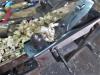
    Through all of this, I made sure I marked where to make the saw cut...and then set up the rip fence...with the Zero Clearance Overlay...
    The Lid,2, rip fence set up.JPG
    Now you know why the box has to be square and flat all around....I get a better cut..
    The Lid,2, after the cut.JPG
    Hmmm...could be better?

    Stay tuned...90 minutes of shop time..on a Monday?
    A Planer? I'm the Planer, and this is what I use

  2. #32
    Join Date
    Jun 2010
    Location
    twomiles from the "peak of Ohio
    Posts
    12,169
    Ok...open the lid to see what went on...
    The Lid, 2, lid sawn.JPG
    Might have had a little "flex" in the overlay? Easy enough to fix...planes to level the cuts, check progress..
    The Lid,2, check the fit.JPG
    Added a big "^" to the box's front..so I can tell which is what....
    There are small holes around the bottom of the box, those will get that brass corner protector....there are also 4 holes in the lid,,,we have ways..
    The Lid, 2, plugs.JPG
    Then trim these flush...set the lid back in place..
    The Lid.2, close the lid.JPG

    IF there be shop time tomorrow...I will try to hinge and latch the lid....and maybe add the brass? Need to cobble an insert for the fancier 79 to rest on, that will also hold it's parts....depth stop, fence, bolts..

    Round a few more corners, and see what flavour stain I can use...

    Stay tuned..might even try for a label?
    3720 box label.jpg

    No. 3720....
    A Planer? I'm the Planer, and this is what I use

  3. #33
    Join Date
    Jul 2014
    Location
    Edmond, Oklahoma
    Posts
    1,750
    Steven,

    I have been catching up on the Neander posts and just caught up with this. The boxes are turning out well. Been doing handyman work today, painting our foyer ceiling, working with the better half on my retirement medical cost pension, and grocery shopping with the better half, etc. That is the way it has been going, so got behind on my Neander reading. At any rate, nice build so far. Various tasks on the house remodel, but the big job, the kitchen has not even been started.

    Stew

  4. #34
    Join Date
    Jun 2010
    Location
    twomiles from the "peak of Ohio
    Posts
    12,169
    OK, our kitchen ceiling still has not been repaired....letting in a COLD draft. Landlord's problem.

    Next? An insert for this plane...set a pine board inside the box, and trace around the plane..
    Box #2, filler fitted.JPG
    Bandsaw to make a few cuts.. needed a hole drilled for the fence's bolt, get out the cordless drill and a #9 bit...
    Box #2, cordless drill.JPG
    Drill in from one face, until the snail just starts to show...rotate the board around, and drill from the other face..
    Box #2, needed a hole drilled.JPG
    And you can see all the cuts that were needed...a trench was chiseled out, not very deep, just enough to hold the rod ..
    Box #2, trench work.JPG
    So when the fence is locked in place, the fence's rod can't go rolling around in the box. Depth stop and it's bolt have another way to stay put...and lock the fence in place..
    Box #2, insert glued down.JPG
    First some glue was spread around, a few c clamps cranked down....depth stop bolt sits in a counter-bored hole(used that #9 bit) and the bolt is threaded down into the hole. Depth stop uses a screw and a washer, and is set up to press the fence against the back wall of the case...set this mess aside...while I install the hinges onto the lid..
    Box #2, hinge work.JPG
    One of these days, I just MIGHT get the hang of doing hinges....chisel to mortise them. Have a high-tech pilot hole drill..
    Box #2, pilot hole drill.JPG
    Not too crazy about them plastic gears it has....but it seems to work nicely enough...

    Stay tuned...BRB...
    A Planer? I'm the Planer, and this is what I use

  5. #35
    Join Date
    Jun 2010
    Location
    twomiles from the "peak of Ohio
    Posts
    12,169
    OK, I'm back....set the case into the vise, to see how well it looked...hammer adjust the lid a bit..(can a box have a case of overbite?) then set up to add the latch...had to level the playing field a bit
    Box #2, leveled the front.JPG
    We have ways...and the latch will work better, too....while adding the latch, I also added the brass corners..
    Box #2, latch and brass.JPG
    Front view...and..
    Box #2, hinges and brass.JPG
    Hinge side...open the lid?
    Box #2, fitted out inside...JPG
    Bring Box No. 1 over, and see how these 2 stack up...
    Box #1 & #2, Latched.JPG
    Those numbers were done when I processed the pictures, boxes have nothing on them...yet..

    Batch of Witch's Brew Stain has been mixed and brushed on, today...letting that dry a day, and see IF they need a second coat, before any varnish..

    Almost PIP Time...stay tuned..
    A Planer? I'm the Planer, and this is what I use

  6. #36
    Join Date
    Jun 2010
    Location
    twomiles from the "peak of Ohio
    Posts
    12,169
    Letting the stain dry a day...or 2
    Boxes, the PIP, Closed.JPG
    Have to remember to leave the lids opened, to air the insides out better...
    Boxes,the PIP, Opened.JPG
    Awaiting varnish, labels, varnish.....as soon as I can get the labels made....

    Stay tuned...
    A Planer? I'm the Planer, and this is what I use

  7. #37
    Join Date
    Jun 2010
    Location
    twomiles from the "peak of Ohio
    Posts
    12,169
    Work-in-Progress labels...
    The Label Selections.JPG
    As Graphic
    arts is not a specialty of mine....working from this as a starting point...
    3720 box label.jpg

    Will see how this goes....and see about a coat of varnish...or 2....


    ps: a crew showed up last evening, and repaired the kitchen ceiling....
    A Planer? I'm the Planer, and this is what I use

  8. #38
    Join Date
    Jun 2010
    Location
    twomiles from the "peak of Ohio
    Posts
    12,169
    Waiting on 1st coat to dry...just a teaser..
    The Label PIP. waiting on varnish.JPG
    Fancier red label for the 3720 that has all it's parts..
    The Label PIP, red.JPG
    And for the rather plain-jane model...
    The Label PIP. green.JPG
    Waiting to see how these 2 turn out....may add a label on the inside...maybe either on the inserts, or on the underside of the lids...we'll see..
    craftsman label.PNG
    Just a simple one...

    Stay tuned...
    A Planer? I'm the Planer, and this is what I use

  9. #39
    Join Date
    Feb 2011
    Location
    Carlsbad, CA
    Posts
    2,230
    Blog Entries
    2
    Lookin' GOOD! thanks for sharing the pics.

  10. #40
    Join Date
    Jun 2010
    Location
    twomiles from the "peak of Ohio
    Posts
    12,169
    May post these down in the Projects section?
    Craftsman Projects post, fancy plane.JPG
    Inside look at the Green Label Box..
    Craftsman Projects post, fancy plane.JPG
    And inside the Red Label Box
    Craftsman Projects post, stackables.JPG
    Stacked up, and heading towards a shelf....planes are made by Sargent (No. 79) and have the Craftsman No. 3720 model number....sold from before the 1948 model change...but just after the plane added a front horn. 3 lobed spurs, not the round wheel thingy...

    Thanks for looking in!
    A Planer? I'm the Planer, and this is what I use

Posting Permissions

  • You may not post new threads
  • You may not post replies
  • You may not post attachments
  • You may not edit your posts
  •