Results 1 to 13 of 13

Thread: fixing workbench dovetails - advise?

  1. #1
    Join Date
    Feb 2021
    Location
    Israel
    Posts
    317

    fixing workbench dovetails - advise?

    Hi all,

    by now some of you remember that I am building a bench (since march)
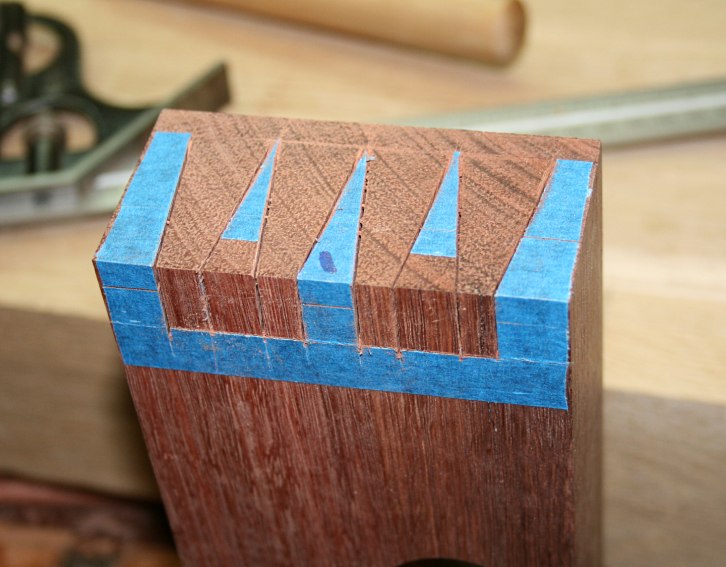
    it has been an incredibly slow but satisfying experience. I just finished the male dovetail for the bench's tail vise.
    My first attempt at dovetails too (gulp!). I think it went reasonably well with one small issue:

    Screenshot 2021-12-27 152804.jpg

    I was wondering whether it would be noticeable or not, and if yes how best to fix it?

    in general, I tend to overelaborate things (i.e. houndstooth dovetails instead of standard). I think I have a fix but I wanted to run it by the creekers collective wisdom. I would reinsert the triangles I cut out that made the dovetail and wedge them upwards, then shoot it on the shooting board until the line is crisp again. hopefully the wedges will prevent spelching.

    I welcome any thoughts before I start to layout the pins/female part of the joint

  2. #2
    Join Date
    Feb 2004
    Location
    Perth, Australia
    Posts
    9,494
    Assaf, don't fret about it. Once all is together, you can either plane the surface down 1mm, or add a a mix of glue and sawdust.

    Regards from Perth

    Derek

  3. #3
    Join Date
    Jul 2019
    Location
    Northeast WI
    Posts
    571
    Hi Assaf,

    Personal opinion here, but I wouldn't worry about it. If anything, it will make the first dent or ding that gets put in the bench less painful.

    Almost every historical bench I have seen has dents, dings, gouges, holes, etc. I understand the desire to take pride in craftsmanship, but it's going to get beat up over time anyway

  4. #4
    Join Date
    Feb 2021
    Location
    Israel
    Posts
    317
    Quote Originally Posted by Derek Cohen View Post
    Assaf, don't fret about it. Derek
    But Derek, how else would I clear the waste?
    (sorry, couldn't help myself)

  5. #5
    Join Date
    Dec 2016
    Location
    South West Ontario
    Posts
    1,504
    Assaf, looking at your layout lines the pencil line is not very clear and layout scoring only evident across the base of the dovetail. Derek’s blue tape, clear lines and scoring improve layout accuracy, which is everything. Green tape works also

    Once your layout is accurate, commit and split the line from the waste side.
    ​You can do a lot with very little! You can do a little more with a lot!

  6. #6
    Join Date
    Feb 2004
    Location
    Perth, Australia
    Posts
    9,494
    Quote Originally Posted by William Fretwell View Post
    Assaf, looking at your layout lines the pencil line is not very clear and layout scoring only evident across the base of the dovetail. Derek’s blue tape, clear lines and scoring improve layout accuracy, which is everything. Green tape works also

    Once your layout is accurate, commit and split the line from the waste side.
    Assaf, William offers a good reminder - I did this same joint on my bench. Blue tape helped enormously (green tape is for the oppositionally defiant ) ...


    Link: http://www.inthewoodshop.com/ShopMad...ngaBench4.html

    By the way ... I think that you are awfully brave for your first dovetail!!! That is outstanding work.

    Regards from Perth

    Derek
    Last edited by Derek Cohen; 12-27-2021 at 10:43 PM.

  7. #7
    Join Date
    Aug 2019
    Location
    Pittsburgh, PA
    Posts
    853
    If you don't want the chipped corner in the final bench, then either saw off that end, glue up a couple of strips, or simply make a new piece. It's just a bench, you'll wack, dent, saw, spill, drill, etc. it over time.

  8. #8
    Join Date
    Feb 2021
    Location
    Israel
    Posts
    317
    To Derek and William:
    This is what I did this morning before I opened up the computer:

    WhatsApp Image 2021-12-28 at 12.17.14 (2).jpeg
    Let put it this way, when I type in to my search par "in" it completes it to "http://www.inthewoodshop.com/"

    William: you mentioned that the pencil line isn't clear on the tails. that is because I erased it. I didn't put a lot of importance on the tail lines (except where they end) but rather on sawing at 90˚ so that the tails would fit well in the pins. beyond aesthetics, and excluding extreme variations, the shape of the tail isn't that important. it just has to sit well in the pinboard. I am laying out the tail VERY carefully.

    I am using a trick I learned from Mark Spagnolo - I lay out the line in pencil, then nudge the board left and right accordingly and relay the line with a knife (to avoid making the layout wider than necessary by the width of the knife marks). To my eye it seems a little tight but I can always pare down to make it fit.

    I doubt it will help much but I do want to address something that has been repeated many times: not to worry because it is shop furniture.
    1) I think that is an absolutely valid point, if the person who makes the piece feels that way. personally if someone is writing that they need help with a joint or a project, telling them not to worry because it doesn't matter isn't going to help them - its rather dismissive and counterproductive.
    2) in my case I just finished school and am studying for something similar to the Bar exam in the states (not in law). so I have free time. I am building the thing in my balcony, and when it is done, it will sit in the living room (I have no workshop, I live in an apartment). the way I see my future schedule, it will be for display most of the time until I find time to do a project (I don't think I will have much time). I do want living room furniture to be visually pleasing.
    I don't think there was any ill intent in these comments though

    Cheers (wish me luck)
    Assaf

  9. #9
    Join Date
    Jan 2019
    Location
    Fairbanks AK
    Posts
    1,566
    You got this doc. Houndstooth dovetails in contrasting wood species are visually stunning forever. You have set the bar pretty darn high for your first dovetail, but I give up on talking you down from that. I cut my first dovetails in a couple small pieces of hickory with the expectation I could BBQ some pig on the evidence of my beginnerhood.

    If you got to dive this deep into the hobby to let go of the stress of your day job, go for it and may whatever higher power you believe in bless you for for fighting the good fight. For what it is worth, when I type IN into my web browser I end up at the same website. That webmaster is doing a service to mankind that probably was not on his to do list when he started learning html.

  10. #10
    Join Date
    Feb 2021
    Location
    Israel
    Posts
    317
    OK so it didn't go as bad as I though it would, nor as good as I hoped. the joint layout was very tight and after A LOT of fettling I got it to seat. I think the needl point dovetails was the part where I over reached the tips collapsed... Tomorrow I need to seat it again, glue it, and patch the walnut endgrain a bit.
    WhatsApp Image 2021-12-28 at 17.59.01.jpeg
    First Dovetail, what do you know...

  11. #11
    Join Date
    Feb 2014
    Location
    Lake Gaston, Henrico, NC
    Posts
    9,044
    Looks good to me!

  12. #12
    Join Date
    Feb 2004
    Location
    Perth, Australia
    Posts
    9,494
    Superb work, Assaf!!

    Regards from Perth

    Derek

  13. #13
    Join Date
    Sep 2007
    Location
    Longview WA
    Posts
    27,454
    Blog Entries
    1
    When your family and friends look at this they will not see the flaws they will see the beauty.

    This is a high bar you have set for yourself and dovetail joints.

    jtk
    "A pessimist sees the difficulty in every opportunity; an optimist sees the opportunity in every difficulty."
    - Sir Winston Churchill (1874-1965)

Tags for this Thread

Posting Permissions

  • You may not post new threads
  • You may not post replies
  • You may not post attachments
  • You may not edit your posts
  •