Page 2 of 2 FirstFirst 12
Results 16 to 22 of 22

Thread: Dungeon Shop Reruns, Computer Desk Project

  1. #16
    Join Date
    Jun 2010
    Location
    twomiles from the "peak of Ohio
    Posts
    12,181
    Hmm...dovetail...tails?
    Computer Desk drawers, bandsaw cuts.JPG
    Nothing all that hard to do. Trace around the pins, mark which will be the waste side of the lines...a bandsaw to make a few cuts...the more of the line I leave, the tighter the joints will be. Chisel to remove the waste, then a dry fit...
    Computer Desk Drawers, dovetail test run.JPG
    Looks good enough to me..

    Now, about the dados...
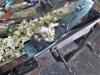
    Computer Desk Drawers, ready for dado setup.JPG
    I figured this might come in rather handy...for 8 dados
    Computer desk drawers, dado cleaner.JPG
    You can use a chisel to clean the floor of the dado...but, I'd wait until those pilot holes are drilled. The back corner is cut at an angle...called a "Starter Bevel"
    Computer desk drawers, back details.JPG
    I also counter sink the pilot holes...
    Computer desk drawers, countersink, drill.JPG
    To keep the heads of the screws out of the way.
    Computer Desk Drawers, backs.JPG
    4 of these will be backs for the drawers. need trimmed for length, trimmed for height above the groove. Want it flush with the top of the drawer side, while resting on the drawer's plywood bottom.
    Computer Desk Drawers, two assembled.JPG
    Cut the 1/4" plywood to size...slide all the parts together with a bit of glue as needed...the screws holding the sides to the backs also act as clamps...all I should need is 2 or 3 clamps at the front corners...let sit overnight...since they can't just sit on my bench...found a better way..

    I can just sit them up on the drawer fronts on top of the desk's top.

    Next up, besides the other 2 drawers? Need to remove the clamps, plane and sand the drawers clean, and get them to slide into their new homes....using just a single finger..

    Stay tuned..
    A Planer? I'm the Planer, and this is what I use

  2. #17
    Join Date
    Jun 2010
    Location
    twomiles from the "peak of Ohio
    Posts
    12,181
    Time to remove some clamps, and get the other 2 drawers clamped up....meanwhile..back at the bench..
    Computer desk drawers, #2 glued up.JPG
    #2 drawer needed a couple extra clamps...to pull the drawer front in tight...
    Computer desk drawers, 31 front clean up.JPG
    Drawer #1 needed a little off the top...and..
    Computer Desk Drawers, clean up tools.JPG
    At the front corners...and along the sides...
    Computer Desk Drawers. #3 clean up.jpg
    we have ways..keep sliding drawers in until they do indeed fit...
    Computer Desk drawers, 2 done.JPG
    1st 2 fitted...wait on glue to dry, work on the next 2 the same way...
    Computer Desk drawers, 4 done.JPG

    Until the 4 main drawers are fitted. Didn't want to close them up all the way...without a way to pull them back out. left a tiny bit sticking out.
    Need parts milled for the 2 skinny drawers....
    Computer Desk Drawers, skinny drawer parts.JPG
    2 Ash fronts, 4 Pine sides, 2 Pine backs....had to make sure they all fit into the openings..
    So, stay tuned for the Skinny on the Skinny Drawers....I even found some handles that MIGHT just work...
    A Planer? I'm the Planer, and this is what I use

  3. #18
    Join Date
    Jun 2010
    Location
    twomiles from the "peak of Ohio
    Posts
    12,181
    "Skinny Drawers"? No, not skinny jeans....the 2 drawers that will be over my legs.....
    Computer Desk Drawers, #3 done.JPG
    They both have to fit in there....rather a bit shallow, not meant to hold all that much....so.
    Skinny Drawers, sides jointed.JPG
    Edges were jointed until they all would slide into place....Backs needed to be a bit skinnier, to allow the bottom panel room.
    Skinny Drawers, Dovetail milled.JPG
    same as the "main" drawers...pins milled..

    trimmed up with a chisel. Traced around the pins to lay out the tails....saw and chop the tails to fit...

    Stanley 45 to plough the grooves for the plywood bottom. Then a bit of assembly work...

    One done...while this was in the clamps, build the other drawer.....once first drawer came back out, there will be the usual clean up going on....but, for now..
    Skinny Drawers, it fits....JPG
    It can sit here overnight....at least it does fit.....there was a slight problem later on.....came time to slide the drawer all the way in...couldn't...seems the bolts holding the top to the case were sticking down a bit too low ( washer under the bolts head) but a small notch where that bolt head hit the back of the drawer solved that.

    Both Skinny Drawers are done?
    Computer Desk Top, last drawer...JPG
    Ah yes..handles....Old Sideboard needed new, improved...NOT RUSTY , handles, so....Took the old handles to the shop..
    https://sawmillcreek.org/attachment....7&d=1633872244
    ..wire wheel to clean them back to bare metal...then a few coats of silver paint..

    Stay tuned....
    Attached Images Attached Images
    Last edited by steven c newman; 10-10-2021 at 9:32 AM.
    A Planer? I'm the Planer, and this is what I use

  4. #19
    Join Date
    Jun 2010
    Location
    twomiles from the "peak of Ohio
    Posts
    12,181
    Hmm...Photos have a mind of their own, it would seem....and this site won't let me FIX/EDIT to what I intended?

    Assembly was pretty straight forward...just a drawer..
    Skiiny Drawers, right drawer assembled.JPG
    Then stash in it's new home...
    Skinny Drawers, it fits....JPG
    Making sure it does indeed fit....was a problem with the back being a tad too wide...re-cut the back for a better fit...along with a trim to the bottom panel. Both were about a saw kerf too big.

    Handles? Before the clean up...
    Computer desk drawers, handles.JPG
    And after a couple coats of silver....
    handles, painted.JPG

    Ovals for the main drawers, rounds for the skinny drawers....and..after a coat of stain?
    Pip #3.JPG

    Hmmm....which leaves building a hutch to hold the Computer stuff....that will be in the next episode....

    ( what is with this "Attached Thumbnails" BS?)And the photos in this post? edit 3 times, STILL NOT SHOWING UP?
    Last edited by steven c newman; 10-10-2021 at 12:58 PM. Reason: editting problems with photos on this site
    A Planer? I'm the Planer, and this is what I use

  5. #20
    Join Date
    Jun 2010
    Location
    twomiles from the "peak of Ohio
    Posts
    12,181
    That business ( Funny Business?) with posting photos......especially when I am sure when this build thread was first seen on this site, those photos did NOT have any issues. Anyway, I'll try again, and see what happens...keep yer fingers crossed..

    Hutch. Needed a shelf system to sit the Monitor and Mainframe on....and maybe stash away some bills behind a door...and maybe a top shelf to stash lamps and other doo-dads...so...
    Computer Desk Hutch, live edge top.JPG
    I had a Live Edge plank I could keep for that Top Shelf.....the rest can be a bit narrower...Needed 4 uprights, a couple middle shelves. And a few shelves for inside the door cabinet...
    Computer Desk Hutch, The Plan.JPG
    Something like this. I don't usually make a habit of drawing up a paper plan...as they usually wind up getting changed somewhere along the way...."Plan" is more of a Guide-line.....Hauled a few more 1 x 6 Ash planks to the shop...have a bit of saw work to do...
    Computer Desk Hutch, old hutch.JPG
    Old Hutch...Main Frame sitting on top shelf, Monitor just sitting on the top of the desk..keyboard was even sitting on the front leg of the Monitor....not a very good set up..

    Cuts & Fits....maybe a dry fit?
    Computer Desk Hutch, first dry fit.JPG
    4 uprights, and a few shelves...LOTS of dados to do....
    Computer Desk Hutch, router guide set-up.JPG
    All are Stopped Dados...Guide fence and a router...
    Computer Desk Hutch, Monitor shelf's dados.JPG
    Used a chisel to square the closed end up...
    Computer Desk Hutch, dado cut.JPG
    And...
    Computer Desk Hutch, squared dados.JPG
    I think that will do for now....where 2 dados wind up in almost the same spot,,,one on either face of an upright....I had to off set them a bit. Mainframe does sit on it's own little shelf,,,gap under that shelf for cables, if need be...or an external hard drive. When this Hutch was done....I found out the Monitor was a 1/8" too tall to sit on the shelf....to where it would also sit under the top shelf....

    Stay tuned...
    A Planer? I'm the Planer, and this is what I use

  6. #21
    Join Date
    Jun 2010
    Location
    twomiles from the "peak of Ohio
    Posts
    12,181
    Hmmm...offset dados?
    Computer Desk Hutch, back bracket installed.JPG
    Where 2 shelves meet....have to off set just a bit, otherwise won't be much left in the divider....Bracket is to attach the hutch to the desk.
    Shelves in the cubby holes were a bit thick,,,,was out of thin plywood by now, and didn't feel like doing any resaws...so..
    Computer Desk Hutch, cubby hole assembled.JPG
    They wound up being 3/4" thick...seems there was a problem between the "plans" and "Existing"....
    Computer Desk Hutch, shelves too short.JPG
    Missed it by that much, Chief.....went back cut new longer shelves....could not just move the uprights....dados were already done for them...Had enough "shelf stock" I could just recut new ones..
    Computer Desk Hutch, fixed shelves.JPG
    Dry fitted, again. other 2 shelves were also checked to make sure they were the right length....almost time to spread some glue...
    Computer Desk Hutch, back installed,.JPG
    Stage 1, assemble the cubby...add a plywood back to keep it square...

    Computer Desk Hutch, left side glue up.JPG
    On the other end...Shelf for the tower to sit on, glued to the 2 uprights. Then to the top shelf....slip the monitor shelf in place between the tower and cubby units...
    Computer Desk Hutch, all glued up.JPG
    Tower unit does not get a plywood back....wanted the air flow instead. After the glue had cured for a day or 2.....went back and re-inforced all the dado joints with screws....Glue is nice, but there is too good of a chance someone will come along and try to lift the desk by this hutch's top shelf.....

    Then sand things smooth, and see how it looks, sit on the desk...
    Computer Desk Hutch, out of the clamps.JPG
    Will wait a day or so.....while I build a door for the cubby.....then stain and varnish all at once. desk was already done....can always set something on the desk while the stain and varnish are getting the brush-off.

    Stay tuned...
    A Planer? I'm the Planer, and this is what I use

  7. #22
    Join Date
    Jun 2010
    Location
    twomiles from the "peak of Ohio
    Posts
    12,181
    So...I need a door to cover the cubbies...might have a few scraps laying around...
    Computer Desk Hutch, door frame.JPG
    Some Mortise and tenon corner joints....mill a slot for a plywood panel...
    Computer Desk Door, inside.JPG
    5 piece of wood, a few cauls to keep things flat while the glue dries...test fit afterwards..
    Computer Desk Hutch, door dry fit.JPG
    Stained, hardware...
    Computer Desk Hutch, door latch and hinges.JPG
    Then varnish...a couple coats....almost Moving Day....will need some help to get this thing upstairs...
    Movining day, the before.JPG
    Old desk desk, to leave, sent out to the curb...where it sat for LESS than a day,BTW...
    Moving day, all moved in.JPG
    New Desk. Brought the desk up ( minus the hutch and all the drawers) assembled it, and took it for a test drive..
    Moving Day, test drive.JPG
    Well, what do you know...my fat body fits! Have since added a front "porch" to the Monitor Shelf, to get the monitor off the desk top.

    Well...not too bad of a Project? Currently? I have returned to the shop, on a limited basis....knee decides when I quit for the day.....working on a Jewelry Box with Fancy Corners. Will start that "Build-along" after a bit....

    Stay tuned....
    A Planer? I'm the Planer, and this is what I use

Posting Permissions

  • You may not post new threads
  • You may not post replies
  • You may not post attachments
  • You may not edit your posts
  •