I am also curious as to how you guys are measuring the toe out or travel on your sliders? A dial indicator on the cast iron to the right of the carriage or?


 Member
I am also curious as to how you guys are measuring the toe out or travel on your sliders? A dial indicator on the cast iron to the right of the carriage or?
Contributor
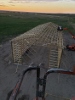
i use a oneway holder and a cheapo dial gauge, not shown but i clamp it to the table as well but you dont need to do that if you can hold it steady. I have also used the indicator holder but you could just use a wood block or nothing as long as the dial gauge doesnt move. I will say that the oneway holder is awesome and has many usesOriginally Posted by Bobby Robbinett

https://www.instagram.com/kessler_woodworks/?hl=en
590AF014-4BDF-4F9E-9B46-1C5F0DD24F74.jpg
also used on the rip
9C75A0BE-AA60-4A51-8316-D80EF2A9188C.jpg
Last edited by Mark e Kessler; 07-27-2021 at 3:22 PM.
Contributor
Glad to see you took it on, everyone wants to believe the sliders can be used as delivered and in most cases they can but they all benefit from good tweaking here and there depending on the user preference. I always recommend, checking and recording all measurements on install, checking cast flatness and twist (this is critical, if it has a twist you will be chasing your tail trying to dial in the slide), blade squareness to the top, slide coplanar to the cast (so you are 90deg on both sides of the blade, and other reasons..) what the toe out is, ect. and comparing the measurements to the manufactures spec and as long as it is close to and the slide is not below the cast just use it for awhile to determine if anything needs to be done at all (it will if you want to optimize it). Note: In the case of Felder/Hammer before any adjustments are made under warranty, you need to call/place a service ticket and get it on record that way if things go south you will be covered...
Yes, it is a bit tricky but once you wrap your head around it it becomes more clear what is going on, I level/make co-planer on 3 points then systematically tighten the others, for me I found if it moves too much after tightening 2-3 other points I just start over by loosening everything just like you did.
You stopped at a logical point, you will never get it exact and that's ok, use it for awhile and see how it goes. I like my table 6-8 thou above the cast leaning to the 8 thou, I ended up with 6-9 thou and the last foot or so jumped to I think around 0.015, I called that good - I have a 9ft slide and unless I need a perfect depth of cut on a dado past 8' it doesn't matter what is most important to me is that the slide is coplaner to the cast....
Here is a quick run down, I am sure there will be naysayers but it only takes 1/2 hour to do the first four steps which is important if you are going to adjust the slide, the more info you have the less you will be chasing your tail.
1. Get the saw reasonably level, I just use a carpenters level so the slide stays put wherever I put it.
2. Check flatness of cast table, there will probably be a dip in the center, left of center, Felder has an adjustment for that inside the cabinet (not sure on the Hammer)
a. you may not be able to get it all out, mine has a slight dip close to blade and this is on a 900 series - this is ok, we are cutting wood not machining metal.
3. Check for twist, more than likely it's good enough mine was but I have heard of others that were not
b. This is important because if for example your cast table is high/low in one corner you will be chasing your measurements when trying to adjust the height. if it has a twist doesn't necessarily mean you need to adjust it, could be that it just keeps you from going nuts when you are adjusting the slide
4. Adjust blade 90 deg to Cast
5. Adjust slide to preferred height above cast AND coplanar to cast (use three dial gauges, you will thank me later)
a. depending on slider, the toe out at the same time, I bumped mine way out while I was adjusting and didn't discover until I nailed the height then had to loosen all the bolts....
6. Adjust outrigger, height, coplanar, tracking...
7. Square fence
Did I miss anything? probably...lol
Last edited by Mark e Kessler; 07-27-2021 at 9:27 AM.
Member
Thanks Mark. This is incredibly helpful. Your flow is pretty much what I followed in terms of setting it up. How close are you getting with dialing in twist? I'm using a Starrett 98-12 machinist level which is a bit more accurate than a contractor's level but a far cry from something like say the 199.
Are there any recommendations on the sequence of bolts to adjust when raising and lowering the slider as well as the slider position?
 Contributor
where does the twist come from, I can see non flat from constant use over years and or maybe some sag. Ive seen low on shapers from constant wear from using power feeds. Near as I could tell I could not put any twist in the saw (SCM) with the base being so rigid.
Contributor
The twist would come from the attachment to the base, in my case bolt in each corner. Highly unlikely at least in a new saw that it is out but a good thing to check because it will put the measurements you get when adjusting the slider into context. Mine is a little low, cant remember how much but when i was adjusting I kept that in mind knowing that what ever measurement I was reading it was actually a little lower
Pic attached - one of my adj bolts.
D56F13D8-5361-40DC-B43B-1701562B499B.jpg
Contributor
ILl have to look at it again, I cant see it being possible the top is thick and the base is very rigid. Not there yet but have to get to it again i was getting it on track and you are right there are many dynamics. This one has a bar, the bar has wear as its gone many cycles. I put new bearings timken which was cheap but the bar is still low. If my tool and die maker friend still had his shop id trust him to have flipped the bar to a new surface end to end and re drill it all. Might be worth trying to find someone. Last CNC shop I tried could not even make an accurate spacer.
Contributor
As far as levels go for checking twist I would think you would need something that resolves to 0.001, i used a 199 that I borrowed from work but is complete overkill and almost frustrating to use, I think the 98-12 is 0.005” not really enough for the twist check but more than enough for everything else.
I think there is a import one out there for under $100 but unless you have other needs for it probably not worth buying, more than likely it’s close enough.
And as far as the adjustment sequence, the only one I really follow regular is the initial height adjustment which is
1. loosen all the upper bolts
2. Loosen all the lower bolts except 3, the 2 that align with the infeed/outfeed of cast and one across from the 2. The two next to the cast adjust the height and the one pivots the table so it is coplanar to cast.
----Edit, oops have it a little flip flopped, on #1 - loosen all but 3, the three I talk about in step #2....
3. Adjust table to desired height while maintaining coplanar, also this is with the slider position centered and forward/back maybe 20”
4. Once you are good with #3 i then snug up all the bottom nuts and top nuts hand tight, light touch.
5. Then I just go for it, a little at a time on the top nut, and i mean a little.
it’s a good idea to know where the bearing cage is in relation to where the slider is, if you peak in there you can see it. But in general when the slide is centered the bearing cage is close to the center, when pulled all the way back, its close to front of the cast, same goes for forward. Kinda obvious but it is the bearing cage that is holding your position if that makes any sense
hope that helps!
Last edited by Mark e Kessler; 07-28-2021 at 12:08 PM.
 Member
It's an excuse to break out the fun measuring stuff, but really you can do it by clamping a board to the carriage and making a cut. If the cut contacts the leading edge of the blade, but not the trailing (or vice versa), you know you have toe in/out. Turn the blade by hand with the test board along side of it and you can also see and measure arbor wobble. Use a feeler gauge if you want to quantify it. This test process is actually easier on a slider than a cabinet saw. The adjustment to correct though, that is a whole level harder.
Contributor
Free cut on the slider can be checked easily by raising the blade to max height and cutting a 15” or so piece of MDF or similar. Listen to the noise the blade makes when cutting and as the blade cuts the last part that noise will go away. Burning or black marks on the cut piece will also indicate no toe out or possibly out the wrong way.
I don’t know what other mfgs Recommend but Martin says 0.1mm over one meter of travel. Or about .004 inch. That’s very slight. And about the same for the rip fence. My T72 came set like that from the factory and I have never needed to touch it. I think it is difficult to check this off the blade with a dial indicator. There is so many variables and distortion with blades. I am in the process of fine tuning my newly restored T17 joinery saw and going to try adjusting that using a feeler gauge.
here are some of the tools Martin uses in the factory to adjust sliders.
089D0218-1CF8-4BA7-A2FC-41DE08D7C09D.jpeg
 Contributor
Our techs use dial indicators to set free-cut. As Joe mentioned, we are talking thousands of an inch over the full slider travel. The riving knife will tell you.
Erik
Ex-SCM and Felder rep
 Posting Permissions

 Reply With Quote